Final project Neuro_Jump

Concept:
Neuro-jump is an interactive game that aims to challenge its users and encourage them to think about using their body as an interaction tool that allows them to interact with technology. Neuro-jump detects the user’s EMG-muscle signals and allows them to control the jumping Alien cowboy by flexing their bicep muscle
This game is a critique to the status quo of video games and technology in general and an invitation to steer away from using the basic interactive tools such us touch screens and hand held items, and to think about the possibility of employing different techniques.

User testing:
Throughout the process of developing the game I have tried different settings and techniques. I have noticed that some people do very well whereas others struggle to play it. After multiple tests I figured out the best level of difficulty that is not too challenging but not too boring at this same time. I also implemented a slider that allows the users to change the height of the jump of the alien thus making the game easier.

Implementation:
I have used P5 and Arduino to link the EMG signal detecting electrodes with the P5 side of the game. Setting the serial connection was not a very big challenge for me as I made sure only the necessary data will be ent form the Arduino to the computer which will make the user interaction instant and very fast and effective. I have also used the brain-shield gadget that allowed me to detect the EMG signal and transition them into digital data.
The game allows the user to both jump the incoming obstacles by flexing their hand but to also shoot the harmful birds by pressing the space Bar.
For the Arduino code I have used the original script that came with the hardware but I had to change and alter it to make it send the strength signal and use it in the length.

Future improvements and reflections:
I would like to implement the strength of the flex in the game and maybe make the jump or the attack depend on the strength of the flex. I would also like to add other tools that would allow the game to be played by two players instead of one, and maybe add another character and make the game a competitive. I would also like to create a “button-free” game the users can manipulate without the use of their hands but just their movement, facial expression or body position. I want to experiment mare with Interactivity and allow the users to be creative and have a fun time without the need of buttons or touch screens. For Neuro-Jump I would like to implement a program that detects facial gesture or body tracking that would allow the user the control the character.

P5:

Arduino code:

/*
* --------------------------------------------------------------------------------------
* Code monitors amplitude of EMG envelope, displays EMG strength on LED bar and controls
* robotic gripper by controlling servo motor.
* --------------------------------------------------------------------------------------
*/

#include <Servo.h>
#define GRIPPER_STATE_BUTTON_PIN 4          //pin for button that switches defult state
                                            //of the gripper (opened/closed)
#define SERVO_PIN 2                         //pin for servo motor
#define SENSITIVITY_BUTTON_PIN 7            //pin for button that selects sesitivity
#define NUM_LED 6                           //number of LEDs in LED bar
#define GRIPPER_MINIMUM_STEP 5              //5 degree dead zone (used to avoid
                                            //aiming oscilation)
#define OPEN_MODE 1                         //default gripper state is opened
#define CLOSED_MODE 2                       //default gripper state is closed
#define MINIMUM_SERVO_UPDATE_TIME 100       //update servo position every 100ms
#define Max_EMG_LED 3


Servo Gripper;                              //servo for gripper
byte ledPins[] = {8, 9, 10, 11, 12, 13};    //pins for LEDs in LED bar

//EMG saturation values (when EMG reaches this value
//the gripper will be fully opened/closed)
int sensitivities[] = {200, 350, 520, 680, 840, 1000};
int lastSensitivitiesIndex = 2;             //set initial sensitivity index

int emgSaturationValue = 0;                 //selected sensitivity/EMG saturation value
int analogReadings;                         //measured value for EMG
byte ledbarHeight = 0;                      //temporary variable for led bar height

unsigned long oldTime = 0;                  //timestamp of last servo angle update (ms)
int oldDegrees = 0;                         //old value of angle for servo
int newDegree;                              //new value of angle for servo

unsigned long debouncerTimer = 0;           //timer for button debouncer
int gripperStateButtonValue = 0;            //variable that stores state of button
int userReleasedButton = 1;                 //flag that is used to avoid multiple
                                            //button events when user holds button

int currentFunctionality = OPEN_MODE;       //current default position of claw


//-----------------------------------------------------------------------------------
//   Setup servo, inputs and outputs
// ----------------------------------------------------------------------------------
void setup(){

  Serial.begin(9600);
    //init servo
    Gripper.attach(SERVO_PIN);

    //init button pins to input
    pinMode(GRIPPER_STATE_BUTTON_PIN, INPUT);
    pinMode(SENSITIVITY_BUTTON_PIN, INPUT);

    //initialize all LED pins to output
    for(int i = 0; i < NUM_LED; i++){
        pinMode(ledPins[i], OUTPUT);
    }

    //get current sensitivity
    emgSaturationValue = sensitivities[lastSensitivitiesIndex];
}


//-----------------------------------------------------------------------------------
//   Main loop
//
//   - Checks state of sesitivity button
//   - Checks state of default-gripper-state button
//   - Measure EMG
//   - Shows EMG strength on LED bar
//   - Sets angle of servo based on EMG strength and current mode (open/closed)
// ----------------------------------------------------------------------------------
void loop()
{

    //-----------------------  Switch sensitivity ------------------------------------

    //check if button is pressed (HIGH)
    if (digitalRead(SENSITIVITY_BUTTON_PIN))
    {
        //turn off all the LEDs in LED bar
        for(int j = 0; j < NUM_LED; j++)
        {
            digitalWrite(ledPins[j], LOW);
        }

        //increment sensitivity index
        lastSensitivitiesIndex++;
        if(lastSensitivitiesIndex==NUM_LED)
        {
            lastSensitivitiesIndex = 0;
        }

        //get current sensitivity value
        emgSaturationValue = sensitivities[lastSensitivitiesIndex];

        //light up LED at lastSensitivitiesIndex position for visual feedback
        digitalWrite(ledPins[lastSensitivitiesIndex], HIGH);

        //wait user to release button
        while (digitalRead(SENSITIVITY_BUTTON_PIN))
        {
            delay(10);
        }
        //whait a bit more so that LED light feedback is always visible
        delay(100);
    }


    //----------------------------  Switch gripper default position open/close ---------

    //check if enough time has passed for button contact to settle down
    if((millis() - debouncerTimer) > 50)
    {
        gripperStateButtonValue = digitalRead(GRIPPER_STATE_BUTTON_PIN);
        //if button is pressed
        if(gripperStateButtonValue == HIGH)
        {
            //if last time we checked button was not pressed
            if(userReleasedButton)
            {
                debouncerTimer = millis();
                //block button events untill user releases it
                userReleasedButton = 0;

                //toggle operation mode
                if(currentFunctionality == OPEN_MODE)
                {
                    currentFunctionality = CLOSED_MODE;
                }
                else
                {
                    currentFunctionality = OPEN_MODE;
                }
            }
         }
         else
         {
            userReleasedButton = 1;
         }
    }


    //-----------------------------  Measure EMG ---------------------------------------

    analogReadings = analogRead(A0);//read EMG value from analog input A0


    //---------------------- Show EMG strength on LED ----------------------------------

    //turn OFF all LEDs on LED bar
    for(int j = 0; j < NUM_LED; j++)
    {
        digitalWrite(ledPins[j], LOW);
    }

    //calculate what LEDs should be turned ON on the LED bar
    analogReadings= constrain(analogReadings, 30, emgSaturationValue);
    ledbarHeight = map(analogReadings, 30, emgSaturationValue, 0, NUM_LED);

    //turn ON LEDs on the LED bar
    for(int k = 0; k < ledbarHeight; k++)
    {
        digitalWrite(ledPins[k], HIGH);
    }

  //-------------------- Send EMG strength data over serial -----------------------
  Serial.println(analogReadings);


    //-------------------- Drive Claw according to EMG strength -----------------------

    //set new angle if enough time passed
    if (millis() - oldTime > MINIMUM_SERVO_UPDATE_TIME)
    {
        //calculate new angle for servo
        if(currentFunctionality == OPEN_MODE)
        {
            analogReadings = constrain(analogReadings, 40, emgSaturationValue);
            newDegree = map(analogReadings, 40 ,emgSaturationValue, 190, 105);
        }
        else
        {
            analogReadings = constrain(analogReadings, 120, emgSaturationValue);
            newDegree = map(analogReadings, 120 ,emgSaturationValue, 105, 190);
        }

        //check if we are in servo dead zone
        if(abs(newDegree-oldDegrees) > GRIPPER_MINIMUM_STEP)
        {
             //set new servo angle
             Gripper.write(newDegree);
        }
        oldTime = millis();
        oldDegrees = newDegree;
    }
}


Final Project – The Boy Who Fell

I am excited to present to you all the final video game I made for this class utilizing p5 js and Arduino which is called The Boy Who Fell:

The Boy Who Fell is a survival game where you must control a boy and keep him above by utilizing the platforms from floating in below. But be careful as some of the platforms are spikes which will decrease the number of lives, but you can replenish those by jumping onto the wooden platforms. Also be wary of the row of spikes on the top so don’t stick onto one platform for too long!

User Testing

Sanjana helped me in the user testing. She was able to figure out how to play the game using just the on-screen instructions. What she did needed help in explaining was the lives system and how it worked which was the spikes take away life points while wood restores them until a maximum of 10. I decided to make wood give life for balancing sake.

Implementation

I started out in p5 js by creating the game with different classes such as Game, Player, and Platforms. The p5 js handles different functions such as the gravity of the player, randomizing which platform will appear and the overall design of the game.

For the Arduino, I added buttons onto the solderless board as to emulate the feeling of holding a controller. The controller is used in order to move the boy left or right. I set it so pressing a specific button sends either 1 or 2, depending on the button, to p5 js through which it detects which input is being pushed the and the boy moves in that direction.

In the end, only the Arduino is sending data to p5 js which is the value of what button is being pressed which is then stored in a variable and then compared to in an IF statement in order to determine which direction the boy moves.

I’m particularly proud of how I implemented the different platforms and they come from the bottom and the interaction between the player and the platform. I had even more platforms ready with different interactions but it proved to be too difficult and too much according to some feedback, so I eased the game down.

For improvements, I can improve the controller used in order to play the game but making a controller out of boxes and using bigger and better buttons. The game graphics can be improved as well as the instructions describing the game.

User Testing

User Testing:

To conduct user testing, I had Moeez and Sanjana play my game in its initial state, and they provided me with valuable feedback, which I incorporated into my project. Initially, my game required the user to wait for the flower to reach the bottom of the screen and overlap with the corresponding flower image at the bottom. Sanjana suggested changing the game concept to flower catching and increasing the speed, which I agreed to as it adds excitement. I also initially made my game with a fixed speed throughout but Moeez recommended starting with a slower speed and gradually increasing it to allow users to get accustomed to it. To further enhance the user experience, I plan to add on-screen messages, such as “wrong flower pressed” and “good job!” to make the game more interactive.

Video:

https://youtube.com/shorts/7kJ7MyrLNME


Final Project

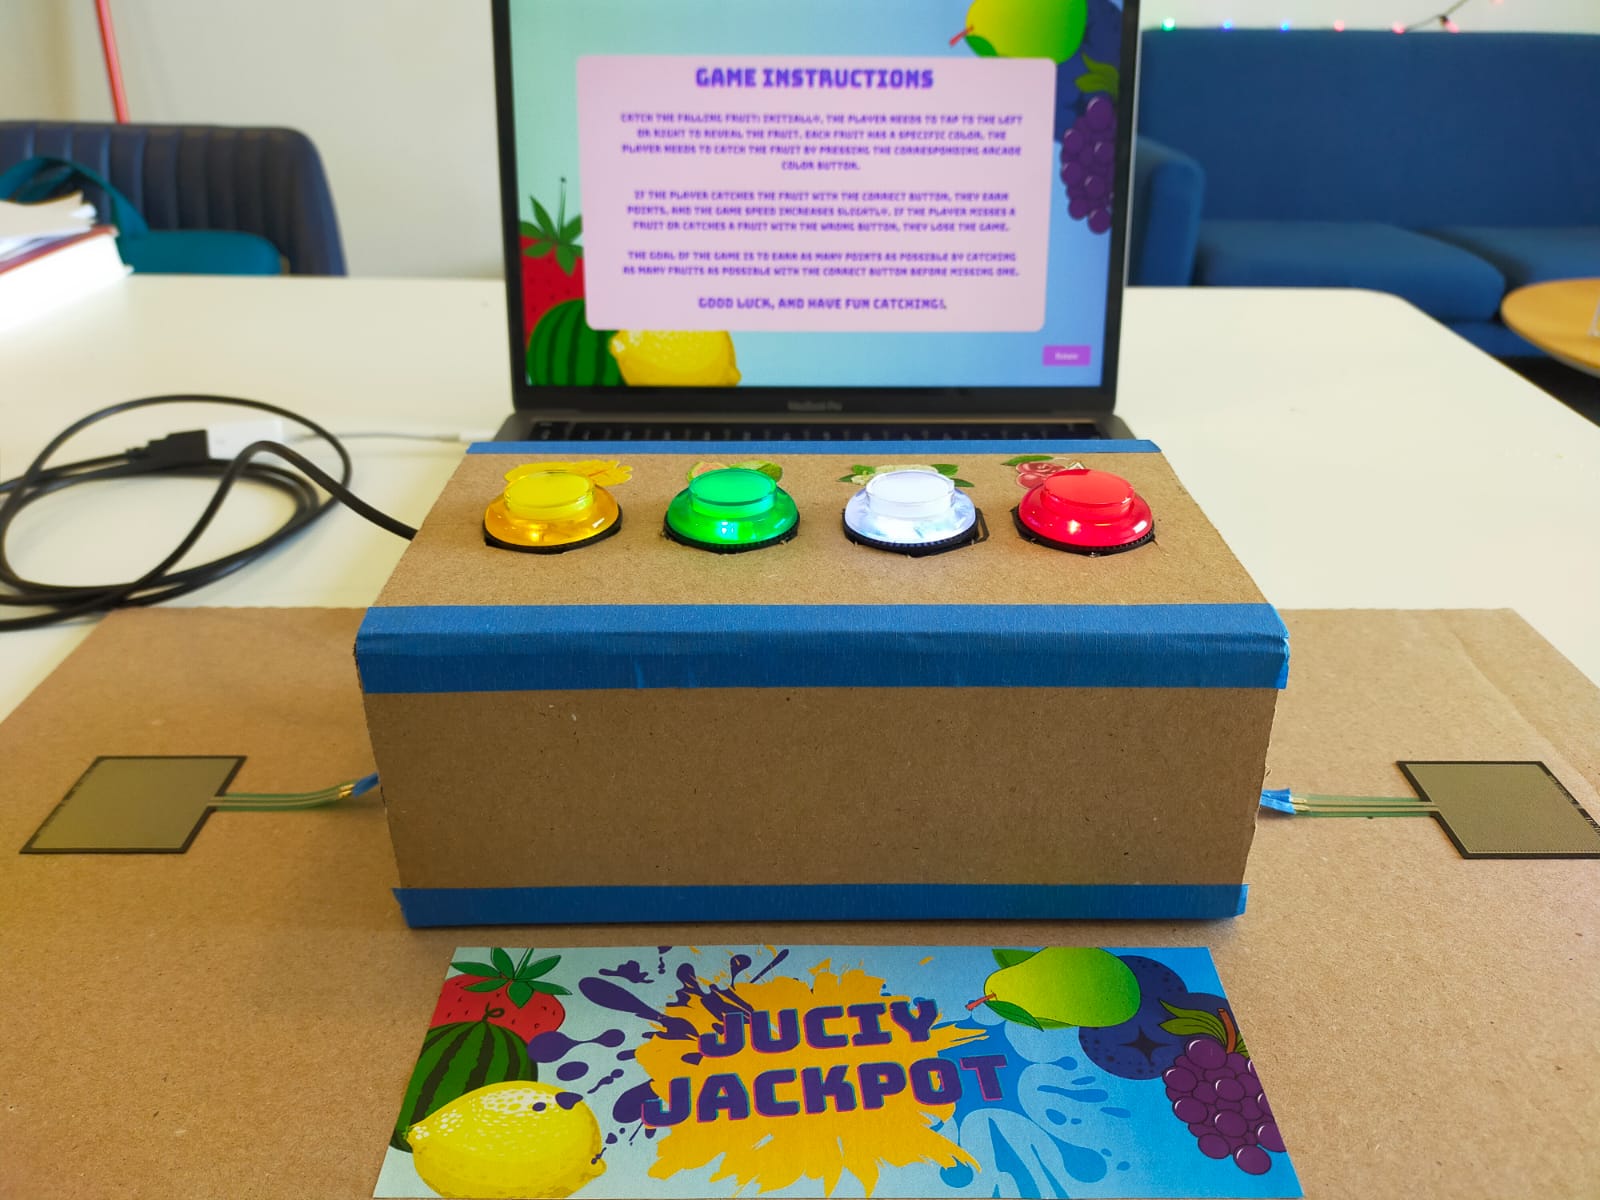
Final Project – juicy jackpot

Concept:

The game I have designed is an engaging and interactive experience, incorporating elements from classic games such as piano tiles, paddle catch, and reaction time games. The central theme of the game is simple yet delightful – players are tasked with discovering hidden fruit and must catch the correct fruit to earn points and progress through the levels. As the game proceeds, the speed of play increases, demanding rapid reflexes and quick decision-making from players to succeed. To uncover the hidden fruit, players must stay alert and swiftly respond to left or right signs, then press the correct arcade button to capture the fruit they seek. The game promises a thrilling and immersive experience, testing players’ skills and keeping them captivated as they strive to achieve the highest score possible.

Implementation:

Building and executing the entire setup for my project was a challenging task, but I am thrilled with the results. I decided to use two force sensors to track left and right movements and four arcade buttons to represent the different fruits. These force sensors typically provide values ranging from 0 to 1023, and while I initially mapped them using Arduino code, it became complicated to send so many values over serial communication. So, I resorted to mapping the values in p5js, which proved to be a more effective solution.

Using this setup, I was able to receive values from both force sensors and the arcade buttons over serial communication. While soldering the force sensors, I encountered some issues with the values changing, but I was able to remap them successfully. If the value is above 100 for one sensor, it’s pressed, and for the other, it’s above 500.

To make the game more engaging, I randomly assigned the fruits and direction arrows. Initially, I had planned to implement a piano tiles-style game with increased complexity, but that wouldn’t allow users to play completely. So, I opted for a randomly falling catch game instead. I first tested the collision and mapping of objects with keyboard keys and then proceeded with mapping them with the Arduino reading.

During testing, I faced a lagging issue while storing all mapped values in an array after splitting the string from the Arduino. However, I was able to resolve this issue by using separate variables, simple if-else statements, and increasing the frame rate.

Mapping the values for the force sensors and arcade buttons to their respective fruits and direction arrows was a crucial step, and I am particularly proud of how well it turned out. Overall, I am pleased with the final result and excited to continue improving the game in the future.

p5js code:

link: https://editor.p5js.org/Sanjana-Nambiar/sketches/-JxDz5psg

Arduino code:

//declaring all the port pins as const int
const int yellow = 13;
const int green = 11;
const int blue = 9;
const int red = 7;

const int left = A3;
const int right = A1;

void setup() {
  //serial port activation 
  Serial.begin(9600);

  //declare the switches as digital input devices
  pinMode(yellow, INPUT_PULLUP);
  pinMode(green, INPUT_PULLUP);
  pinMode(blue, INPUT_PULLUP);
  pinMode(red, INPUT_PULLUP);

  pinMode(left, INPUT);
  pinMode(right, INPUT);
}

void loop() {
  String arrow;
  String fruit;
  String message;

//printig the values from the left and right sensors 
  int sensor1 = analogRead(left);
  int sensor2 = analogRead(right);

  Serial.print(sensor1);
  Serial.print(",");
  Serial.print(sensor2);
  Serial.print(",");

//since the arcade buttons are pullup buttons 
//they are high when it isnt pressed.
  if(digitalRead(yellow) == HIGH)
    {Serial.print("0,");}
  else 
    {Serial.print("1,");}

  if(digitalRead(green) == HIGH) 
    {Serial.print("0,");}
  else 
    {Serial.print("1,");}

  if(digitalRead(blue) == HIGH)
    {Serial.print("0,");}
  else 
    {Serial.print("1,");}

  if(digitalRead(red) == HIGH) 
    {Serial.println("0");}
  else 
    {Serial.println("1");}

}
User testing:

During the user testing phase, my game was tested by Saamia and Moeez, who found the game instructions to be simple and straightforward. However, they encountered a minor issue when distinguishing between the fruit colors. The confusion arose from the white berry and guava fruits, which shared a similar color scheme. To address this issue, I took the feedback on the board and included pictures of the fruits at the front of the box. This small change resolved the confusion, and the testers were able to play the game smoothly. Overall, the user testing phase yielded positive results, and the feedback provided by Saamia and Moeez allowed me to make an improvement to the game that enhanced the user experience.

Future improvements and reflections:

Looking toward the future, there are several areas where this game could be improved to make it even more engaging and exciting for players. One possibility is to add more layers of complexity to the game. For example, rather than just catching the fruit, players could be required to perform additional tasks before the fruit is revealed. This could include completing a pattern or sequence of movements or even solving simple puzzles. Additionally, the game could be made into a two-player mode, where players compete against each other to catch the most fruit or avoid the most obstacles. This could be accomplished by adding a second set of sensors and buttons or even incorporating motion-tracking technology to track players’ movements in real-time.

Overall, I am very proud of the mapping part of the game, where the sensors and buttons were effectively mapped to the fruits and arrows for catching them. With further development, this game has the potential to become a popular and entertaining addition to the world of physical gaming.


Final Project – Dance Evolution/User Testing

Concept:

For my final project “Dance Evolution”, I decided to work on a “remake” of a famous Japanese video game called “Dance Revolution.” In this game, instead of being provided the music at the beginning, the user has to press on the tiles in order to generate and construct the music itself track by track. For each round, the user is shown an arrow pointing either to the left or to the right and they have to press on the respective tile in a timely manner, otherwise they lose. Them pressing on the tiles will start slowly “unlocking new tracks,” allowing them to construct the final song.

Implementation:


Arduino:

My Arduino board consisted of 3 force sensors. These would then trigger the work of p5js. However, an issue I faced for some time was that when the sensor was activated, Arduino would register multiple high values of the sensor, which was inconvenient specifically for my project as it would set off a chain of undesirable events. Therefore, when working on my Arduino board and code, I had to make sure I debounced the signal properly so that it only registered the activation only once when the sensor is pressed.

p5.js:

Initially, I thought that the p5.js implementation of the project would be straightforward. However, I encountered a variety of different issues that made me change my approach to making this game. Firstly, I was unable to properly play the sounds of my tracks when the sensors were pressed.  It was very difficult to come up with an algorithm in which the activation of a sensor would lead to the playing of a track in a way that matches the other tracks (that may already be played) rhythmically. Therefore, I decided to play all the tracks in the setup and simply unmute each track when the sensor is triggered.

My p5.js code would take in the values of the sensor, or more specifically “signs” from the Arduino that the sensor was pressed and reached its maximum value, and would use that in order to generate new rounds of the game. My biggest obstacle throughout this process was creating an algorithm that would a) randomly pick between the two different images of arrows, b) make the user go from one round to the other, c) have the pictures be timed so that if the sensor is activated late, the user loses, etc. However, mainly through the usage of the “millis()” function, I was able to tackle these issues.

Code:

p5.js:

let bg;

//variables for all the musical tracks

let bass;

let hat;

let kick;

let snare;

let synth;

let strings;

let vox1;

let vox2;

let now; //variable that trackes the time every time the user presses on a button 

let gameStartTime; //tracks the beginning of each round

let sensorValue;

let middleSensorVal;//value of the sensors that p5js receives from Arduino

let gameState = "start"; // Can be 'start', 'playing', 'end'

let threshold = 5000; //the value for the first arrow that appears

let num = 0; //the value that activates the different cases

let arrowImage = []; //an array that holds the values of the images of the arrows

let randomIndex; //selects a random image from an array 

function preload() {
  vox1 = loadSound("vox_1.mp3");

  kick = loadSound("kick.mp3");

  vox2 = loadSound("vox_2.mp3");

  snare = loadSound("snare.mp3");

  bass = loadSound("hat.mp3");

  strings = loadSound("strings.mp3");

  synth = loadSound("synth.mp3");

  hat = loadSound("hat.mp3");

  bg = loadImage("background_image.png"); 
  
  arrowImage.push(loadImage("rightArrow.png"));
  arrowImage.push(loadImage("leftArrow.png")); //pushing the images into the array 

  bruno = loadFont("BrunoAceSC-Regular.ttf"); //loading the font of the game
}

function setup() {
  createCanvas(windowWidth, windowHeight);
  textAlign(CENTER);
  imageMode(CENTER);

  //playing all the tracks during setup and muting each track

  vox1.setVolume(0);
  vox1.play();
  vox1.loop();

  vox2.play();
  vox2.setVolume(0);
  vox2.loop();

  strings.play();
  strings.setVolume(0);
  strings.loop();

  snare.play();
  snare.setVolume(0);
  snare.loop();

  synth.play();
  synth.setVolume(0);
  synth.loop();

  kick.play();
  kick.setVolume(0);
  kick.loop();

  bass.play();
  bass.setVolume(0);
  bass.loop();

  hat.play();
  hat.setVolume(0);
  hat.loop();
}

function draw() {
  background(220);
  image(bg, width / 2, height / 2, width, height);
  
  //assigning different functions to different states of the game

  if (gameState == "start") {
    drawMainPage();
  } else if (gameState == "instructions") {
    drawInstructions();
  } else if (gameState == "playing") {
    drawGame();
  } else if (gameState == "win") {
    drawWinScreen();
  } else if (gameState == "loss") {
    drawLossScreen();
  } 
}

function windowResized() {
  resizeCanvas(windowWidth, windowHeight);
}

function drawMainPage() {
  textSize(70);
  fill("rgb(255,0,163)");
  stroke(255);
  strokeWeight(5);
  textWrap(WORD);
  textFont(bruno);
  text("Dance Evolution", width / 2, height / 5, width / 13);

  textSize(18);
  fill("white");
  stroke(0);
  strokeWeight(4);
  textFont(bruno);
  text("Press the Space Bar for the Instructions", width / 2, height / 1.2);
}

//setting up the serial connection

function keyPressed() {
  if (key == " ") {
    setUpSerial();
    gameState = "instructions";
  }
}

function drawInstructions() {
  textSize(60);
  fill("rgb(255,0,163)");
  stroke(255);
  strokeWeight(5);
  textWrap(WORD);
  textFont(bruno);
  text("Instructions", width / 2, height / 5);
  
  textWrap(WORD);
  textSize(16);
  stroke(0);
  strokeWeight(3);
  fill(255);
  textFont(bruno);
  text(
    "Once you start the game, you will see an arrow. Wherever the arrow points, that's the tile you should click on. Once you click on the tile, you will hear a track playing. Below the picture of the arrow, you will see the number of seconds you are given for each round. If you don't press the tile in time, you LOSE! If you manage to press on all the arrows on time and play all the tracks, you WIN!",
    0,
    height/2.5,
    width
  );
  
  textSize(18);
  fill("white");
  stroke(0);
  strokeWeight(4);
  textFont(bruno);
  text("Step on the Tile in the Middle to Play!", width / 2, height / 1.2);

  if (middleSensorVal == 1023) {
    gameState = "playing";
    restartRound(); //begins the game when the button is pressed
  }
}

function drawGame() {
  textSize(60);
  fill("rgb(255,0,163)");
  stroke(255);
  strokeWeight(5);
  textWrap(WORD);
  textFont(bruno);
  text("DANCE!", width / 2, height / 6.5);
  
  //tracking to see if the time that passed since the start of the round is less than the time the threshold

  if (millisInGame() < threshold && num < 8) {
    image(arrowImage[randomIndex], width / 2, height / 2, width/2, height/2);

    fill(255);
    strokeWeight(0);
    text(
      round(millisInGame() / 1000) + "/" + round(threshold / 1000) + " s",
      width / 2,
      height / 1.15
    );
  }
  
  //assigning the conditions for loss
  
  if (millisInGame() > threshold && num < 8) {
    gameState = "loss";
  }

  if (sensorValue === 1023 && num < 9) {
    num++;
    console.log(num);
    restartRound();
    threshold = threshold * 0.92;
    console.log(threshold);
    flag = true;
  }

  if (num == 8) {
    drawWinScreen();
  }
  
  switch (num) {
    case 0:
      break;
    case 1:
      vox1.setVolume(0.2);
      break;
    case 2:
      vox2.setVolume(0.2);
      break;
    case 3:
      kick.setVolume(0.2);
      break;
    case 4:
      bass.setVolume(0.2);
      break;
    case 5:
      snare.setVolume(0.2);
      break;
    case 6:
      hat.setVolume(0.2);
      break;
    case 7:
      synth.setVolume(0.2);
      break;
    case 8:
      strings.setVolume(0.2);
      break;
  }
}

function drawWinScreen() {
  background(220);
  image(bg, width / 2, height / 2, width, height);

  textSize(40);
  fill("rgb(255,0,163)");
  stroke(255);
  strokeWeight(5);
  textWrap(WORD);
  textFont(bruno);
  text("CONGRATULATIONS", width / 2, height / 5);
  
  textSize(18);
  fill("white");
  stroke(0);
  strokeWeight(4);
  textFont(bruno);
  text("Step on the tile in the middle to RESTART!", width / 2, height / 1.2);
  
  //restarting the game when the middle sensor is played

  if (middleSensorVal == 1023) {
    gameState = "instructions";
    vox1.setVolume(0);
    vox2.setVolume(0);
    strings.setVolume(0);
    snare.setVolume(0);
    synth.setVolume(0);
    kick.setVolume(0);
    bass.setVolume(0);
    hat.setVolume(0);
    num = 0;
    threshold = 5000;
  }
}

//tracking the start time of each round and generating an index to then randomly generate an image from the array 

function restartRound() {
  now = millis();
  gameStartTime = now;

  randomIndex = floor(random(arrowImage.length));
}

//tracking the difference between the current time and the moment when the game started

function millisInGame() {
  return millis() - gameStartTime;
}

function drawLossScreen() {
  textSize(60);
  fill("rgb(255,0,163)");
  stroke(255);
  strokeWeight(5);
  textWrap(WORD);
  textFont(bruno);
  text("LOSS", width / 2, height / 5);

  if (middleSensorVal == 1023) {
    gameState = "instructions";
    vox1.setVolume(0);
    vox2.setVolume(0);
    strings.setVolume(0);
    snare.setVolume(0);
    synth.setVolume(0);
    kick.setVolume(0);
    bass.setVolume(0);
    hat.setVolume(0);
    num = 0;
    threshold = 5000;
  }
  
  textSize(18);
  fill("white");
  stroke(0);
  strokeWeight(4);
  textFont(bruno);
  text("Step on the tile in the middle to RESTART!", width / 2, height / 1.2);
}

//receiving the information from the Arduino

function readSerial(data) {
  if (data != null) {
    let fromArduino = split(trim(data), ",");

    if (fromArduino.length == 2) {
      
      middleSensorVal = int(fromArduino[0]);
      sensorValue = int(fromArduino[1]);

    }
  }
}

function keyTyped() {
  if (key === 'f') {
    toggleFullscreen();
  }
}
function toggleFullscreen() {
  let fs = fullscreen(); 
  fullscreen(!fs); 
}


Arduino

const int leftPSensor = A0;
const int rightPSensor = A1;
const int middleSensor = A2; 

int lastSensorStateLeft = 0;
int lastSensorStateMiddle = 0;

int threshold = 1022;

bool flag = false;

int rightPressureVal;
int leftPressureVal;
int middleSensorVal;

void setup() {

  pinMode(leftPSensor, INPUT);
  pinMode(rightPSensor, INPUT);
  pinMode(middleSensor, INPUT);
  Serial.begin(4800);
}

void loop() {

  leftPressureVal = analogRead(leftPSensor);
  rightPressureVal = analogRead(rightPSensor);
  middleSensorVal = analogRead(middleSensor);


  if (leftPressureVal < threshold && rightPressureVal < threshold && middleSensorVal < threshold) {
    flag = true;
  } 

  if (flag == true && (leftPressureVal == 1023 || rightPressureVal == 1023)) {
      lastSensorStateLeft = 1023;
      flag = false;
    delay(300);
  } else {
    lastSensorStateLeft = 0;
  }

  if (flag == true && middleSensorVal == 1023) {
      lastSensorStateMiddle = 1023;
      flag = false;
      delay(300);
  } else {
    lastSensorStateMiddle = 0;
  }

  Serial.print(lastSensorStateMiddle);
  Serial.print(", ");
  Serial.println(lastSensorStateLeft);
}

Communication:

The communication between Arduino and p5.js proved to be a difficulty. As mentioned earlier, I tackled the issue of multiple registrations of the activation of the sender by debouncing it and ensuring that the value of the sensor is sent to p5js only once. However, when that was happening, despite p5.js recognizing the value, it would simply ignore it, even though it was clearly instructed to carry out an operation with the value. After some time, I realized that this issue could be resolved by decreasing the baud rate from 9600 to 4800 on both p5js and Arduino, which would allow p5js to recognize the one, small “1023” value that gets lost in a fast stream of values that are being received from Arduino. This was very helpful as it fixed the issue and ensured the smooth operation of the game.

Future improvements:

With this project, I am proud that it ultimately became what I envisioned, albeit with some limitations. I am proud of the algorithm that I used for flipping through rounds using the sensor and playing the different tracks themselves.

In the future I want to make sure there is more randomness to the process in terms of the different tracks that are played because as of now, the tracks are played in the same order. I also want to add different levels of difficulty where the user can choose to make the time given for their step on the tiles shorter. Finally, I want to improve the p5.js – Arduino communication in order to make sure that the user does not have to press on the tiles a few times for the value to be registered, which is an issue I observe currently.

Video:


User Testing:

I conducted user testing on one of my friends, whom I did not have explain the Instructions to. According to him, the instructions were clear. Despite that, he still struggled at times with clicking on the tiles as they would take a few tries for the value to be received by p5.js. All in all, however, he claimed that the game is fairly easy to understand.


Final Project

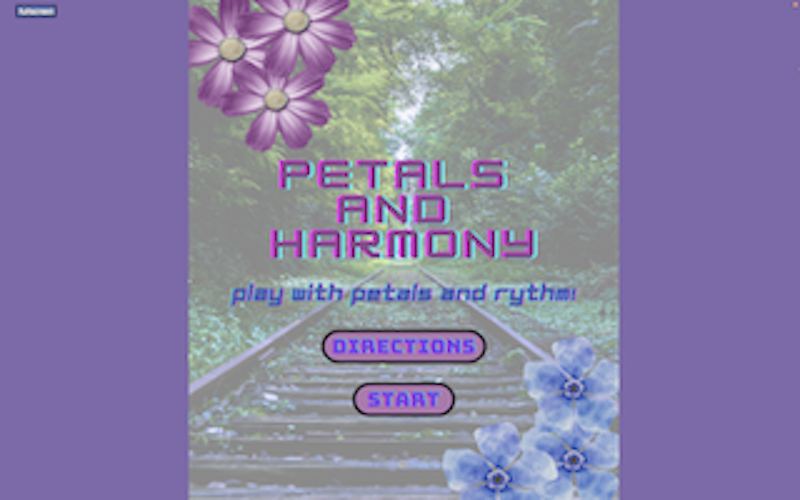
Project: Petals and Harmony

Concept

My project aims to provide a simple and engaging activity for elderly individuals who may face difficulty attending physiotherapy sessions. The game is nature-themed and involves a flower-catching game set in a forest or garden, accompanied by a calming fairyland-like musical background. This relaxing environment is designed to calm the nerves, similar to a physiotherapy session.

As the game progresses, flowers appear one at a time from a distance and move closer to the player, creating an enjoyable challenge that encourages individuals to exercise their hand-eye coordination and mobility.

Implementation

For my project, I utilized four pressure sensors as analog sensors to capture input from the user’s four fingers. The sensors provided data within a range of 0 to 1023. However, to ensure that a “press” was distinguished from a mere touch, I set a threshold range for the boolean values. If the sensor reading exceeded 500, the boolean value was set to true.

I created four boolean variables, one for each sensor. These variables were set to true when the sensor reading was above 500, and false otherwise. Only when the user pressed the correct pressure sensor, the moving flower appeared and the next flower appeared on the screen.

To create a realistic flower movement effect, I attempted to simulate the appearance of flowers approaching from afar. At first, I considered having the flowers move in four rows, similar to piano tiles. However, I found that manipulating the size and movement angle of the flowers was more effective in achieving the desired effect. With this approach, I was able to create the impression that the flowers were coming closer from a distance.

This is the code that helps me achieve this effect:

angle = radians(126);
image(img,start_x,start_y,size,size);
start_x += speed * cos(angle);
start_y += speed * sin(angle);
size = map(start_y, 466, height, 10, 110);

I calculated the specific angle value to each flower, allowing me to manipulate the x and y coordinates independently. To adjust the size of the flowers, I utilized the map function. Specifically, when the value of the start_y coordinate (the y-coordinate of the flower) was 466, the size of the flower was set to 10. Similarly, when the y-coordinate reached the end of the canvas (i.e., height), the size of the flower was set to 110 using the same ratio.

My p5.js project features a main page that showcases the game’s title along with a slogan, as well as two buttons: “Start” and “Instructions.” The instructions section provides a comprehensive guide on how to play the game and includes information on how missed flowers will be displayed at the end of the game. Once the user has gone through the instructions, they can then proceed to start the game.

In the top left corner of the game’s interface, there is a fullscreen button that allows the user to enter or exit fullscreen mode. Since my game is in a vertical orientation, I centered the printing of the game’s background images, while covering the rest of the canvas with a plain colored background.

Arduino Code:

const int pressureSensor0 = A0;
const int pressureSensor1 = A1;
const int pressureSensor2 = A2;
const int pressureSensor3 = A3;
// the setup routine runs once when you press reset:
void setup() {
  // initialize serial communication at 9600 bits per second:
  Serial.begin(9600);
  pinMode(pressureSensor0, INPUT);
  pinMode(pressureSensor1, INPUT);
  pinMode(pressureSensor2, INPUT);
  pinMode(pressureSensor3, INPUT);
}

// the loop routine runs over and over again forever:
void loop() {
  // read the input on analog pin 0:
  int sensorValue0 = analogRead(pressureSensor0);
  int sensorValue1 = analogRead(pressureSensor1);
  int sensorValue2 = analogRead(pressureSensor2);
  int sensorValue3 = analogRead(pressureSensor3);

  // print out the value you read:
  //Serial.print("(");
  Serial.print(sensorValue0);
  Serial.print(", ");
  Serial.print(sensorValue1);
  Serial.print(", ");
  Serial.print(sensorValue2);
  Serial.print(", ");
  Serial.println(sensorValue3);
  //Serial.println(")");

}

P5js Implementation:

Areas I am particularly proud of

I am incredibly proud of creating my first interactive game. In the past, I had made games, but they were never as engaging as this one, which uses a glove to take input from the user. This gave a whole new level of interactivity to the project, making it more engaging and immersive. It reminded me of our in-class discussions, where we talked about the importance of direct input from the user. By using not just visual but touch senses to control the success of the game, I was able to create a unique experience for the player. It was exciting to see my vision come to life and to be able to share it with others. I learned a lot during the process, and I’m looking forward to continuing to explore the possibilities of interactive game development in the future.

Future Improvements

In the future to make the game more engaging and interactive, I am considering adding a multiplayer mode. This would provide an opportunity for players, particularly older individuals, to play with their friends rather than playing alone. I believe that a multiplayer game would instill feelings of healthy competition, making the gameplay even more exciting and encouraging players to keep coming back to the game.

Final Project – Lime Liner

Concept and Implementation: 

For my final project, I created a digital version of the classic Etch-a-Sketch toy which utilizes both Arduino and P5JS. I personalized the design by using neon green and black colors to give it a modern, sleek look. The goal was to replicate the drawing experience of the original toy while adding new features that enhance the user’s creativity and leaving a personal mark on the concept. Additionally, to better reflect my altered version of the toy, I decided to name it Lime Liner.

The Lime Liner was created using an Arduino Uno board and two potentiometers connected to analog pins A0 and A1. The potentiometers control the movement of the cursor on the screen. A switch connected to digital pin 2 was also used to clear the screen. The p5.js sketch is used to draw the cursor and lines on the canvas. The user interacts with the Etch-a-Sketch by turning the potentiometers to move the cursor horizontally and vertically, and pressing the switch to clear the screen. The cursor moves smoothly on the screen and leaves a trail as it moves. The user can create different patterns and shapes by changing the direction and speed of the cursor.

Arduino Code: 

The Arduino code initializes the serial communication and reads the values of the potentiometers and switch. It sends the values to the p5.js sketch using the Serial library.

// This code is for an Arduino project that receives data from p5.js and sends sensor data back to p5.js
// The inputs are:
// - A0: first potentiometer
// - A1: second potentiometer
// - 2: switch input

void setup() {
  // Serial communication is started to send the data
  Serial.begin(9600);

  // Set pin 2 as input
  pinMode(2, INPUT);

  // Bidirectional communication starts
  while (Serial.available() <= 0) {
    // Send a starting message to p5.js
    Serial.println("0,0");
  }
}

void loop() {
  // Waits to receive data from p5.js first and then starts executing
  while (Serial.available()) {

    // Parse the incoming data from p5.js
    int left = Serial.parseInt();
    int right = Serial.parseInt();
    
    // If a new line character is received, read the sensors and button and send the data back to p5.js
    if (Serial.read() == '\n') {
      int sensor = analogRead(A0);
      delay(5);
      int sensor2 = analogRead(A1);
      delay(5);
      int button = digitalRead(2);
      delay(5);

      // Send the sensor and button data to p5.js
      Serial.print(sensor);
      Serial.print(',');
      Serial.print(sensor2);
      Serial.print(',');
      Serial.println(button);
    }
  }
} 

P5js Code: 

The p5.js code sets up the canvas and draws the cursor and lines using the values received from the Arduino. It also includes functions to clear the screen and prevent the cursor from going outside the canvas.

// Variables for controlling color, position, and switch state
let xPos = 0; // horizontal position of the ellipse
let yPos = 0; // vertical position of the ellipse
let switchState = 0; // state of the switch that clears the Etch A Sketch

// Setup function, runs once when the sketch is loaded
function setup() {
  createCanvas(600, 400);
  textSize(18);
  background(255);
  frame();
}

// Counter variable for the while loop in draw function
let i = 0;

// Draw function, runs continuously to update the sketch
function draw() {
  // While loop to set the button state to 1 only once
  while (i < 1) {
    switchState = 1;
    i++;
  }

  // Map the xPos and yPos to the canvas size to control ellipse position
  fill("#39FF13");
  // Draw the ellipse at a position determined by the mapped xPos and yPos
  ellipse(
    map(xPos, 0, 1023, 70, width - 90),
    map(yPos, 0, 1023, 70, height - 80),
    3
  );

  // Check if the switchState is 1, and call the frame function to clear the sketch
  if (switchState == 1) {
    frame(); // calls the frame function i.e. restarts the sketch
  }
}

// Function to set up the serial connection when spacebar is pressed
function keyPressed() {
  if (key == " ") {
    setUpSerial();
  }
}

// Function to read data from the Arduino
function readSerial(data) {
  ////////////////////////////////////
  //READ FROM ARDUINO HERE
  ////////////////////////////////////

  // Check if there is any data received
  if (data != null) {
    // Split the message
    let fromArduino = split(trim(data), ",");
    // If the message is of the correct length, store the Arduino values
    if (fromArduino.length == 3) {
      xPos = fromArduino[0]; // Update the xPos value based on input from Arduino
      yPos = fromArduino[1]; // Update the yPos value based on input from Arduino
      switchState = fromArduino[2];
    }
    //////////////////////////////////
    //SEND TO ARDUINO HERE (handshake)
    //////////////////////////////////
    let sendToArduino = xPos + "," + yPos + "\n";
    writeSerial(sendToArduino);
  }
}

// Function to draw the frame of the Etch A Sketch
function frame() {
  // Draw the outer frame
  strokeWeight(120);
  noFill();
  stroke("#2BC20E");
  rect(0, 0, width, height);

  // Draw the inner frame
  fill("#010B12");
  strokeWeight(30);
  stroke("#010B12");
  strokeJoin(ROUND);
  rect(70, 70, width-140, height-140);

  // Draw the title 
  noStroke();
  fill("#1E1F21");
  textAlign(CENTER);
  textSize(30);
  textFont("Brush Script MT");
  text(" ~ Lime Liner ~ ", width/2, 40);

  // Draw the two knobs at the bottom
  noStroke();
  fill("#010B12");
  ellipse(width-570, 365, 50, 50);
  ellipse(570, 365, 50, 50);
}

Serial communication is used to send and receive data between the Arduino and p5.js. The Arduino sends the position of the potentiometers and button to p5.js, which uses this data to draw on the screen. The clear button also uses serial communication to send a signal from p5.js to the Arduino.

Areas I am proud of and future improvments:

I am particularly proud of the clean and modern design of the Etch-a-Sketch, which makes it stand out from other versions. I also spent a lot of time debugging both the physical and code components of the project to ensure that everything was functioning properly.

Since this was a back-up project, I am a bit disappointed that I did not have the skills and time to finish my initial idea of a radar. Regardless, I feel satisfied with the final version of my project. In the future, one area for improvement would be to add more features to the Lime Liner, such as the ability to change the color of the lines or adjust the thickness of the stylus. Another potential improvement would be to make the stylus wireless to allow for more freedom of movement. Additionally, the code could be optimized to reduce latency and improve performance and a game could be implemented in which the user will interact more with the project.


Final Project – Stick Hero


Concept:

I was fascinated by the idea of creating a game that could be controlled using hand movements, and I successfully brought that idea to life using p5.js and Arduino. Inspired by the game ‘Stick Hero,’ I decided to recreate it with a unique twist. In this game, the player’s objective is to achieve a high score by helping their character cross platforms using a growing stick. By clenching their fist, the player can extend the stick to bridge the gap between platforms. The challenge lies in finding the perfect stick length—not too short to fall short of the other platform, and not too long to overshoot it.

p5.js:

The p5.js code represents a game where players navigate platforms by using a growing and rotating stick.

  1. Global variables are declared for images and sounds.
  2. Images and sounds are preloaded to ensure smooth gameplay.
  3. The Game class is defined, responsible for managing game objects and states.
  4. The class includes functions for start checking, score display, platform removal, game over detection, state management, platform and stick creation, and game display.
  5. The Player class represents the player character, incorporating functions for setting the destination, sticking to platforms, moving, and displaying.
  6. The Platform class represents the platforms and includes functions for movement and display.
  7. The Stick class represents the growing and rotating stick, featuring functions for growth and rotation.
  8. The setup and draw functions are defined for game initialization and updates.
  9. Event handlers for mouse clicks and releases are implemented to capture player interactions.
  10. The code also includes a callback function for reading serial data from an Arduino, enabling hand-controlled gameplay.

The code creates an engaging game where players maneuver their character across platforms using a stick, striving to reach the end without falling off. The game dynamically changes based on mouse interactions and player movements, and the score is constantly displayed during gameplay.

p5.js Code:

// Declaring the global variables
let bg_img;
let player_img;
let success;
let failure;

// prelaoding the images and sounds
function preload() {
  start_screen = loadImage("start_screen.png");
  bg_img = loadImage("bg1.jpeg");
  player_img = loadImage("sprite.png");
  success = loadSound("success-sound-effect.mp3");
  failure = loadSound("failure.mp3");
}

// Setting up the canvas and creating the game object
class Game {
// Declaring the variables
  constructor() {
    this.platforms = [];
    this.gaps = [];
    this.widths = [];
    this.stick = false;
    this.state = 0;
    this.score = 0;
    this.start_x = 217;
    this.start_y = 352;
    this.start_w = 98;
    this.start_h = 30;
// Making an array of all the possible gaps between the platforms
    for (let g = 4; g < 61; g++) {
      this.gaps.push(g * 5);
    }

// Making an array of all the possible widths of the platforms
    for (let w = 8; w < 31; w++) {
      this.widths.push(w * 5);
    }

    // Making the first three platforms
    let x = 0;
    for (let i = 0; i < 2; i++) {
      let gap = random(this.gaps);
      this.create_platform(x);
      x = x + this.platforms[this.platforms.length - 1].w + gap;
    }

    // Making the player
    this.player = new Player(
      this.platforms[0].x + this.platforms[0].w,
      this.platforms[0].y
    );
  }

  // Function to display the game
  check_start() {
    if (
      mouseX >= this.start_x &&
      mouseX <= this.start_x + this.start_w &&
      mouseY >= this.start_y &&
      mouseY <= this.start_y + this.start_h
    ) {
      this.state = 1;
    }
  }

// Function to display the start screen
  display_score() {
    textSize(20);
    noStroke();
    fill(0);
    text("Score: " + this.score, 20, 30);
  }

// remove the platform once it is out of the screen
  remove_platform() {
    if (this.platforms[0].x <= -this.platforms[0].w) {
      this.platforms.shift();
    }
  }

  // Function to check if the game is over
  check_game_over() {
    if (this.state === 8 && this.player.x === this.player.destination_x) {
      failure.play();
      this.state = 9;
    }
  }

  // Function to display the game over screen
  display_game_over() {
    background(bg_img);
    textSize(20);
    noStroke();
    fill(0);
     textSize(30);
    text("Score: " + this.score, width / 2 - 50, height / 2-50);
    text("Game Over", width / 2 - 70, height / 2);
    text("Click to restart", width / 2 - 88, height / 2 + 50);
  }

 state_manager() { // Function to manage the states of the game

    if (this.state === 0) { // State 0 displays the game instructions.
      image(start_screen,0,0);
    } else if (this.state === 2) { // State 2 detects a mouse click and grows the stick.
      this.create_stick();
      this.stick.grow();
    } else if (this.state === 3) { // State 3 detects a mouse release and rotates the stick.
      this.stick.rotate();
    } else if (this.state === 4) { // State 4 checks if the player has reached the platform after the stick has finished rotating, and transitions to state 5 or state 8 accordingly.
      this.player.set_destination();
    } else if (this.state === 5) { // State 5 moves the player towards their destination.
      this.player.move();
    } else if (this.state === 6) { // State 6 determines the new positions of the platforms and the player once the player reaches their destination platform.
      this.set_platforms_destination();
    } else if (this.state === 7) { // State 7 moves the platforms and the player towards their destination.
      for (var i = 0; i < this.platforms.length; i++) {
        this.platforms[i].move();
        this.player.stick_to_platform();
      }
      this.remove_platform(); 
    } else if (this.state === 8) { // State 8 moves the player towards the end of the stick and checks if they have reached it.
      this.player.move();
      this.check_game_over();
    } else if (this.state === 9) { // State 9 ends the game and displays the game over screen as soon as the player reaches the end of the stick that is not on the platform.
      this.display_game_over();
    }
  }

 // Function to create a new platform
 create_platform(x) {
    let w = random(this.widths);
    let y = height - 100;
    let p = new Platform(x, y, w, 100);
    this.platforms.push(p);
  }

// Function to set the destination of the platforms
  set_platforms_destination() {
    this.create_platform(width);
    this.platforms[0].destination_x = -this.platforms[0].width;
    this.platforms[1].destination_x = 0;
    this.platforms[2].destination_x = this.platforms[1].w + random(this.gaps);
    game.state = 7;
  }
    
// Function to create a new stick
  create_stick() {
    if (!this.stick) {
        this.stick = new Stick(
          this.platforms[0].x + this.platforms[0].w, this.platforms[0].y,3,0);
      }
  }

// Function to display the game
  display() {
    background(bg_img);
    this.state_manager();
    if (game.state != 9 && game.state != 0) {
      this.display_score();
      for (let j = 0; j < this.platforms.length; j++) {
        this.platforms[j].display();
        this.player.display();
        if (this.stick != false) {
          this.stick.display();
        }
      }
    }
  }
}

// class for player
class Player {
  constructor(x, y) {
    this.w = 30;
    this.h = 50;
    this.x = x - this.w;
    this.destination_x = x;
    this.v = 5;
    this.y = y - this.h;
    this.position = 0;
  }

  // Setting Destination of the player so that he moves after the stick is down
  set_destination() {
    if (
      game.stick.x_2 >= game.platforms[1].x &&
      game.stick.x_2 <= game.platforms[1].x + game.platforms[1].w
    ) {
      this.destination_x = game.platforms[1].x + game.platforms[1].w - this.w;
      game.score += 1;
      success.play();
      game.state = 5;
    } else {
      this.destination_x = game.stick.x_2;
      game.state = 8;
    }
  }

  // Setting player's x equal to the platform so it moves along with it
  stick_to_platform() {
    if (game.platforms.length === 2) {
      this.x = game.platforms[0].x + game.platforms[0].w - this.w;
      if (game.platforms[0].x === 0) {
        game.state = 1;
      }
    } else {
      this.x = game.platforms[1].x + game.platforms[1].w - this.w;
      if (game.platforms[1].x === 0) {
        game.state = 1;
      }
    }
  }

  // Function to move the player according to his destination
  move() {
    if (this.x < this.destination_x) {
      this.x += this.v;
      this.position = (this.position + 1) % 7;
    } else if (this.x > this.destination_x) {
      this.x -= this.v;
    } else if (
      this.x == this.destination_x &&
      this.x > game.platforms[0].x + game.platforms[0].w &&
      game.state === 5
    ) {
      game.stick = false;
      game.state = 6;
    }
  }

  // Display the player using the respective position from the sprite sheet
  display() {
    let c = player_img.get(this.position * 109, 0, 109, 120);
    image(c, this.x, this.y, this.w, this.h);
  }
}

// Declaring the platform class
class Platform {
  constructor(x, y, w, h) {
    this.x = x;
    this.destination_x = x;
    this.y = y;
    this.w = w;
    this.h = h;
    this.v = 5;
  }

  // Function to move the platform according to its destination
  move() {
    if (this.x != this.destination_x) {
      this.x = this.x - this.v;
    }
  }

  // Display the platform
  display() {
    noStroke();
    fill(color("#808080")); //"#6d4a3b"
    rect(this.x, this.y, this.w, this.h);
    stroke(0);
  }
}

// Declaring the Stick class
class Stick {
  constructor(x, y, w, h) {
    this.l = h;
    this.x_1 = x;
    this.y_1 = y;
    this.x_2 = x;
    this.y_2 = this.y_1 + this.l;
    this.angle = PI / 2;
  }

  // Function to grow the stick
  grow() {
    this.y_2 -= 5;
    this.l += 5;
  }

  // Rotate the Stick according when the mouse if released and check if the rotation is complete
  rotate() {
    this.angle -= PI / 64;
    this.x_2 = this.x_1 + this.l * cos(this.angle);
    this.y_2 = game.platforms[0].y - this.l * sin(this.angle);

    if (this.angle <= 0) {
      game.state = 4;
    }
  }

  // Display the stick
 display() {
  stroke("#808080"); 
  strokeWeight(2);
  line(this.x_1, this.y_1, this.x_2, this.y_2);
  strokeWeight(4);
  
}
}

function setup() {
  createCanvas(550, 450);
  game = new Game();
}

function draw() {
  clear();
  game.display();
}

// Perform functions when mouse is clicked according to the state of the game
function mousePressed() {
  if (game.state === 0) {
    game.check_start();
  } else if (game.state === 1) {
    game.state = 2;
  } else if (game.state === 9) {
    game = new Game();
    game.state = 1;
  }

}

function readSerial(data) //call back function
{
  if (data != null) //if the data received is not null
    {
      console.log(data);
      if (game.state === 0) {
    // game.check_start();
  } else if (game.state === 1 && data > 1008) {
    game.state = 2;
  } else if (game.state === 9) {
    // game = new Game();
    // game.state = 1;
  }
    else if( game.state ===2 && data < 1008)
    {
       game.state = 3;
    }
    
     
    }
  
  let redlight= 2;
  let greenlight = 1;
    if(game.state === 2) 
    {
      let sendToArduino = 1 + "\n";
      writeSerial(sendToArduino);
    }
    else if(game.state === 9) 
    {
      let sendToArduino = 2 + "\n";
      writeSerial(sendToArduino);
    }
    else
    {
      sendToArduino = 0 + "\n";
      writeSerial(sendToArduino);
    }
  
}

function keyPressed() //if any key is pressed, then set up serial
{
  setUpSerial();
}

// Shift the state when the mouse is released
function mouseReleased() {
  if (game.state === 2) {
    game.state = 3;
  }
}


Arduino:

The code reads analog input from a flex sensor connected to pin A4 and controls two LEDs (green and red) connected to pins 8 and 2, respectively.

In the `loop()` function:

– The flex sensor’s analog value is read using `analogRead()` and stored in the `value` variable.

– The analog value is printed to the serial monitor using `Serial.println()`.

– If input is available from p5.js, the code reads the value and checks for specific conditions.

– Based on the brightness value, the green and red LEDs are controlled by turning them on or off using `digitalWrite()`.

The code utilizes analog input from a flex sensor to control the brightness of two LEDs connected to pins 8 and 2, based on input received from p5.js via serial communication.

Arduino Code:

//Constants:

const int flexPin = A4; // Pin A4 to read analog input
const int ledPin = 8; // Green LED pin
const int ledPin2 = 2; // Red LED pin

// Variables:
int value; // Save analog value

void setup() {
  Serial.begin(9600); // Begin serial communication
  pinMode(ledPin, OUTPUT);
  pinMode(ledPin2, OUTPUT);
}

void loop() {
  value = analogRead(flexPin); // Read analog input from flex sensor
  Serial.println(value); // Print the analog value to the serial monitor
  delay(100); // Small delay

  // Wait for input from p5.js
  while (Serial.available()) {
    int brightness = Serial.parseInt();

    if (Serial.read() == '\n') {
      // Control the LEDs based on the received brightness value
      if (brightness == 1) {
        digitalWrite(ledPin, HIGH);
        brightness = 0;
      } else {
        digitalWrite(ledPin, LOW);
      }

      if (brightness == 2) {
        digitalWrite(ledPin2, HIGH);
        brightness = 0;
      } else {
        digitalWrite(ledPin2, LOW);
      }
    }
  }
}


User Testing:


Improvements:

Difficulty Progression: Enhance the gameplay experience by implementing a progressive difficulty system. As the player progresses, introduce challenges such as faster platform movement, shorter time limits to place the stick, or additional obstacles. This will keep players engaged and provide a sense of accomplishment as they overcome increasingly difficult levels.

Power-ups: Introduce exciting power-ups or bonuses that players can collect during gameplay. These power-ups could temporarily slow down platform movement, extend the stick’s length, grant extra lives, or introduce other unique abilities. Power-ups add depth, strategy, and an element of surprise to the game, making it more enjoyable and rewarding.


What I am proud of:

I am proud in successfully bringing my initial concept to life. Creating a game that can be controlled by hand movements is truly amazing. I also quite like the game dynamic as it is very visually appealing. It has been a joy to see the enjoyment that people experience while playing the game, as it has been positively received during testing with various individuals.


Week 14 – Final Project

Project ‘Pakistani Moseeqi’ (translates to Pakistani music)

Description: A Sound Visualizing Musical Instrument

Concept and corresponding elements

A sound visualization instrument that allows you to:

    1. mix and play sounds to make your own unique music and 
    2. visualize it on the p5js screen

An ode to Pakistani music

This project pays tribute to Pakistani music by incorporating sounds from instruments that are unique to Pakistani music such as the tabla, bansuri, sitar, and veena among others. This way, I wanted to expose the NYUAD community, who will use my project, to Pakistani music while also paying tribute to my culture. 

Accessibility

With buttons, this instrument gives one the opportunity to make their own music. To make it accessible to people who are blind/visually impaired, I used a simple design with an easy-to-use interface that does not require many instructions to read. This way, someone who cannot see can still enjoy it and make their music. 

Additionally, to make it accessible to people who cannot hear, I added the sound visualization element so that they can see a unique visualization of each sound and hence, enjoy the instrument in a different way – as a visualization tool. 

Interaction design, feedback, and implementation

    • 4 momentary LED-Buttons to play 4 different sounds when pressed
    • Each button has an LED light that turns off when the button is pressed to indicate to the user that it is working
    • Each button plays a different sound when pressed. 
    • When pressed, button sends a signal to the p5js to display the animation/visualization associated with that button and sound
    • More than one button can be pressed simultaneously.
    • Turned on/off indicator led light
    • The blue ‘power’ LED on the bottom left is an indicator. When the instrument is in use, it is turned on. When not, it is off. This way, it provides indication to the user when the instrument is working and when it is not. 
    • Arduino/physical elements – contained within a cardboard box
    • 5th non momentary button/switch – this button is not momentary – it, when pressed, plays a background music. The user can then add more sound effects on top of this music. When pressed again, the button stops the music. And this can be repeated. 

P5js elements:

    • Start page – this page displays the cover and brief instructions to keep everything simple and easy to use
    • The play button leads to the music creation and sound visualization page – here, whenever a physical button is pressed, a visualization associated with the sound appears while the button is pressed
    • A slider to control volume of the sound effects from the momentary buttons (not the background music – so that the user controls the volume of the sound they “add” to the background music.
    • Inspiration: https://patatap.com/ 

Arduino Code

For the Arduino end, as mentioned, buttons and LEDs are arranged in a box. 

Inputs and Outputs:

    • From LED buttons to Arduino, which process and send information to p5 

From P5: 

    • Indication if instrument turned on/off: power LED on/off
    • LEDs to indicate if instrument is on or if any button is pressed (feedback)
const int redButtonPin = A2;
const int greenButtonPin = A1; 
const int yellowButtonPin = A3;
const int blueButtonPin = A4;
const int ledPin = 8;
const int songButtonPin = 7; 

void setup() {
  // put your setup code here, to run once:
  Serial.begin(19200);
  //pinMode(blueLedPin, OUTPUT);
  pinMode(redButtonPin, INPUT);
  pinMode(greenButtonPin,INPUT);
  pinMode(yellowButtonPin,INPUT);
  pinMode(blueButtonPin,INPUT);
  pinMode(ledPin, OUTPUT);
  pinMode(songButtonPin, INPUT);

   // start the handshake
  while (Serial.available() <= 0) {
    digitalWrite(LED_BUILTIN, HIGH); // on/blink while waiting for serial data
    Serial.println("0,0"); // send a starting message
    delay(300);            // wait 1/3 second
    digitalWrite(LED_BUILTIN, LOW); 
    delay(50);
    digitalWrite(ledPin, LOW);
  }
}

void loop() 
{
  // put your main code here, to run repeatedly:
  while (Serial.available())
  {
    digitalWrite(LED_BUILTIN, HIGH);
    //if red button pushed
    
    int redButton = digitalRead(redButtonPin);
    int greenButton = digitalRead(greenButtonPin);
    int yellowButton = digitalRead(yellowButtonPin);
    int blueButton = digitalRead(blueButtonPin);
    int songButton = digitalRead(songButtonPin);
    Serial.print(redButton);
    Serial.print(",");
    Serial.print(greenButton);
    Serial.print(",");
    Serial.print(yellowButton);
    Serial.print(",");
    Serial.print(blueButton);
    Serial.print(",");
    Serial.println(songButton);
    //delay(100);


    int light = Serial.parseInt();
    if (light == 1)
    {
      digitalWrite(ledPin, HIGH);
    }
    if (light == 0)
    {
      digitalWrite(ledPin, LOW);
    }

  }
}


P5 Sketch and Code

The P5 screen will first present very brief instructions on how to use the instrument. Once the experience begins, the screen will show a visualization of the music created using input from the sensors. 

Inputs and outputs:

    • Use inputs from buttons that Arduino sends to draw shapes/patterns on the screen
    • Display details such as volume/start instruction on the screen


let incrementCircle = true;
let greenB=true;
let blueB=true;
let yellowB=true;
let playBg1 = true;
let playStart = true;
let start = true;
let numOfCircles = 0;
let circleX = [];
let circleY = [];
let circleWidth = []
let s = 0;
let alt = true;
let mode = 'pause';
let drum, flute, sitar, veena; 
let volumeSlider; 
let vol;
function setup() {
  startSound = loadSound('audio/bubbles.mp3');
  starting = loadSound('audio/start.mp3');
  volumeSlider = createSlider(0,100);
  volumeSlider.position(650, 20);
  drum = loadSound('audio/tabla.mp3');
  flute = loadSound('audio/bansuri.mp3');
  sitar = loadSound('audio/strike.mp3');
  veena = loadSound('audio/spiral.mp3');
  bgMusic = loadSound('audio/calmBg.mp3');
  //drumA=createAudio('audio/drum.wav');
  startImg = loadImage('images/pak music.png');
  displayImg = loadImage('images/display.png');
  startMusic = loadSound('audio/clay.mp3');
  createCanvas(800, 800);
  
  angleMode(DEGREES);
  rectMode(CENTER);
  
  
} 

function draw() {

  vol = volumeSlider.value();
  drum.setVolume(vol);
  flute.setVolume(vol);
  veena.setVolume(vol);
  sitar.setVolume(vol);
  
  if (mode == 'pause')
  {
    startPage();
    
  }
  
  
  if (mode == 'play')
    {
      background(0);
      for (i = 0; i < 10; i++)
      {
      fill('#F44336A5');
      //CAN DRAW PERMANENT CIRCLES
      noStroke();
      ellipse(width/2, height/2, s+15*i, s+15*i);
      fill('rgb(126,9,9)');
      ellipse(width/2, height/2, s-i*10, s-i*10);
      }
      s = s+10;
      if (playStart == true){
           startSound.play();
        playStart = false;
      }
   
    }
    if (mode == 'drums')
    { //if button pressed, random circles 
      if (incrementCircle == false)
      { 
        playDrums();
      }
      else 
      {
        drawCircles();
      }
    }
      
      
    if (mode == 'sitar')
      {
         if (blueB == false )
          {
            background(0);
          }
        else if (blueB == true)
          {
            playSitar();
          }
      }
  
      if (mode == 'flute')
       {
         console.log(mode);
         console.log(greenB);
        if (greenB == false)
          {
            background(0);
            playFlute();

          }
        else if (greenB == true)
          {
            console.log('calling playFlute')
            playFlute();
          }
      }
      if (mode == 'veena')
      {
        if (yellowB == false)
        {
          background(0);
        }
        else if (yellowB==true)
        {
          playVeena();
        }
      }
      
  textSize(12);
      if (!serialActive) 
      {
        text("Press Space Bar to select Serial Port", 20, 30);
      } else 
      {
        text("Connected", 20, 30);
        let volumeLabel = "Volume: " + vol;
        text(volumeLabel, 600, 20 );
        //everything else goes here

      }
    
}

function readSerial(data) {
    ////////////////////////////////////
    //READ FROM ARDUINO HERE
    ////////////////////////////////////
     if (data != null) 
     {
      //console.log("data:");
       console.log(data);
       // make sure there is actually a message
       let fromArduino = split(trim(data), ",");
       // if the right length, then proceed
       if (fromArduino.length == 5) 
       {
         let redButton = int(fromArduino[0]);
         if (redButton == 1)
         {
           mode = 'drums';
           if (incrementCircle == true)
           {
             numOfCircles = numOfCircles + 1;
             circleX[numOfCircles] = random(width);
             circleY[numOfCircles] = random(height);
             circleWidth[numOfCircles] = random(100);
             incrementCircle = false;
             drum.play();
           }
         }
         else if (redButton == 0)
           {
             incrementCircle = true;
           }
         
         let greenButton = int(fromArduino[1]);
         
         if (greenButton == 1)
         {
           mode = 'flute';
           if(greenB==true)
           {
             console.log("greenb set to false");
             flute.play();
             greenB = false;
           }
         }
        else if (greenButton == 0)
        {
            greenB = true;
            console.log("greenb set to true");
        }
         
         let yellowButton = int(fromArduino[2]);
          if (yellowButton == 1)
         {
           mode = 'sitar';
           if (yellowB == true)
           {
             sitar.play();
             yellowB=false;
           }
         }
         else if (yellowButton == 0)
           {
             yellowB = true;
           }
        
         let blueButton = int(fromArduino[3]);
           if (blueButton == 1)
         {
           mode = 'veena';
           if (blueB == true)
           {
             veena.play();
             blueB=false;
           }
         }
         else if (blueButton == 0)
           {
             blueB = true;
           }
         
         let songButton = int(fromArduino[4]);
         if (songButton ==1)
           {
             console.log('here');
             if (playBg1 == true && mode == 'play')
               {
                 console.log('here1');
                 bgMusic.play();
                 playBg1 = false;
               }
           }
          else if (bgMusic.isPlaying() == true && mode == 'play' && songButton == 0)
               {
                 console.log('here2');
                 bgMusic.stop();
                 playBg1 = true;
               }
      
         
    if (greenButton == 0 && blueButton ==0 && yellowButton == 0 && redButton == 0 && mode != 'pause')
           
      {
        mode = "play";
      }         
         
  // if (playBg1==true && mode == 'play')
  //   {
  //     startMusic.play();
  //     playBg1 = false;
  //   }
  // else {
  //   //calmBg.stop();
  // }         
         /////////////////////////////////////////////////////////
/////////////////////////////////////////////////////////
       }
          //////////////////////////////////
          //SEND TO ARDUINO HERE (handshake)
          //////////////////////////////////
       let light; 
      if (mode != 'pause')
      { 
        light = 1;
      }
       else if (mode =='pause')
         {
           light =0;
         }
        let sendToArduino = light + "\n";
        writeSerial(sendToArduino);
     }
}

function startPage()
{
  
  //background('white');
  image(startImg, 0, 0, width, height);
  //fill(255);
  // textSize(64);
  // text("موسیقی",60,120);
  // textSize(20);
  // fill(0);
  // rect(width/3-10,height-50,200,60);
  
  fill(255);
  let x = mouseX;
  let y = mouseY;
  let t = x+','+y;
  text(t, mouseX, mouseY);
  //text("Press 's' to play your own music", width/3-230, height-10); 
  textSize(14);
      textStyle(NORMAL);
      text("Play, mix, and visualize Pakistani music by pressing the buttons", width/4, 3*height/4+50);
  if (mouseX >= 242 && mouseX <=558 && mouseY >=679 && mouseY <= 764)
    {
      noStroke();
      fill('#503418')
      ellipse(390,720,120,75);
      fill(255);
      textSize(38);
      //fontWeight(200);
      textStyle(BOLD);
      text("PLAY",335,734);
      
      if (mouseIsPressed)
        {
          mode='play';
        }
    }
  
}

function keyPressed() 
{
  if (key == " ") 
  {
    // important to have in order to start the serial connection!!
    setUpSerial();
    
    if (playStart==true && mode == "play")
    {
      startMusic.play();
      playStart = false;
    }
    
    startMusic.play();
  }   
  if (key == 's')
  {
    mode = "play";
  }
//   if (key =='d')
//     {
//       mode = 'drums'
//       incrementCircle = false;
//       drum.play();
//     }
// if (key == 'f')
//     {
//       mode = 'flute';
//       flute.play();
//     }
//   if (key == 'g')
//     {
//       mode = 'sitar';
//       sitar.play();
//     }
//   if (key == 'v')
//     {
//       mode = 'veena';
//       veena.play();
//     }
  
  
}

function drawCircles()
{
  noStroke();
  //fill(random(255));
  fill(240);
  for (i =0; i < numOfCircles; i++)
    {
      circle(circleX[i], circleY[i], circleWidth[i]);
    }
}

function playDrums()
{ 
  if (alt== true)
    {alt = false}
  else
  {alt =true;}
 
   background('black');
  for (i = 23; i > 0; i--)
    {
      noStroke();
      if (alt == true)
      {
        if(i%2 == 0)
        { 
          fill('white');
        }
        else 
        {
          fill('black');
        }
      }
      else 
        {
          if(i%2 == 0)
        { 
          fill('black');
        }
        else 
        {
          fill('white');
        }
        }
      ellipse(width/2, height/2, random(50*i));
    }
   fill(0);
  //ellipse(width/2,height/2,40)
}

function playFlute()
{
  console.log("here ");
  background(0);
  noFill();
  push();
  translate(width/2, height/2);
  for (let i =0; i < 200; i++)
  {
    push();
    rotate(sin(frameCount+i)*100);
    
      let r = map(sin(frameCount), -1,1,50,255);
      let g = map(cos(frameCount/2),-1,1,50,255);
      let b = map(sin(frameCount/4),-1,1,50,255);
    noFill();
    stroke(r,g,b);

    rect(0,0,800-i*2,300-i);
    
    pop(); 
  }
  pop();
}

function playSitar()
{
  noStroke();
  for (i =30; i>0; i--)
 {
   if (i%2==0)
   {
     fill(0);
   }
   else
    {
     fill(255,150,0);
    }
   square(width/2, height/2, random(50*i));
 }
}
let direction = 1;

function playVeena()
{
  background(0);
  noStroke();
  let x=random(width);
  let y=0;
  direction = random(-1,1);
    //random(0,width);
  
  //y=random(0,height);
  for (i =0; i < 3*width;i++)
    {
      x=x+direction;
      y=y+1;
      fill(random(x,x+30),random(y-20,y+10),random(y-30,y+20));
      circle(x,y,30);
    }
}

function displayScreen()
{
  image(displayImg, 0,0, width, height);
}

User testing

For the most part, the design was simple to understand for the users. The simple instruction to use buttons to play music for users to understand how to begin. Then, as they pressed each, they easily saw its connection to sound and the visualization on the p5 and used this information to improvise and process the information.  

Things that can be improved: 

The slider for volume is not as visible or clear so we can replace it with clearer labels in the future.

More buttons can be added to create an array of different sounds.

More western music can ALSO be integrated to add a cultural diversity angle to the project.

Bigger box can be used so wires and Arduino can easily be places inside

The 5th red button was, in a way, ignored by the user due to its small size and because it looked small and unimportant alongside all the led lights and buttons. This button can be replaced with something better. 

What I am proud of:

I am particularly proud of my sound visualizations. They add a dynamism and motion to the project that makes listening to each sound even more fun and interesting. The visualizations are very appealing to the eye. I am also proud that I attempted to make the instrument more accessible as this reinforced the importance of keeping accessibility in mind when designing things. 

Final Project

Main Concept

For the final project, I created a California themed car game. The physical hardware consists of a box with an arduino installed inside along with an ultrasonic sensor. There is a long road panel in front of it where the player places their NYU card keys and slides it along the road lanes to mimic the movement of a car on the road. The ultrasonic sensor detects the motion of the card along the lanes and causes the actual car in p5.js to move as well. On the screen, I decided to design the UI on a californian theme so I went with pictures and elements which depicted that concept. When the game begins, there are cars approaching the player from each lane and the player needs to move their key on the physical road to change the lane of the car on screen. With time the car speed increases and becomes more difficult. As it is a high score based game, every incoming car that is avoided is counted as one point so the ending page shows the high score and individual player score as well. As an indication of when the game has started, the green LED lights up on the box labeled “gas station” and similarly when the car crashes, red LED lights up or yellow goes off when the player is reading instructions, almost to imitate real life traffic lights. 

P5.js

In the p5.js code, I have created a game using different classes. There is the player class which deals with the movement of the player by receiving values from arduino and then mapping it according to the canvas and player position. Then there is a class for the incoming cars, which deals with the downward motion of the cars and is also passed as an argument to the player class to check if the x or y coordinates of the player coincide with those of the incoming cars, in which case the game ends as the cars crash. I created an array for the incoming cars so that they are added at a certain frameRate count and are removed from the array as soon as they go out of the canvas.

//variable declarations


let h = 600;
let w = 400;
let count = 0;
let pos = [55, 165, 270];
let charsize = 80 ; //defines size of player
let charheight = 100
let player; //variable for the player class object
let newcarssize = 100; 
let newcarswidth = 80;
let newcars = [];
let score=0;
let highscore=0;
let bonusarr = []; //array to store bonus objects
let caught = false; 
let bonuscaught = []; //
let scorebool = false;
let newchar = false; //boolean variable to help in creating new character when game starts again
let foodnum = 0; //to iterate over food array
let speedincr = 1; //for the vertical motion of newcarss
let carimg = 0;
let carspeeds = 2;

let r1=0;
let r2 =-600;
let r3 = 0;

let food = []; //array for food images

let gamestate = 'start'; //gamestate for changes in display
framewidth = 20; 

let a = 150;
let b = 300;
let c= 450;
let d = 550;

//image variables
var gif_loadImg, gif_createImg;
let pixelfont;
let startimg;
let startbutton;
let instructbutton;
let instructpage;
let endimg;
let road1, road2, road3;
let car1, car2, car3, car4, car5;
let cars = [];
let endsound, crash, backsound;
let tree;

//arduino variables
let rVal = 0;


//preload function for all the images and sound
function preload() {
    startimg = loadImage('2.png');
    startbutton = loadImage('startbutton.png');
    instructpage = loadImage('3.png');
    instructbutton = loadImage('instruct.png');
    endimg = loadImage('1.png');
    road1 = loadImage('road.png');
    road2 = loadImage('road.png');
    road3 = loadImage('road.png');
    car1 = loadImage('car1.png');
    car2 = loadImage('car2.png');
    car3 = loadImage('car3.png');
    car4 = loadImage('car4.png');
    car5 = loadImage('car5.png');
    tree = loadImage('tree.png');
  
    endsound = loadSound('endsound.mp3');
    crash = loadSound('crash.mp3');
    backsound = loadSound('background.mp3');
    

}


//====================================================
//class for the player object
class Character{
  constructor(){
    this.x = 5+ width/2-(charsize/2);
    this.y = height - ((charsize));
    this.speed = 4; //speed for the movement of player horizontally

  }
  
  display(){

    image(car2, this.x, this.y-10, charsize, charheight ); 


  }
  moveleft(){ //if left key is pressed, causes player to move left
    this.x -= this.speed;

    if (this.x < 0) {
      this.x = 0; //so player does not go beyond the canvas
    }
  }
  moveright(){ //if right key is pressed, causes player to move left
    this.x+=this.speed;

    if (this.x+charsize > width) {
      this.x = width-charsize; //so player does not go beyond the canvas
    }
  }
  update(newcars){
    
    if(rVal < 7){
      this.x = 55;
    }
    else if(rVal>=7 && rVal<14 ){
      this.x = 165;
    }
    else if(rVal >= 14){
      this.x = 270;
    }


        if(this.x>=newcars.x && this.x <= newcars.x+(newcars.pwidth) && this.y>=newcars.y &&  this.y<=newcars.y+ newcars.pheight){
          count++;

      console.log("Loss:" , count);
          crash.play();
          gamestate = 'over';
        

    }
    else if(this.x+charsize >=newcars.x && this.x+charsize <= newcars.x+(newcars.pwidth) && this.y>=newcars.y &&  this.y<=newcars.y+ newcars.pheight){
      count++;

      console.log("Loss:" , count);
      crash.play();
      gamestate = 'over';
            
            }
    
    else if(this.x>=newcars.x && this.x <= newcars.x+(newcars.pwidth) && this.y+charheight>=newcars.y &&  this.y+charheight<=newcars.y+newcars.pheight){
      
          count++;
      crash.play();

          console.log("Loss:" , count);
      gamestate = 'over';
            }


  }


}
//====================================================
//class to create newcarss
class incars{
  constructor(carimg, carspeeds){
    this.x = random(pos);
    this.y = 0;
    this.pwidth = newcarswidth;
    this.pheight = newcarssize;
    this.speed = carspeeds;
    this.num = carimg
    
  }
  
  displaynewcars(){
 
     image(cars[this.num], this.x, this.y , this.pwidth, this.pheight);
  }


  //causes newcars to move upwards
  update(){
    this.y += this.speed;

  }
  
  
}


function setup() {
  
  createCanvas(w,h);
  
  background(220);
  player = new Character();
  cars = [car1, car2, car3, car4, car5];


}

function draw() {
  if(frameCount == 1){
    backsound.play();
  }
  background(220);
   if (!serialActive) 
  {
    text("Press Space Bar to select Serial Port", 20, 30);
  } else 
  {

  }


  if(gamestate == 'start'){ //if game is at start page then display homepage


    startpage();


  }
  //if gamestate is of 'game' then plays the game through thegame() function
  else if(gamestate == 'game'){
        image(road1,  0,r1, width, height, 0, 0, road1.width, road1.height); //homepage image displayed
    image(road1, 0,r2,  width, height, 0, 0, road1.width, road1.height);
    
    r1+=2;
    r2+=2;

    if(r1 >= height){
      r1 = r2- height ;
    }
    if(r2>= height){
      r2 = r1-height ;
    }


  thegame(); //plays game through this function
    a++;
    b++;
    c++;
    d++;
    
       image(tree,  -75,a, 150, 150, 0, 0, tree.width, tree.height);
        image(tree,  -75,b, 150, 150, 0, 0, tree.width, tree.height);
            image(tree,  width-60,c, 150, 150, 0, 0, tree.width, tree.height);
        image(tree,  width-60,d, 150, 150, 0, 0, tree.width, tree.height);
    
    if(a > height+150){
      a = -150;
    }
    else if(b> height+150){
      b = -150;
    }
    else if(c> height+150){
      c = -150;
    }
        else if(d> height+150){
      d = -150;
    }


  }
  
  else if(gamestate == 'over'){ //if gamestate is over then end page displayed 


    image(endimg, 0, 0, width, height, 0, 0, endimg.width, endimg.height);

  endpage();
   
    
  }
  else if(gamestate == 'instructions'){ //displays instructions 
    instructionspage();

  }
}
//========================
function thegame(){ 

 
   //checks if game is started again and creates a new player to play the game again
    if(newchar == true){
     player = new Character();
    newchar = false;
  }


  //for keys to move the player
  if(keyIsDown(LEFT_ARROW)){
    player.moveleft();
  }
  else if (keyIsDown(RIGHT_ARROW)){
    player.moveright();
  }


  //for new newcars and elements to be created and added to their arrays
  if(frameCount%150 == 0){

    newcars.push(new incars(carimg, carspeeds));

    score++;
    console.log(score);
    carimg++;
    if(carimg>4){
      carimg = 0;
    }
    
 
  }


  //FOR LOOP
  for(let i = 0 ; i<newcars.length ; i++){
    //shows newcarss and updates their positions by decreasing y coordinated to move them up
    newcars[i].displaynewcars();
    
    newcars[i].update();


    //when newcars and food goes beyond the roof, they are removed from their arrays 
    if (newcars[i].y > height+400 ){
      newcars.splice(i, 1);
      // bonusarr.splice(i, 1);
      // bonuscaught.splice(i,1);
 

    }
    
    //Player's position checked against newcars and ladder's position
    player.update(newcars[i]);

    newcars[i].update();//moves it up
    
    
  }
  
  player.display(); 
  
  //END of FOR


}

//==============================

function startpage(){ //function to display the images of starting page
    image(startimg, 0, 0, width, height, 0, 0, startimg.width, startimg.height);


    imageMode(CENTER);
      image(startbutton, width/2, height/2, map(startbutton.width, 0, startbutton.width, 0, width/4), map(startbutton.height, 0, startbutton.height, 0, height/6));

    imageMode(CORNER);

    //checks if mouse pressed on the button and directs to instructions
    if(mouseX < width/2 + (width/(width/100)/2) && mouseX > width/2 - (width/(width/100)/2) && mouseY > height/2 - (height/(height/100)/2) && mouseY < height/2 + (height/(height/100)/2) && mouseIsPressed){
      gamestate = 'instructions';
      // success.play();
    }
  
}


function endpage(){ //function to display score and highscore and 'game over' page


  for(let i = 0 ; i<newcars.length ; i++){
      newcars.pop();
      bonusarr.pop();
      bonuscaught.pop();
  }
  newchar = true;
  
  if(score>highscore){ //updates the highscore with each previous score 
    highscore = score;
  }

  textAlign(CENTER);
  textFont('Times New Roman');
  fill("#FAF8F4");
  textSize(0.05*width);
  text('Score: '+score , width/2, (height/2)-58);
  text('High Score: '+highscore , width/2, ((height/2))-40);

  
  if(keyIsDown(ENTER)){ //when ENTER is pressed, gamestate changed so that game starts again
    gamestate = 'start';
    score= 0 ;
  }

}

function instructionspage(){ //displays instruction images 
  
  image(instructpage, 0, 0, width, height, 0, 0, instructpage.width, instructpage.height);
  

  image(instructbutton, (2.3*width)/4, (3.3*height)/3.7, map(instructbutton.width, 0, instructbutton.width, 0, 150), map(instructbutton.height, 0, instructbutton.height, 0, 50));
  
  //checks if mouse clicked on the button and continues to game state of playing the game
  if(mouseX>(2.3*width)/4 && mouseX < width && mouseY > (3.3*height)/3.7 && mouseY < height && mouseIsPressed){
    gamestate = 'game';
    //success.play();
  }


}


//====================
//ARDUINO


function keyPressed() {
  if (key == " ") 
  {
    // important to have in order to start the serial connection!!
    setUpSerial();
  }
}
function mouseIsPressed()
{
  readSerial();
}

// This function will be called by the web-serial library
// with each new line of data. The serial library reads
// the data until the newline and then gives it to us through
// this callback function
function readSerial(data) {
  ////////////////////////////////////
  //READ FROM ARDUINO HERE
  ////////////////////////////////////

  if (data != null) 
  {
    rVal = data;
  }
  
  //=============
  let sendToArduino=0;
  if(gamestate == 'game'){
    sendToArduino = 1;
  }
    else if(gamestate == 'instructions' || gamestate == 'start'){
    sendToArduino = 2;
  }
      else if(gamestate == 'over'){
    sendToArduino = 3;
  }
  sendToArduino = sendToArduino+"\n";
    
    writeSerial(sendToArduino);
}


Arduino

In arduino, the main component is the ultrasonic sensor and then the LEDs. I have set the trig and echo pins as well as the LED pins initially. The connection between arduino and p5.js is in sending data from the ultrasonic sensor when the card is moved in front of it. The data is read by p5.js and is then used to control the x-coordinate of the player car. The p5.js sends the data regarding the game states which controls the LED pins. The data is sent as an integer, each indicating the game state, and is then used to control the respective LEDs. I soldered the LEDs so I could fix it on top of the box. 


I was facing an issue with consistent readings from the ultrasonic sensor. As it sends out signals in a more spread out manner and reads very minor changes, the car was glitching because slightest tilt of the card was also causing the ultrasonic sensor to change values. I had to add a bit more delay to make sure the card movement has stabilized before the sensor reads its distance.

const int trigPin = 9;
const int echoPin = 10;
const int ledgreen = 2;
const int ledyellow= 4;
const int ledred = 7;
// defines variables
long duration;
int distance;
void setup() {
  pinMode(trigPin, OUTPUT); // Sets the trigPin as an Output
  pinMode(echoPin, INPUT); // Sets the echoPin as an Input
  Serial.begin(9600); // Starts the serial communication
  pinMode(ledgreen, OUTPUT);
  pinMode(ledyellow, OUTPUT);
  pinMode(ledred, OUTPUT);
}
void loop() {
  // Clears the trigPin
  digitalWrite(trigPin, LOW);
  delayMicroseconds(2);
  // Sets the trigPin on HIGH state for 10 micro seconds
  digitalWrite(trigPin, HIGH);
  delayMicroseconds(10);
  digitalWrite(trigPin, LOW);
  // Reads the echoPin, returns the sound wave travel time in microseconds
  duration = pulseIn(echoPin, HIGH);
  // Calculating the distance
  distance = duration * 0.034 / 2;
  // Prints the distance on the Serial Monitor
  //Serial.print("Distance: ");
  Serial.println(distance);
  
  //Serial.write(distance);


    int brightness = Serial.parseInt();
    if(Serial.read() == '\n')
{
      //Serial.println(brightness);
      if(brightness == 1){
        digitalWrite(ledgreen, HIGH);
        digitalWrite(ledyellow, LOW);
        digitalWrite(ledred, LOW);
      }
      else if(brightness == 2){
        digitalWrite(ledyellow, HIGH);
        digitalWrite(ledgreen, LOW);
        digitalWrite(ledred, LOW);
      }
      else if(brightness == 3){
        digitalWrite(ledred, HIGH);
        digitalWrite(ledgreen, LOW);
        digitalWrite(ledyellow, LOW);
      }
    
    
    }
    delay(300);
    //analogWrite(ledgreen, brightness);
  }


Future improvements

I feel like there is a lot that could still be improved. I think the first thing would be to add vertical motion to the car, I was unable to implement it because the ultrasonic sensor detects horizontal distance changes only so it was a bit difficult to manage both the axes. Another factor would be to change the sensor to infrared which would solve the problem of inconsistent readings because infrared sensors send signals in a direct line while ultrasonic sensors send them spread out so the accuracy of readings would be improved. I would also like to add button to the Arduino such as buttons to turn the music on or off and also for the port selection, which I was unable to implement as well.