Final – SpongBlob

Concept:

When I look at how F1 drivers train their reflexes, one of the machines inspired me to create this game. However, this game is not to train your reflexes but your memory. Inspired by this, my project, “SpongBlob” aims to enhance users’ color memory skills through an interactive game developed using Arduino and p5.js. This game not only serves as an entertaining experience but also as an educational tool to study color perception and memory. The game is also aimed for kids who are at risk of losing their focus span to the developing social media and short video world, which makes this game a tool for them to gain their focus back. This inspired the SpongeBob theme, so that it is more kid friendly.

Game setup:

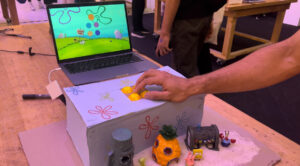
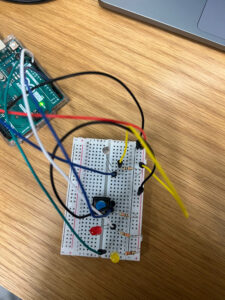
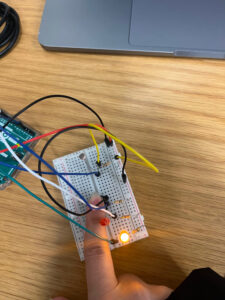
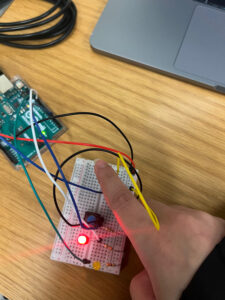
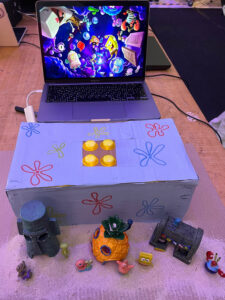
The game has an interactive set up with 4 buttons replacing the keys on the keyboard. By pressing the buttons, the players are interacting with the game on the P5 sketch. This is shown in the following pictures:

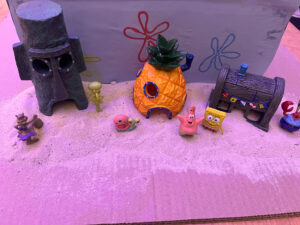
As shown in the picture, the aesthetics of the game are really important especially since this game is also targeting kids. Having a nice set up of “Bikini Bottom” was really important in my opinion to make sure that the game is not just functioning well but also looks appealing to the players.

The use of these buttons makes it so much easier than the keyboard according to the users that tested the game. Moreover, when user testing, most of the students suggested having a less hectic and messy background so that the player can focus and memorize the colors of the circles without getting distracted by the background. There was some debate over whether the users should get to see the score they achieved or not. Since it is a memory game, I thought the players should focus more on memorizing and enhancing their focus span than focus on the score, so I did not make it visible to the players.

P5 Sketch Full Screen Link: https://editor.p5js.org/jana_mohsen/full/Vymgnruow

Code:

// Define pin numbers for buttons
const int leftButtonPin = 2;
const int upButtonPin = 3;
const int downButtonPin = 4;
const int rightButtonPin = 5;

void setup() {
  Serial.begin(9600);
  // Set button pins as inputs
  pinMode(leftButtonPin, INPUT);
  pinMode(upButtonPin, INPUT);
  pinMode(downButtonPin, INPUT);
  pinMode(rightButtonPin, INPUT);
}

void loop() {
  // Read button states and send data over serial
  int leftButton = digitalRead(leftButtonPin);
  int upButton = digitalRead(upButtonPin);
  int downButton = digitalRead(downButtonPin);
  int rightButton = digitalRead(rightButtonPin);

  // Send button states to serial
  Serial.print(leftButton);
  Serial.print(",");
  Serial.print(upButton);
  Serial.print(",");
  Serial.print(downButton);
  Serial.print(",");
  Serial.println(rightButton);

  // Delay to control the rate of data transmission
  delay(100);
}


This Arduino sketch manages four buttons connected to the board, using pins 2, 3, 4, and 5 for left, up, down, and right buttons respectively. The setup() function initializes serial communication at 9600 baud and sets the button pins to input mode. The loop() function continuously reads the state of each button using digitalRead() and sends these states over the serial connection using Serial.print(). Each button state is outputted sequentially and separated by commas, with a newline at the end of each set via Serial.println(). A delay(100) is included to control the rate of data transmission, preventing data overflow and ensuring manageable communication speeds.

function drawGamePage() {
  //song.play();
  background(backgroundImage);
  if (currentPage == 2 || currentPage == 3) {
    let selected = -1;

    // Map arrow keys to grid positions
    if (ArrowUp == 1 && ButtonPressed == 0) {
      selected = 0; // Top-left
      ButtonPressed = 1;
    } else if (ArrowDown == 1 && ButtonPressed == 0) {
      selected = 1;
      ButtonPressed = 1; // Top-right
    } else if (ArrowRight == 1 && ButtonPressed == 0) {
      selected = 2;
      ButtonPressed = 1; // Bottom-left
    } else if (ArrowLeft == 1 && ButtonPressed == 0) {
      selected = 3;
      ButtonPressed = 1; // Bottom-right
    } else if (
      ArrowLeft == 0 &&
      ArrowRight == 0 &&
      ArrowUp == 0 &&
      ArrowDown == 0
    ) {
      ButtonPressed = 0;
    }

    // Check if the selected color matches the currentColor
    if (selected != -1) {
      if (gridColors[selected] == currentColor) {
        prepareNextLevel();
      } else {
        currentPage = -1;
      }
    }
  }

  fill(nextColor);
  ellipse(windowWidth / 2, 200, 120, 120);
  let padding1 = windowWidth / 2 - 75;
  let padding2 = windowHeight / 2 - 100;
  for (let i = 0; i < gridSize; i++) {
    for (let j = 0; j < gridSize; j++) {
      fill(gridColors[i * gridSize + j]);
      ellipse(
        padding1 + j * (ellipseSize + 50),
        padding2 + i * (ellipseSize + 50),
        ellipseSize,
        ellipseSize
      );
    }
  }
}

function drawOverPage() {
  //laugh.play();
  background(gameOverImage);
  textAlign(CENTER, CENTER);
  textSize(32);
  fill(0);
  text("Game Over", width / 2, height / 2 - 100);

  // Draw "Again" button
  fill(200); // Light grey button background
  rect(width / 2 - 100, height / 2, 200, 50);
  fill(0); // Black text
  text("Again", width / 2, height / 2 + 25);

  // Draw "Home" button
  fill(200); // Light grey button background
  rect(width / 2 - 100, height / 2 + 70, 200, 50);
  fill(0); // Black text
  text("Home", width / 2, height / 2 + 95);
}

function drawInstructionPage() {
  //song.play();
  background(instructionsImage); 
  fill(0);
  textSize(24);
  textAlign(LEFT, LEFT);
  text("Instructions", width - 810, height - 710);
  textSize(16);
  text("Welcome to the Memory Game! Here's how to play:", width - 840, height - 655);
  text("1. Memorize the colors shown on top of the screen.", width - 840, height - 625);
  text("2. Use the buttons to select the correct color from the grid.", width - 840, height - 595);
  text("3. Match the colors correctly to advance to the next level.", width - 840, height - 565);
  text("Press Space Bar to select Serial Port", width - 840, height - 535);
  textAlign(CENTER, CENTER);
  rect(width - 780, height / 2 - 40, 80, 40);
  fill(200);
  text("Continue", width - 740, height / 2 - 20);
}


function draw() {
  background(220);
  if (!serialActive) {
    text("Press Space Bar to select Serial Port", 20, 30);
  } else {
    text("Connected", 20, 30);
  }

  if (currentPage == 0) {
    drawStartPage();
  } else if (currentPage == 1) {
    drawInstructionPage();
  } else if (currentPage == 2) {
    drawFirstPage();
  } else if (currentPage == 3) {
    drawGamePage();
  } else if (currentPage == -1) {
    drawOverPage();
  }
}


The P5 sketch code is maily about the game page which has the conditions that make the game more interesting. The drawGamePage() function in this p5.js code is designed for a memory game, where it handles the game logic and user interactions during gameplay. It first sets the background and checks if the game is on specific pages (like a game level). The function maps arrow key inputs to grid selections, managing state with a ButtonPressed flag to avoid repeated selections. If a selected color from the grid matches a target color (currentColor), the game progresses to the next level; otherwise, it switches to a game over page. It dynamically renders colored ellipses on a grid, representing game elements. Additionally, other functions like drawOverPage() handle the game over screen, displaying buttons for restarting or returning to the home screen, and drawInstructionPage() displays the game instructions. The main draw() function coordinates these pages based on the current game state, updating the display and handling transitions between different parts of the game, such as starting, instructions, gameplay, and game over scenarios.

Aspects of the project I am proud of:

Game Logic Implementation: The effective mapping of user inputs (arrow keys) to game actions and the incorporation of game state management ensures that the gameplay is both challenging and engaging.

Serial Communication: The use of serial communication to connect Arduino inputs to the p5.js game logic demonstrates a robust application of cross-platform communication techniques, vital for interactive media projects.

Areas for Future Improvement:

Complexity and Features: Introducing additional levels of difficulty, more complex game mechanics, or multiplayer capabilities could increase the game’s replay value and appeal to a broader audience. Also having new shapes, characters to memorize and not just the circles can be fun!

Extensive Testing and Debugging: Conducting more thorough testing across different platforms and setups could identify and resolve any existing bugs or issues with user interactions, ensuring a smooth and reliable user experience.

Week 12 Assignment – Jana and Rashed

Exercise 1: 

P5 code:

let rVal = 0;
let alpha = 255;
let left = 0; // True (1) if mouse is being clicked on left side of screen
let right = 0; // True (1) if mouse is being clicked on right side of screen

function setup() {
  createCanvas(640, 480);
  textSize(18);
}

function draw() {
  // one value from Arduino controls the background's red color
  background(255)

  // the other value controls the text's transparency value
  fill(255, 0,0)

  if (!serialActive) {
    text("Press Space Bar to select Serial Port", 20, 30);
  } else {
    text("Connected", 20, 30);
    // Print the current values
    text('rVal = ' + str(rVal), 20, 50);
    text('alpha = ' + str(alpha), 20, 70);
  }

  // click on one side of the screen, one LED will light up
  // click on the other side, the other LED will light up
  if (mouseIsPressed) {
    if (mouseX > rVal-50 && mouseX < rVal+50 && mouseY > height/2-50 && mouseY < height/2+50) {
      right = 1;
    } 
  } else {
    right = 0;
  }
  ellipse(rVal, height/2, 50,50)
}

function keyPressed() {
  if (key == " ") {
    // important to have in order to start the serial connection!!
    setUpSerial();
  }
}

// This function will be called by the web-serial library
// with each new line of data. The serial library reads
// the data until the newline and then gives it to us through
// this callback function
function readSerial(data) {
  ////////////////////////////////////
  //READ FROM ARDUINO HERE
  ////////////////////////////////////

  if (data != null) {
    // make sure there is actually a message
    // split the message
    let fromArduino = split(trim(data), ",");
    // if the right length, then proceed
    if (fromArduino.length == 2) {
      // only store values here
      // do everything with those values in the main draw loop
      
      // We take the string we get from Arduino and explicitly
      // convert it to a number by using int()
      // e.g. "103" becomes 103
      rVal = int(fromArduino[0]);
      alpha = int(fromArduino[1]);
    }

    //////////////////////////////////
    //SEND TO ARDUINO HERE (handshake)
    //////////////////////////////////
    let sendToArduino = left + "," + right + "\n";
    writeSerial(sendToArduino);
  }
}

We did not face any big issue in this part. We just added the ellipse and changed its position to rVal, height/2.

Video:

Exercise 2: 

P5 code:

let rVal = 0;
let alpha = 255;
let left = 0; // True (1) if mouse is being clicked on left side of screen
let right = 0; // True (1) if mouse is being clicked on right side of screen

function setup() {
  createCanvas(640, 480);
  textSize(18);
}

function draw() {
  // one value from Arduino controls the background's red color
  background(map(rVal, 0, 1023, 0, 255), 255, 200);

  // the other value controls the text's transparency value
  fill(255, 0, 255, map(alpha, 0, 1023, 0, 255));

  if (!serialActive) {
    text("Press Space Bar to select Serial Port", 20, 30);
  } else {
    text("Connected", 20, 30);
    // Print the current values
    text('rVal = ' + str(rVal), 20, 50);
    text('alpha = ' + str(alpha), 20, 70);
  }


function keyPressed() //built in function
{
  if (key == " ") //if space is pressed then
  {
    setUpSerial(); //setup the serial. 
  }
  else if (keyCode == DOWN_ARROW)
  {
    if (right != 0)
    {
      right = right - 20;
    }
  }
  else if (keyCode == UP_ARROW)
  {
    if (right != 250)
    {
      right = right + 20;
    }
  }
}
  }

// This function will be called by the web-serial library
// with each new *line* of data. The serial library reads
// the data until the newline and then gives it to us through
// this callback function
function readSerial(data) {
  ////////////////////////////////////
  //READ FROM ARDUINO HERE
  ////////////////////////////////////

  if (data != null) {
    // make sure there is actually a message
    // split the message
    let fromArduino = split(trim(data), ",");
    // if the right length, then proceed
    if (fromArduino.length == 2) {
      // only store values here
      // do everything with those values in the main draw loop
      
      // We take the string we get from Arduino and explicitly
      // convert it to a number by using int()
      // e.g. "103" becomes 103
      rVal = int(fromArduino[0]);
      alpha = int(fromArduino[1]);
    }

    //////////////////////////////////
    //SEND TO ARDUINO HERE (handshake)
    //////////////////////////////////
    let sendToArduino = left + "," + right + "\n";
    writeSerial(sendToArduino);
  }
}

Arduino code for Exercise 1 and 2:

int leftLedPin = 2;
int rightLedPin = 5;

void setup() {
  // Start serial communication so we can send data
  // over the USB connection to our p5js sketch
  Serial.begin(9600);

  // We'll use the builtin LED as a status output.
  // We can't use the serial monitor since the serial connection is
  // used to communicate to p5js and only one application on the computer
  // can use a serial port at once.
  pinMode(LED_BUILTIN, OUTPUT);

  // Outputs on these pins
  pinMode(leftLedPin, OUTPUT);
  pinMode(rightLedPin, OUTPUT);

  // Blink them so we can check the wiring
  digitalWrite(leftLedPin, HIGH);
  digitalWrite(rightLedPin, HIGH);
  delay(200);
  digitalWrite(leftLedPin, LOW);
  digitalWrite(rightLedPin, LOW);


  // start the handshake
  while (Serial.available() <= 0) {
    digitalWrite(LED_BUILTIN, HIGH); // on/blink while waiting for serial data
    Serial.println("0,0"); // send a starting message
    delay(300);            // wait 1/3 second
    digitalWrite(LED_BUILTIN, LOW);
    delay(50);
  }
}

void loop() {
  // wait for data from p5 before doing something
  while (Serial.available()) {
    digitalWrite(LED_BUILTIN, HIGH); // led on while receiving data

    int left = Serial.parseInt();
    int right = Serial.parseInt();
    if (Serial.read() == '\n') {
      digitalWrite(leftLedPin, left);
      digitalWrite(rightLedPin, right);
      int sensor = analogRead(A0);
      delay(5);
      int sensor2 = analogRead(A1);
      delay(5);
      Serial.print(sensor);
      Serial.print(',');
      Serial.println(sensor2);
    }
  }
  digitalWrite(LED_BUILTIN, LOW);
}

Challenges:

We tried to get the light to decrease its brightness every time the person would click on the left side of the screen and for the brightness to increase whenever the person clicks on the right side of the screen. The code was correct, but for some reason it was not working. So, it might be something with the bulb or the Arduino itself. However, the light does take around 4 clicks on both sides of the screen to turn off or on so, we would consider that a success.

Video:

Exercise 3: 

P5 code:

let dragForce = 0.99;
let mass = 20;
let ledState = 0;
let velocity;
let gravity;
let position;
let acceleration;
let wind;
let force;
let bounced = false;


function setup() {
  createCanvas(640, 480);
  textSize(18);
  position = createVector(width / 2, 0);
  velocity = createVector(0, 0);
  acceleration = createVector(0, 0);
  gravity = createVector(0, 0.3 * mass);
  wind = createVector(0, 0);
}

function draw() {
  
  background(255);

  if (!serialActive) {
    text("Press Space Bar to select Serial Port", 20, 30);
  } else {
    text("Connected", 20, 30);

    noStroke();
    force = p5.Vector.div(wind, mass);
    acceleration.add(force);
    force = 0;
    force = p5.Vector.div(gravity, mass);
    acceleration.add(force);
    force = 0;
    velocity.add(acceleration);
    velocity.mult(dragForce);
    position.add(velocity);
    acceleration.mult(0);

    ellipse(position.x, position.y, mass, mass);
    if (position.y > (height - mass / 2)-30 ) {
      velocity.y *= -0.9;
      position.y = (height - mass / 2)-30;
      ledState= 1;
      
      if (!bounced) {
        fill('blue'); // Red when just bounced
        bounced = true; // Update bounce state
      } else {
        fill('red'); // White otherwise
        bounced = false; // Reset bounce state
      }
    } else {
      ledState = 0;
    }
  
    
  }

  rect(0,height-30,width,30);
  
}

function keyPressed() {
  if (key == " ") {
    // important to have in order to start the serial connection!!
    setUpSerial();
  }
}
function readSerial(data) {
  if (data != null) {
    // make sure there is actually a message
    // split the message
    let fromArduino = split(trim(data), ",");
    // if the right length, then proceed
    if (fromArduino.length == 1) {
      let windCurrent = int(fromArduino[0]);
      wind.x = map(windCurrent, 0, 1023, -1, 1);
    }

    //////////////////////////////////
    //SEND TO ARDUINO HERE (handshake)
    //////////////////////////////////
    let sendToArduino = ledState + "\n";
    writeSerial(sendToArduino);
  }
}

Arduino code:

int ledPin = 10;
int potPin = A0;

void setup() {
  Serial.begin(9600);

  pinMode(LED_BUILTIN, OUTPUT);

  // Outputs on these pins
  pinMode(ledPin, OUTPUT);

  // start the handshake
  while (Serial.available() <= 0) {
    digitalWrite(LED_BUILTIN, HIGH); // on/blink while waiting for serial data
    Serial.println("0"); // send a starting message
    delay(300);            // wait 1/3 second
    digitalWrite(LED_BUILTIN, LOW);
    delay(50);
  }
}

void loop() {
  // wait for data from p5 before doing something
  while (Serial.available()) {
    digitalWrite(LED_BUILTIN, HIGH); // led on while receiving data

    int right = Serial.parseInt();
    if (Serial.read() == '\n') {
      digitalWrite(ledPin, right);
      int potValue = analogRead(potPin);
      delay(5);
      Serial.println(potValue);
    }
  }
}

Challenges:

Everything went smoothly when writing the code. However, when we would click the play button to see the sketch, it would give us the error: “setUpArduino is not defined”. So, we spent countless minutes searching for something that was not there. After looking at the professors week 12 example on serial connection, we realized that we have forgotten the tab that would connect P5 to Arduino. So we just added that and it worked.

Video:

very very cute :3


Week 11 Assignment – The Orquid

Concept:

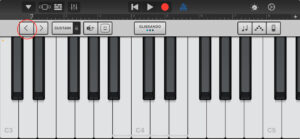
For this assignment, we wanted to go with something simple. Rashed is known for his love for music so I was excited to see what we would come up with. During our brainstorming session, Rashed was doing his hobby – which is music production- on his phone on GarageBand and he noticed how he had to click on the “arrow” button to change the pitch of the piano and we decided we wanted to do something like that but with the potentiometer.

The pitch-changing arrow I was referring to on GarageBand:

Materials used:

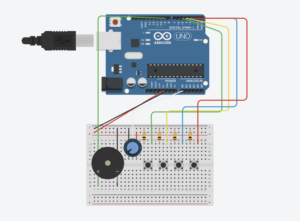
  • x11 Wires
  • x4 Buttons
  • x4 10k Resistors
  • x1 Buzzer
  • x1 Potentiometer

Production:

Writing this code was pretty challenging for us as both of us are still adapting to this new language.

We used the toneMelody example from the examples folder that we used in class to take the “pitches.h” tab from it in order to give a specific range. We collectively decided to have the buttons, by default, be the most basic notes “Do, Re, Me, Fa” also known as “NOTE_C4, NOTE_D4, NOTE_E4, NOTE_F4” which was pretty simple to implement.

However, we faced one major issue:

For some reason, the potentiometer would not cooperate at all. The buttons were working fine, but the pitch won’t budge. We, unfortunately, had to use ChatGPT to help us but it was still very helpful in helping us understand what we were doing wrong.

Here’s the code:

#include "pitches.h"

const int speakerPin = 9;  // Speaker connected to pin 9
int buttonPins[] = {2, 3, 4, 5};  // Button pins for notes
int potPin = A0;  // Potentiometer connected to A0

// Initialize an array of notes that will be used depending on the button press
int noteIndices[] = {NOTE_C4, NOTE_D4, NOTE_E4, NOTE_F4};  // Starting notes for each button

void setup() {
  for (int i = 0; i < 4; i++) {
    pinMode(buttonPins[i], INPUT_PULLUP);  // Setup button pins as input with pull-up resistor
  }
  pinMode(speakerPin, OUTPUT);  // Set speaker pin as output
}

void loop() {
  int potValue = analogRead(potPin);  // Read the current value from the potentiometer
  int noteRange = NOTE_C6 - NOTE_C4;  // Define the range of notes to span
  int noteOffset = map(potValue, 0, 1023, 0, noteRange);  // Map potentiometer value to note range
  
  for (int i = 0; i < 4; i++) {
    if (digitalRead(buttonPins[i]) == LOW) {  
      int noteToPlay = noteIndices[i] + noteOffset;  
      tone(speakerPin, noteToPlay);  // Play the note on the speaker
      delay(200);  // A short delay to help debounce the button
      while (digitalRead(buttonPins[i]) == LOW);  // Wait for button release
      noTone(speakerPin);  // Stop the note
    }
  }
}


Here’s the video where we use it:

Reflection:

I think, despite chatGPT’s involvement in this, we did pretty well; the concept was there, the energy and effort that was put into this is there and we’re both proud of our little creation. However, we both do with we took it a step further and maybe added more buttons or tried to use the sensor instead of the potentiometer. We really hope to get used to and adapt to this language.

Week 10 Reading Reflection

Reflection on “Physical Computing’s Greatest Hits (and misses)”

In “Physical Computing’s Greatest Hits (and misses),” the complex interplay between user interaction and physical computing physics is masterfully broken down. The article examines the ways in which different initiatives seek to build a connection between digital response and human engagement. The investigation of technologies that aid in meditation strikes me as particularly noteworthy. Being a tech and mindfulness fan, I find it fascinating and a little frightening that an essentially qualitative experience can be quantified. Are these devices making the spiritual journey better, or are they just turning it into a set of numbers? This query calls for a more thorough examination of technology’s place in settings that are often designated for pure human experience.

“Digital Wheel Art,” another noteworthy initiative that was highlighted, demonstrates how technology may democratize the creation of art, particularly for people with restricted mobility. It serves as a sobering reminder that technological accessibility is a bridge to equality and self-expression rather than merely a feature. This, together with the creative Sign Language gloves, strengthens my conviction that technology, when used carefully, can serve as a potent force for inclusion rather than just serving a practical purpose.

These illustrations highlight a more general insight that was brought to light by the reading: interactive installations are more than just impressive technical feats; they also reveal human stories and arouse feelings. Therefore, interactive art’s value lies not only in its technological prowess but also in its capacity to speak to our common humanity and elicit a wide range of emotions.

Reflection on “Making Interactive Art: Set the Stage, Then Shut Up and Listen”

With regard to the function of the artist in the age of interactive media, “Making Interactive Art: Set the Stage, Then Shut Up and Listen” presents an interesting perspective. According to the reading, interactive art ought to be a conversation rather than a monologue—a platform for engagement rather than only observation. This speaks to me, especially when it comes to the fear that an artist may have that their creations would be misinterpreted or inappropriately used. The act of giving up control and letting the audience add their own interpretations to the work is evidence of the transformational potential of art.

The spectrum of engagement that creators struggle with is highlighted by the tension between interaction and set narrative, such as that seen in video games or visual novels. These media contest the idea that interactive equals natural, unscripted experiences, proposing instead that the audience’s interpretation and the artist’s intention are complementary elements of a nuanced dialogue.

Thinking about this makes me wonder about the fine line that all artists have to walk. In order to create an environment where art and audience can collaboratively generate meaning, curation involves more than just designing the experience. It also involves managing the lack of direction. It’s a subtle, yet audacious, gesture of faith in the audience’s ability to connect with the work of art, giving each encounter a distinct personality. My comprehension of interactive art has grown as a result of this study, and I now have a greater respect for the bravery and vulnerability that these works of art require.

Week 10 Assignment – light sensor

This projects concept is related to automatic lights, where a sensor detects the amount of light in its surroundings and according to it, it switches lights on and off. So for this assignment, I decided to implement this technique:

This is the code that I used to implement this method:

int photoSensorPin = A0;
int buttonPin = 2;
int ledPin1 = 9;
int ledPin2 = 10;
void setup() {
  pinMode(photoSensorPin, INPUT);
  pinMode(buttonPin, INPUT);
  pinMode(ledPin1, OUTPUT);
  pinMode(ledPin2, OUTPUT);
}
void loop() {
  int sensorValue = analogRead(photoSensorPin);
  int buttonState = digitalRead(buttonPin);
  if (buttonState == HIGH) {
    digitalWrite(ledPin1, LOW);
    digitalWrite(ledPin2, HIGH);
  } else if (sensorValue < 512) {
    digitalWrite(ledPin1, HIGH);
    digitalWrite(ledPin2, LOW);
  } else {
    digitalWrite(ledPin1, LOW);
    digitalWrite(ledPin2, LOW);
  }
}


Week 9 Assignment – Unusual Switch – Cheers

Inspiration

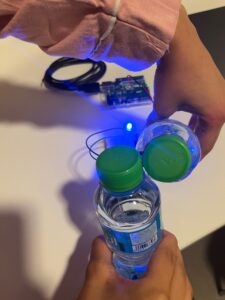
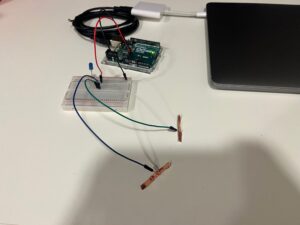
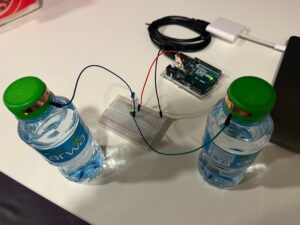
I first thought that it would be hard to find a case to switch the light bulb on without my hands but then the inspiration came to me when my friend sent me this emoji: 🥂. So I thought I could use water bottles to connect the circuit and switch on the light bulb. Which resulted in this:

Materials

    • A 330-ohm resistor
    • 1 LED light
    • A breadboard
    • One red and two black jumper wires
    • An Arduino board with a 5V and GND output
    • Cooper tape
    • Water bottles

Process and Results

Assignment 6 (Week 8a) Reading Reflection

Margaret Hamilton’s narrative is more than just a historical anecdote; it’s a demonstration of the strength of fortitude, cunning, and vision in the face of personal and professional obstacles. Hamilton’s path covers a substantial progression in both her personal life and the area of technology itself. She started out as a young mathematician supporting her husband’s career and ended up being a trailblazing software engineer whose work was essential in bringing people on the moon. In spite of the 1960s social conventions discouraging women from pursuing “high-powered technical work,” Hamilton’s commitment and enthusiasm enabled her to create the contemporary notion of software. This story is interesting because it shows how important software was to the Apollo missions and how it became an essential part of current engineering and technology.

On a personal level, Hamilton’s narrative is tremendously motivating, particularly for someone navigating the complexity of contemporary technology disciplines. It serves as a reminder that prejudice and borders are frequently merely social constructions that are ready to be destroyed by anyone with the guts to question them. Hamilton’s commitment and tenacity inspire me to persevere in the face of adversity and to recognize the worth of hard effort and creativity in my own life. Her ability to manage her responsibilities as a mother and a top engineer in a field that is dominated by men forces me to reevaluate my ideas of what is possible and to pursue greatness against social norms. Her narrative inspires me to follow my goals with utmost fervor and to help break down barriers in technology and other industries, much as Hamilton’s work on the Apollo software did.

The reading “Attractive Things Work Better” explores how important aesthetics are to a product’s usefulness and efficacy. It clarifies how emotional reactions and cognitive processes are connected, implying that appealing products are not only more user-friendly but also have the potential to improve problem-solving and complicated task navigation skills. This idea contests the traditional division between form and function, contending that the two are complementary rather than mutually exclusive. The story suggests that aesthetics have a big impact on usability, transforming boring jobs into delightful experiences that boost productivity and efficiency.

This idea strongly connects with my personal experiences and observations. I’ve discovered how much aesthetics and design influence how I engage with and am satisfied with commonplace items and digital interfaces. For example, a smartphone’s slim form and user-friendly interface not only enhance its visual appeal but also revolutionize its usability by rendering complicated tasks seeming easier and more approachable. I have always thought about this as a child, where all these tasks we do using our smart devices seem so helpful and easy. As I think about this, I see how important it is to include aesthetic elements in my own efforts. The reading’s guiding ideas inspire me to think about how aesthetics and utility may work together to provide more satisfying and productive experiences, whether I’m developing a website, creating a presentation, or even just setting up my workstation.

Midterm Project – Rotten Rescue

Concept:

The initial concept of this game was to be something different and unusual of the games that we already see where the “good” item is collected and the bad item is supposed to be avoided. But since I am using apples, I decided to relate this a bit to physics and the Isaac Newton apple incident that led to him discovering gravity… This makes the game more interesting and leaves a chance to improve it and make it a bit educational as well.

Full screen display of the game: https://editor.p5js.org/jana_mohsen/full/jEKauH5OR

Game:


Design:

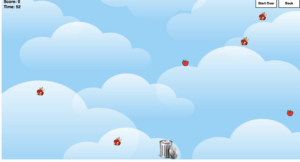
In this game, players maneuver a trash can to catch rotten apples while avoiding the clean ones. The game is structured into several screens: an introduction, instructions, the main game, and a game-over sequence. There are multiple classes used like the Apple Class that regulates both the types of apples, the Trashcan Class which ensures the moevments of the trashcan on the horizontal axis and lastly, the Bubbles Class which is just used to regulate the number, size and speed of apples that are being displayed in the game over page.

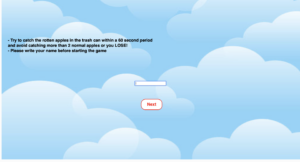
The most important part of the code are the functions for each page of the game. The (displayIntro()) function displays the introduction page, which greets with the player with the game title and a start button. Then the second function: (displayInstructions()) teaches the player the “how-to-play” guidelines, respectively, with options to start or proceed to the game. It also allows the player to input the game before starting to play.

During the active game phase, apples of two types—“clean” and “rotten”—descend from the screen’s top. Players control the trash can, moving it left or right to catch rotten apples while avoiding the clean ones. The game keeps score and includes a countdown timer, enhancing the challenge. It manages the player’s interaction with the game through the trash can’s movements when they press keys, allowing the player to move the trash can left or right to catch falling apples, facilitated by the trashCan.display() and trashCan.move() methods.

Within its cycle, runGame() also takes charge of spawning new apples at fixed intervals, alternating between “clean” and “rotten” types, which are then added to an array for tracking. As time progresses, it continuously updates the player’s score by incrementing by 10 based on the type of apples caught and counts down the game timer, implementing a sense of urgency and challenge. The function diligently checks for end-game scenarios, such as the depletion of the timer or accumulation of too many clean apples, transitioning to a game-over state if any conditions are met. Moreover, within this loop, each apple’s position is updated, and its status is checked to determine if it has been successfully caught by the trash can or missed. Apples that are caught or fall off the screen are removed from the gameplay loop, ensuring the game’s state remains current.

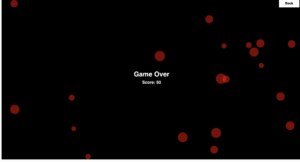
When the game ends, either from catching more than 2 clean apples or because the timer ended, the game trasitions to a game over page where the players final score appears. Finally, the game employs a “bubble” effect on the game-over screen for visual appeal, where bubbles generated by the createBubbles() function move around the screen.

Challenging part: 

The most interesting and challenging part of this game is creating the logic behind it. The rest is just assembling buttons, images and creating a nice aesthetic to the game.

function runGame() {
    inputName.hide();
  // Set Instruction.jpeg as the background
    image(imgInstructions, 0, 0, width, height); 

    trashCan.display();
    trashCan.move();
  // Displays score and timer at the top left
    displayScore(); 

    // Logic for apples falling and being collected or missed
    if (frameCount % 60 === 0) {
        let type = random(['clean', 'dirty']);
        apples.push(new Apple(type));
    }

    for (let i = apples.length - 1; i >= 0; i--) {
        apples[i].move();
        apples[i].display();

        if (apples[i].y + apples[i].size > trashCan.y && apples[i].x > trashCan.x && apples[i].x < trashCan.x + trashCan.width) {
            if (apples[i].type === 'dirty') {
                score += 10;
            } else {
                redApplesCollected++;
                if (redApplesCollected >= 3) {
                    currentPage = 'gameOver';
                  // Create bubbles for game over animation
                    createBubbles(20); 
                    break;
                }
            }
          // Remove collected or missed apple from array
            apples.splice(i, 1); 
        } else if (apples[i].y > height) {
          // Remove apple that falls off screen
            apples.splice(i, 1); 
        }
    }

    // Timer countdown and check for game over condition
    if (frameCount % 60 === 0 && gameTimer > 0) {
        gameTimer--;
    } else if (gameTimer === 0) {
        currentPage = 'gameOver'; // Time's up
        createBubbles(20); // Prepare game over screen
    }

    // Drawing and positioning Start Over and Back buttons
    drawGameButtons();
}

The main issue of the project was developing the logic for this game, which proved to be the most major challenge during development. The complex interactions between the various components of the game—like the falling apples, the moving garbage can, and the score system—needed to be carefully thought out and executed. To guarantee seamless gaming and compliance with the game’s regulations, the logic controlling the game’s behavior has to be strong and effective. In order to guarantee precise and reliable performance, handling edge circumstances such as identifying collisions between apples and the trash can or controlling the game’s timing required careful coding and testing.

The code consists of many parts. The trashcan is displayed and moved by the function in response to the players key press. It also shows the amount of game time left and updates the player’s score. The reasoning behind the apples falling is the most important aspect of the function. At regular intervals, it produces red apples, randomly classifying them as normal or rotten. The apple array is then iterated over, with each apple being moved and displayed as the program looks for collisions with the trash can. If an apple is detected, the apple is taken out of the array and the score is changed appropriately. On the other hand, if an apple is missed, it is removed, and if the player has missed too many and it is rotten, the game ends. Lastly, the function controls the game timer, which starts a countdown every second and enters the game over state when the allotted time is up. It also draws and arranges buttons so that you can go back to the main menu or resume the game. In order to create a compelling gaming experience, this function coordinates the interplay between game objects and player input, encapsulating the fundamental gameplay logic.

Limitations and improvements:

The game can have better ways to make it a bit competitive like adding a high score board to show the scores of all the players. Moreover, the amount of apples is random so it might be unfair between players since one can have 10 rotten apples and another only 5. All of these issues are seen as parts to be improved to make the game more appealing and competitive.

Game visuals: 

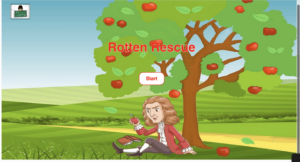
Introduction page:

Instructions page:

Game page:

Game over page:

Assignment 5 – Midterm Progress

Concept 

I am creating an interactive game that revolves around collecting rotten apples in a trash can. What inspired me to do this is that most games always make you collect the “good” items and leave the “bad” items out of the box. So, I flipped this norm that we always see in kids games and I am now collecting rotten apples (bad item) and leaving the good apples (normal items). There is no specific game that inspired the apple catching game but I just thought about using an apple since apples fall from trees so it makes sense that they are falling from the sky and can be collected.

Design

There are normal apples falling from the sky and rotten apples. The purpose of this game is to try to collect as much rotten apples into the trash can as possible. The trash can is in the bottom of the canvas and can move horizontally to catch the falling rotten apples. There is a score that is being incremented by 10 every time a rotten apple is collected in the trash can. For the design of the trash can and the apples, I uploaded pictures of a trash can and pictures of apples to make the aesthetics of this game better. I still did not design the “start” page yet but I will also be uploading pictures to make it look aesthetically pleasing. In terms of sound, I am aiming to add background music just like kids games and also a sound for every time an apple is caught in the trash can. Since the game is still in progress I did not add it to this post.

Improvements

I think what will make this project interesting is adding timer to the game so that the player has limited time to collect the apples. Also I think being able to ask for a players name in the beginning and then add it to an array that holds their name and score can make this a more competitive game so when the game ends the player can see what position he has compared to his friends. I also need to add a function that allows the player to start over the whole game and go back to the home page or only start over the game without having to go to the home page. I also thought power ups can make this game more interesting but I do not know if I can achieve that yet. Lastly, I need to make the screen be as big as possible (take as much of the screen as  possible).

Limitations 

The images that are uploading have a white background, so, if the background is any other color than white, the frame of the image will show and it is not aesthetically pleasing. Also the apple randomizer might make the game unfair because you never know how many rotten apples you will get in the span of your turn. Another player might get more rotten apples in the screen, thus, a better chance to get a higher score. Another limitation is that the apple images might be confusing because they are small and some players might get confused between the rotten and good apple. I obviously will be working to reduce these limitations and make this game as good as possible.

Assignment 5 – Reading Reflection

It is quite thought-provoking to examine how technology is dual in nature in both art and surveillance. The books explore the philosophical and ethical implications of technology’s development, emphasizing how inventions that were first created for beneficial and creative uses might later be transformed into instruments for widespread control and surveillance. This contradiction is best illustrated by the way that facial recognition has evolved from a scientific marvel to a possible tool for privacy invasion. This should cause readers to consider the wider effects of technology progress. Furthermore, a rich field for discussion on the nature of observation and the hazy boundaries between watcher and watched is provided by the irony in works of art that criticize surveillance by using surveillance techniques themselves. This dichotomy challenges readers to consider the social values that influence technology advancement as well as the motivations behind it.

These thoughts resonate with my own experiences and opinions on technology on a personal level. Just as I was astounded when I was a child and could talk to distant relatives via video chats, I have always been in awe of the advances made possible by digital innovation. However, this nostalgia is now flavored with a cautionary tale about the invisible eyes that could be hiding behind any gadget. I’ve been forced by the reading to reevaluate how I use technology and to acknowledge the fine line that separates convenience from invasion. It speaks to my growing knowledge of privacy issues and the covert, frequently undetectable methods that I could be monitored. The aforementioned artworks function as a reminder of the ubiquitous nature of monitoring and the necessity of maintaining awareness of the trade-offs between the advantages of technology and individual privacy. My grasp of the societal effects of technology has grown as a result of this thinking, which has also motivated me to handle my digital imprint more carefully.