Final Project: Final Report

Concept:

To summarize, my final project is a game I like to call Treasure Hunt! In this game there is a pile of random items all over the desk, among these random items is one piece of TREASURE. Your goal is to retrieve that treasure. However, there is a radar sensor moving back and forth constantly trying to detect you. The goal is to get this treasure before the radar detects you and before the time runs out! Hence, you got to hide or run away to avoid the radar’s range.

Implementation:

Arduino:

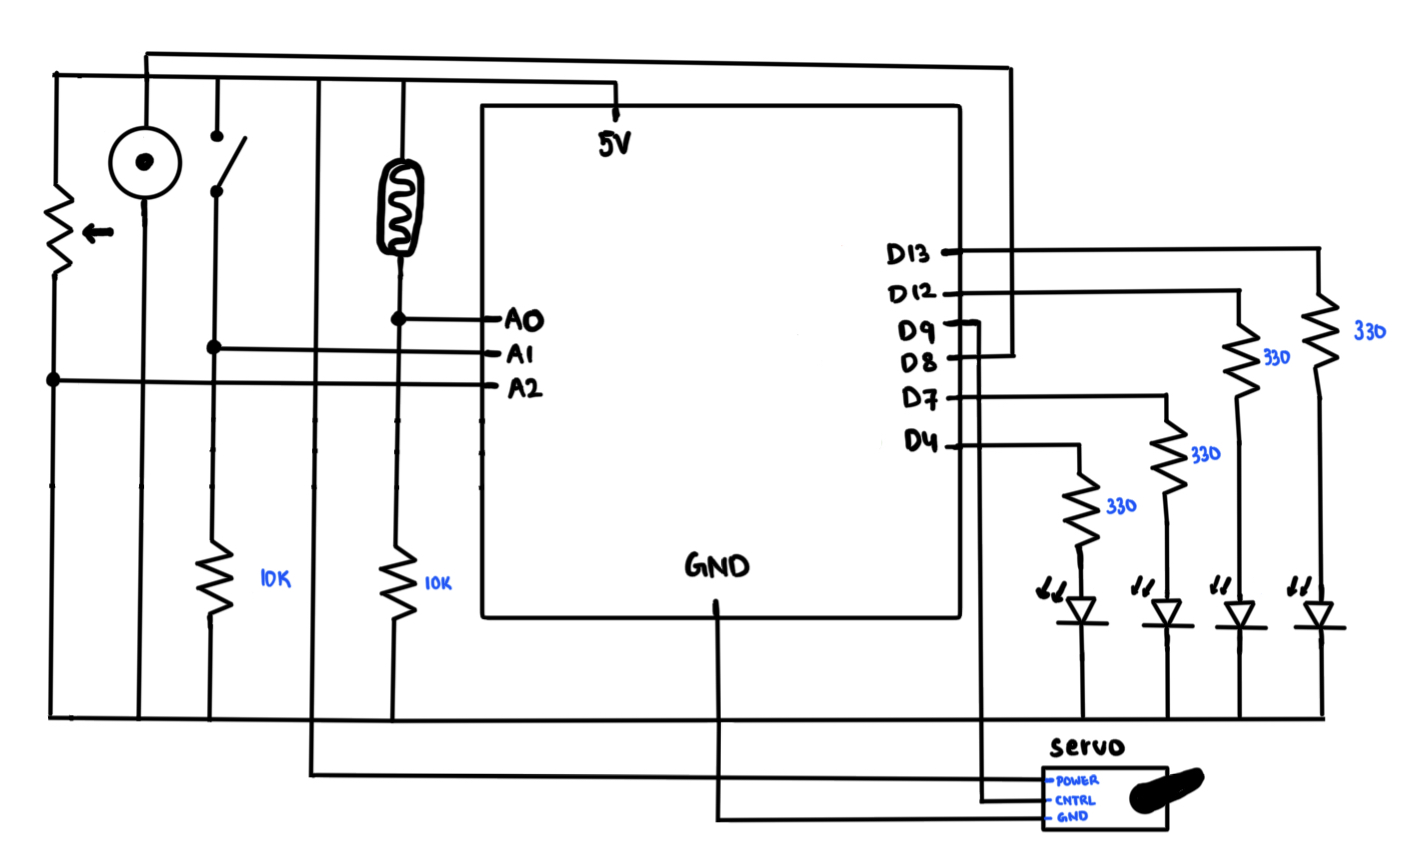
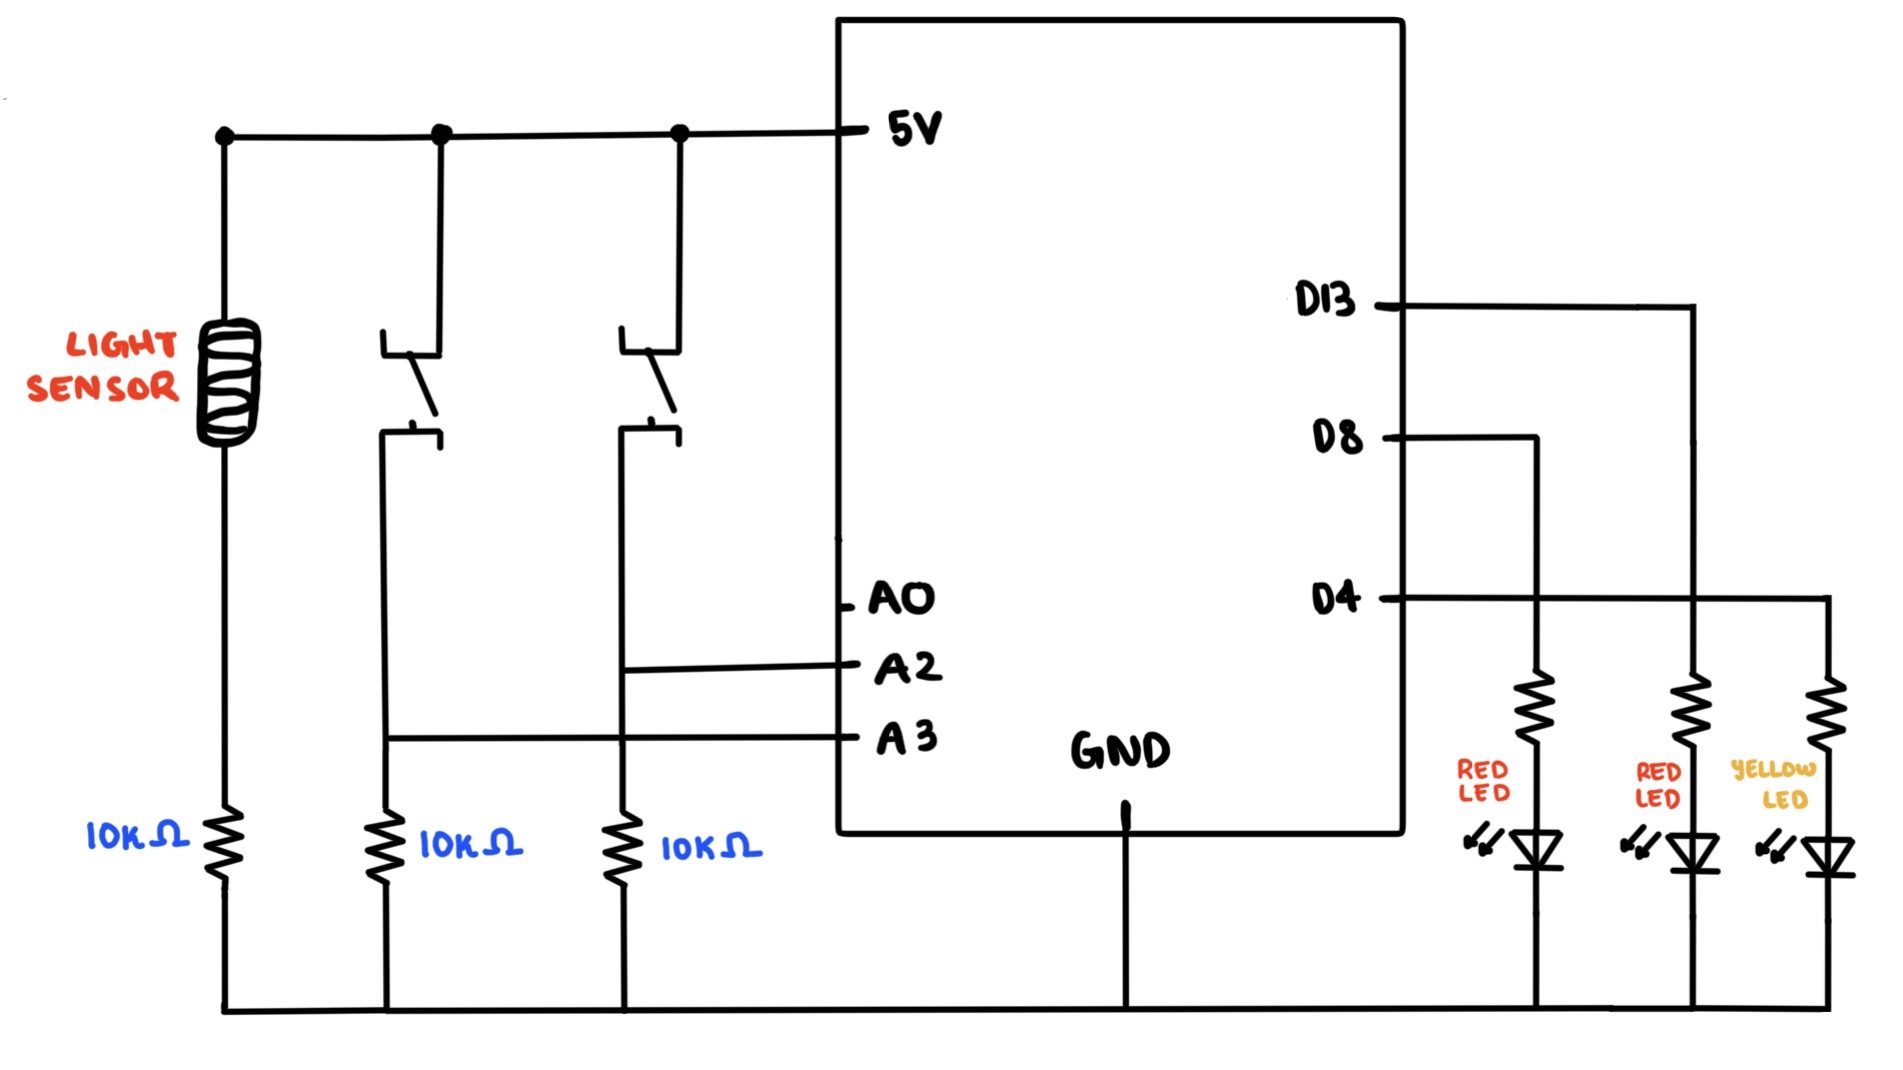
For the arduino aspect of my final project, I used several components:

  • A servo motor which would be the radar sensor moving back and forth consistently.
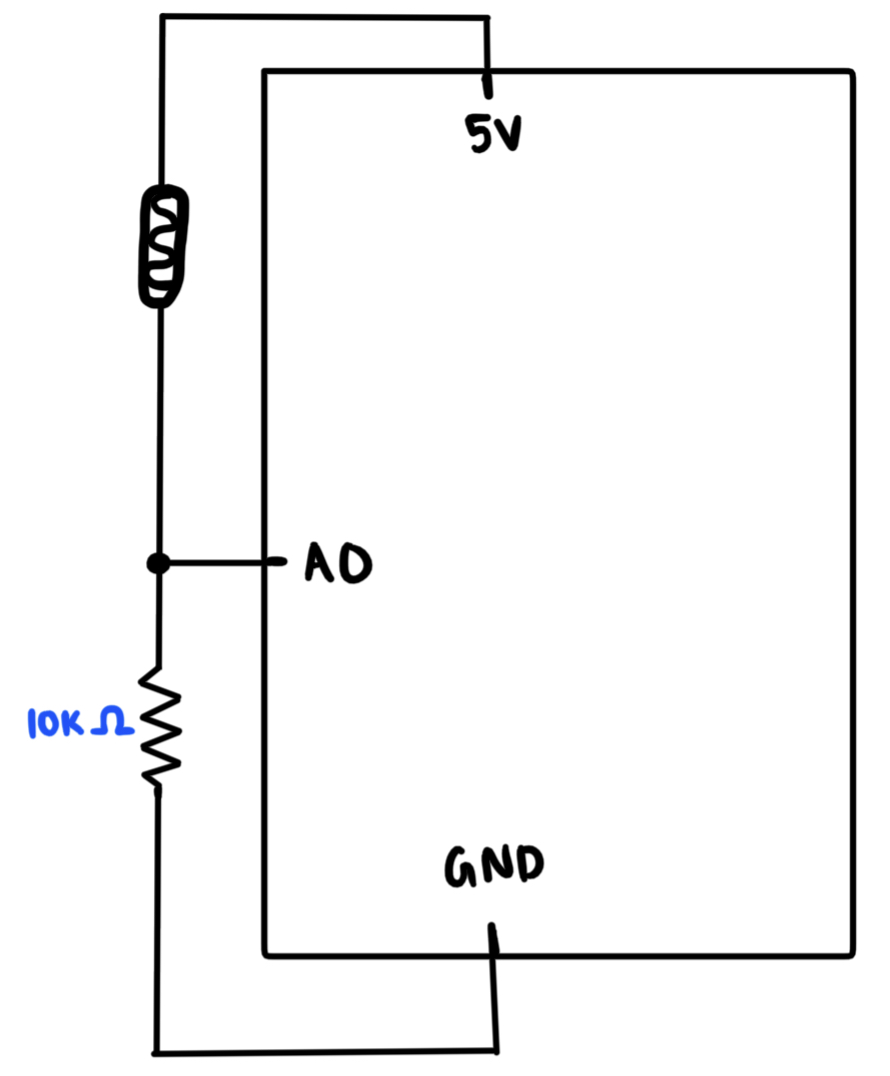
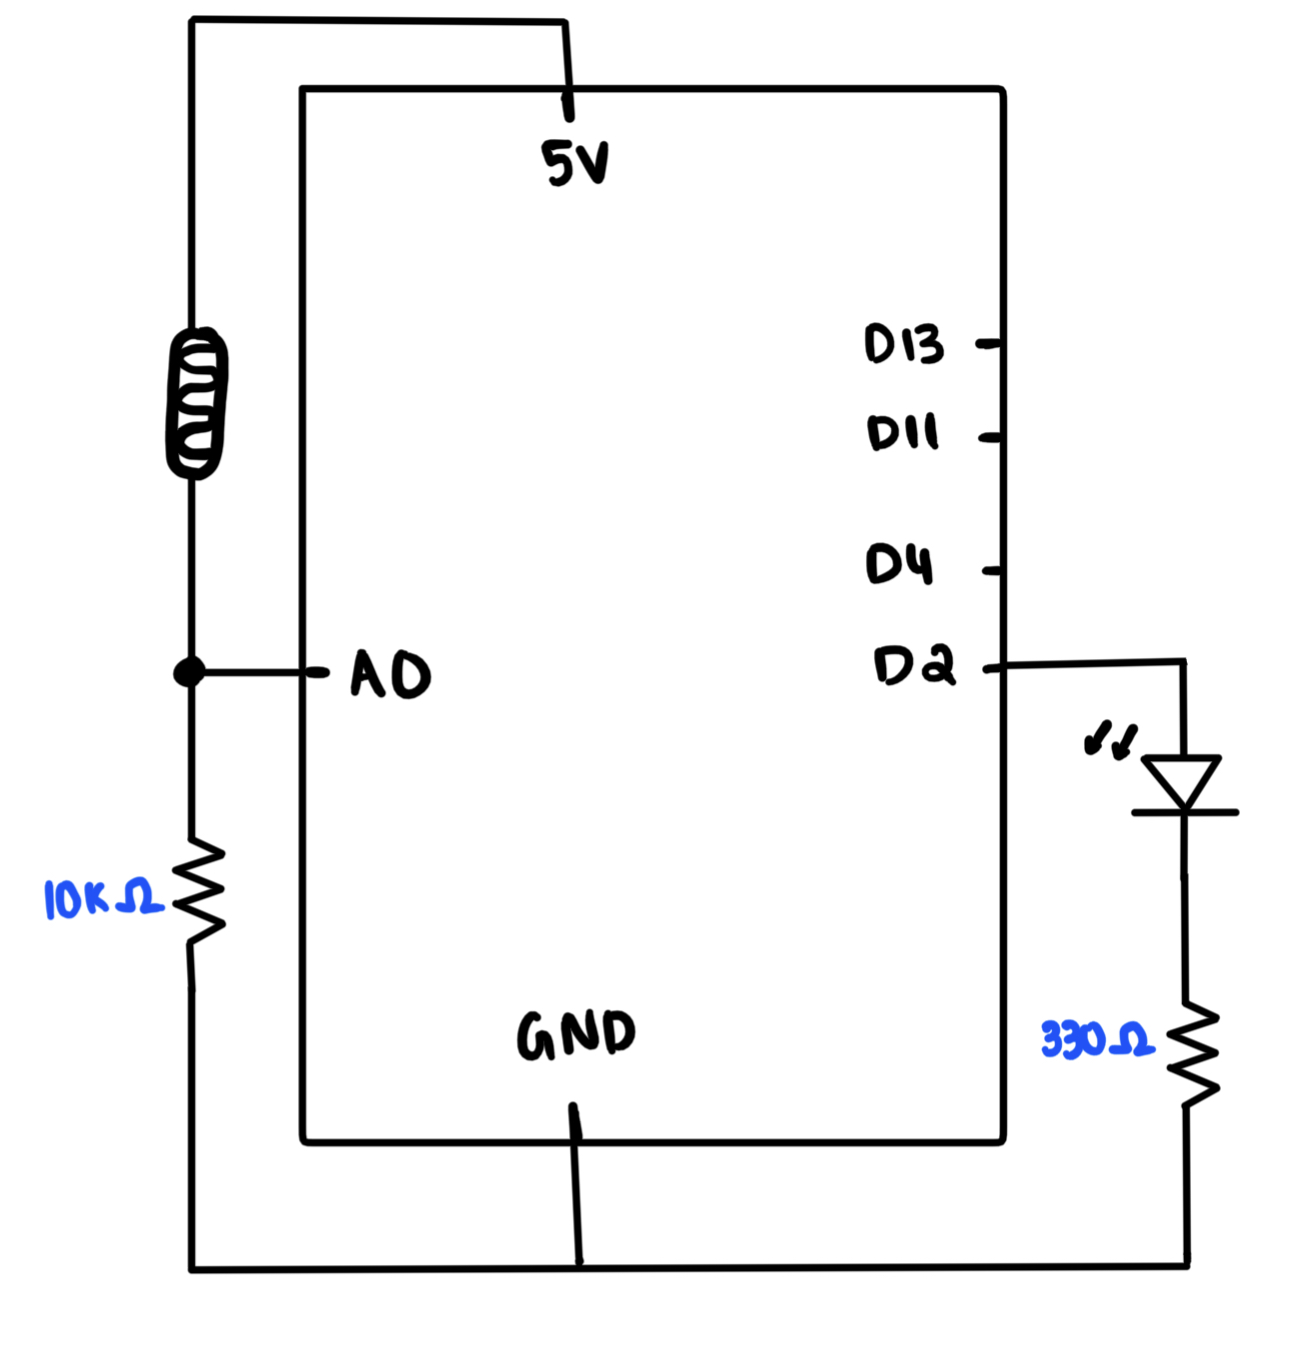
  • An ultrasonic sensor which would be mounted on the servo motor and this would be used to detect the distance of the user from the radar sensor.
  • A force sensor to detect whether the treasure has been picked up or not. If it was 0 for 1 second, that indicates that the treasure has been found and that you won the game!
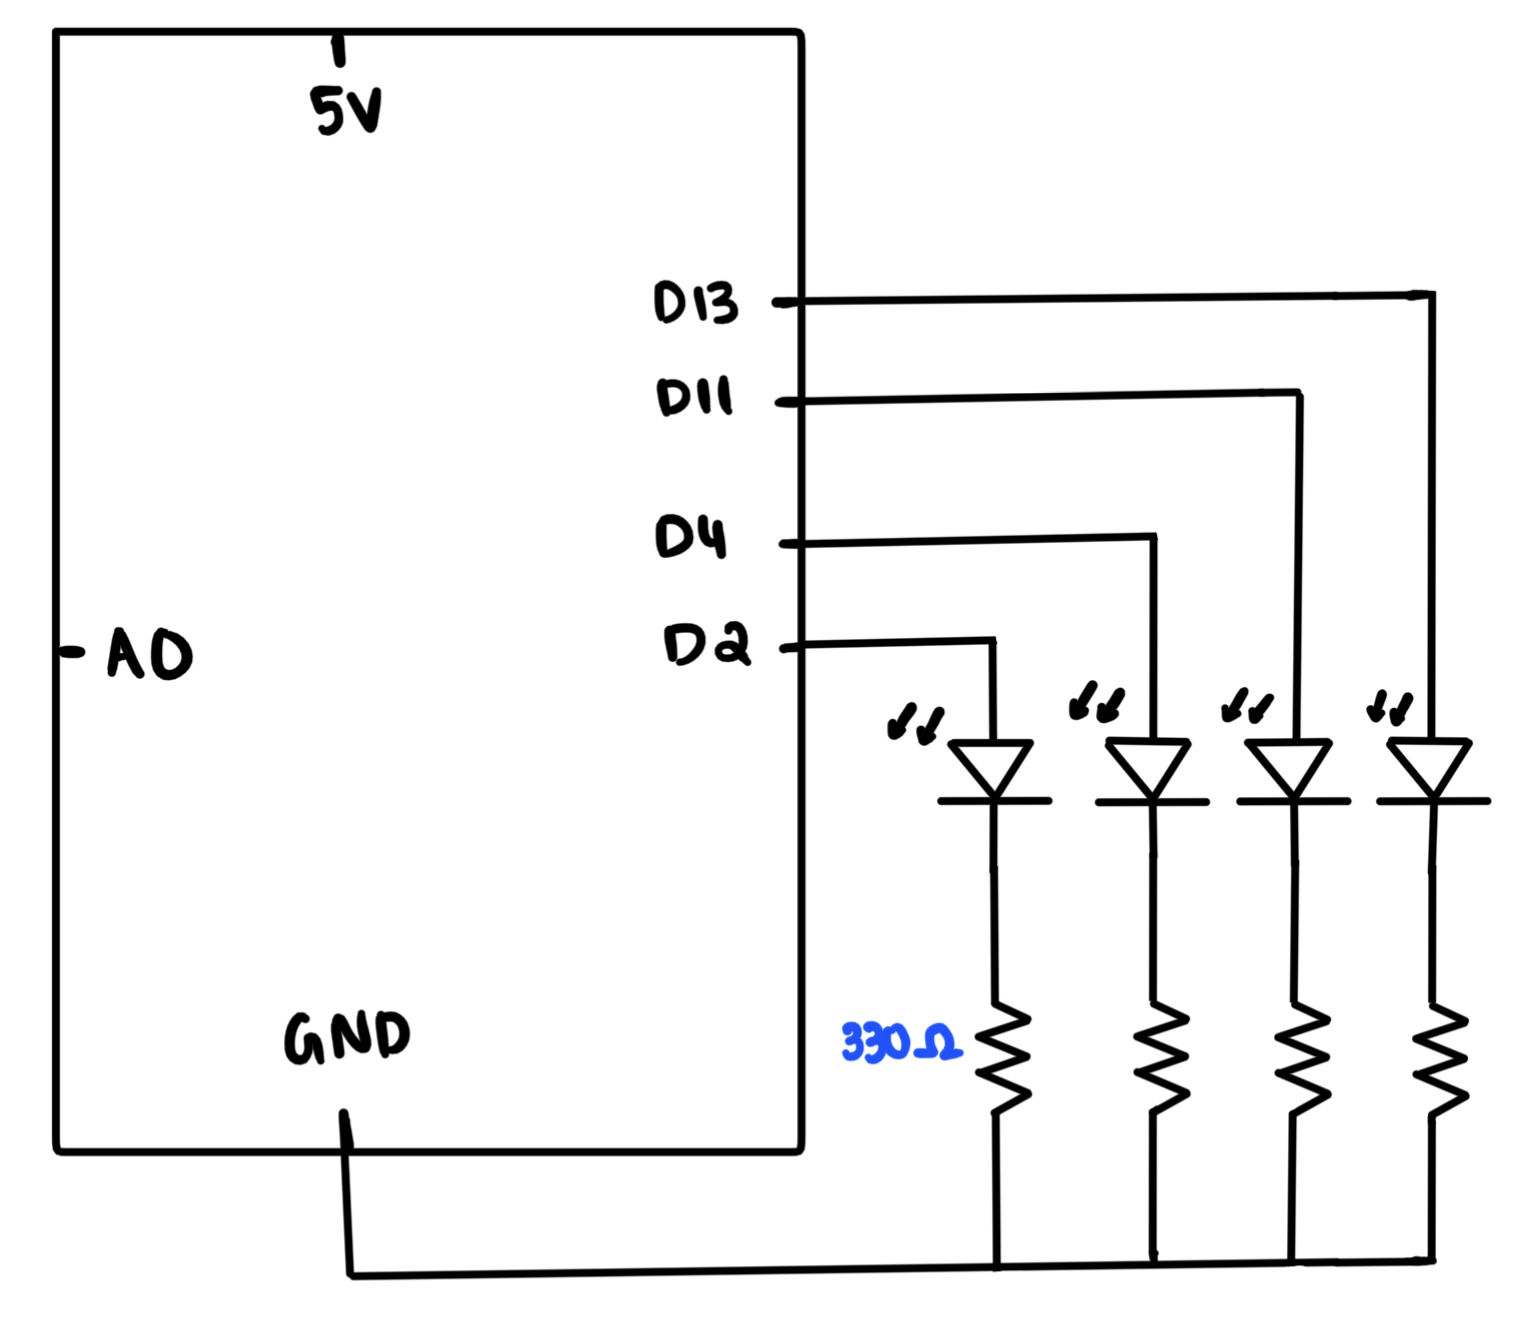
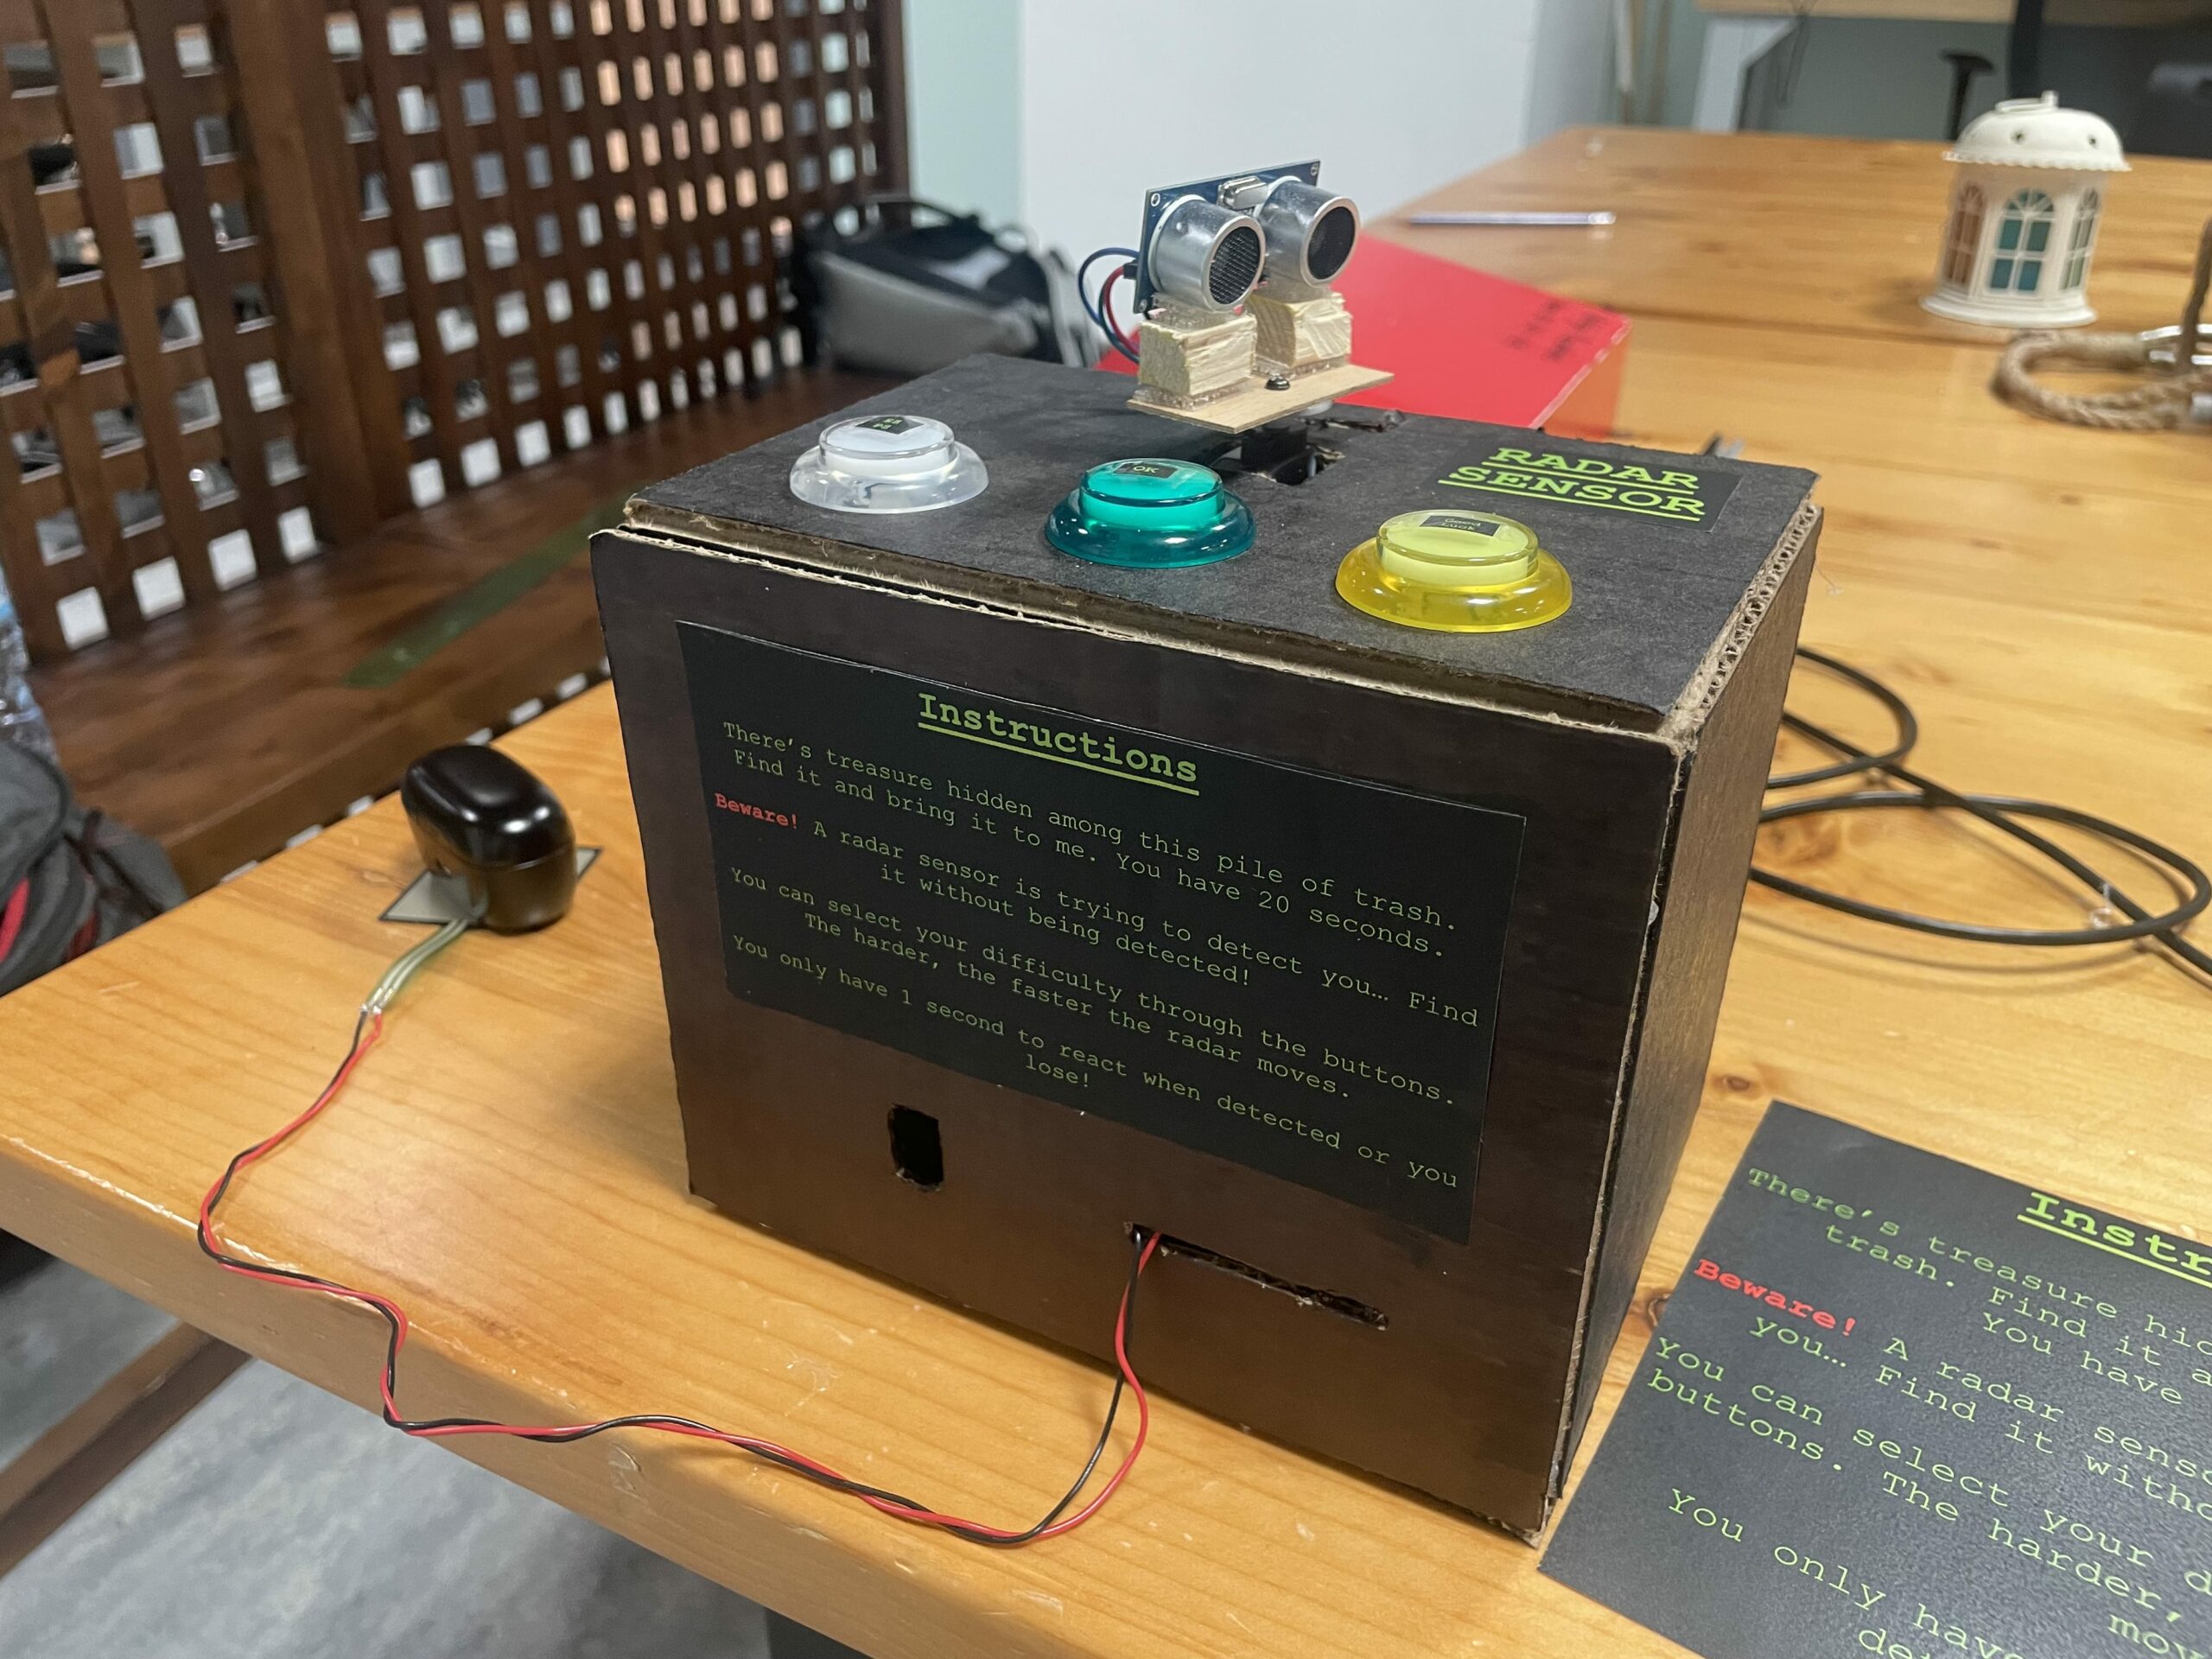
  • Three arcade LED switches to change the difficulty of the game. Depending on which buttons were pressed, that would change the speed of the servo motor, hence the radar sensor would move much faster and would be harder to avoid the radar’s range in time.
  • I also added an LED which is used for debugging and also managing whether the treasure has been set on the force sensor before starting the game. This is because if we started the game and the treasure wasn’t on the force sensor properly, then the game would simply declare the user has won and it wouldn’t make sense.

p5js:

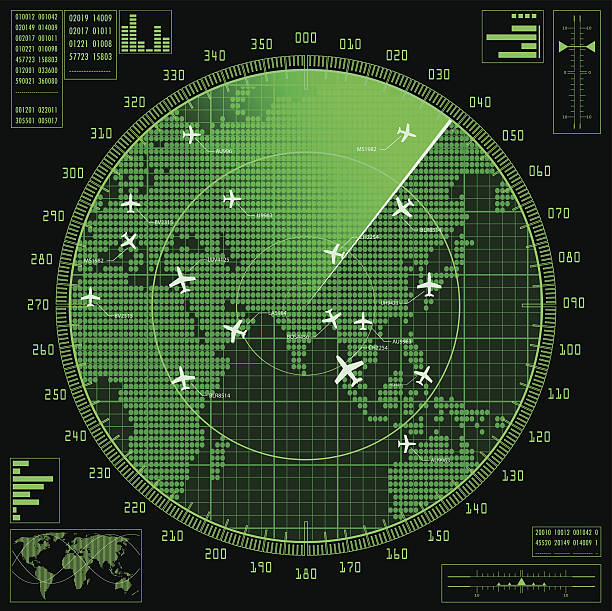
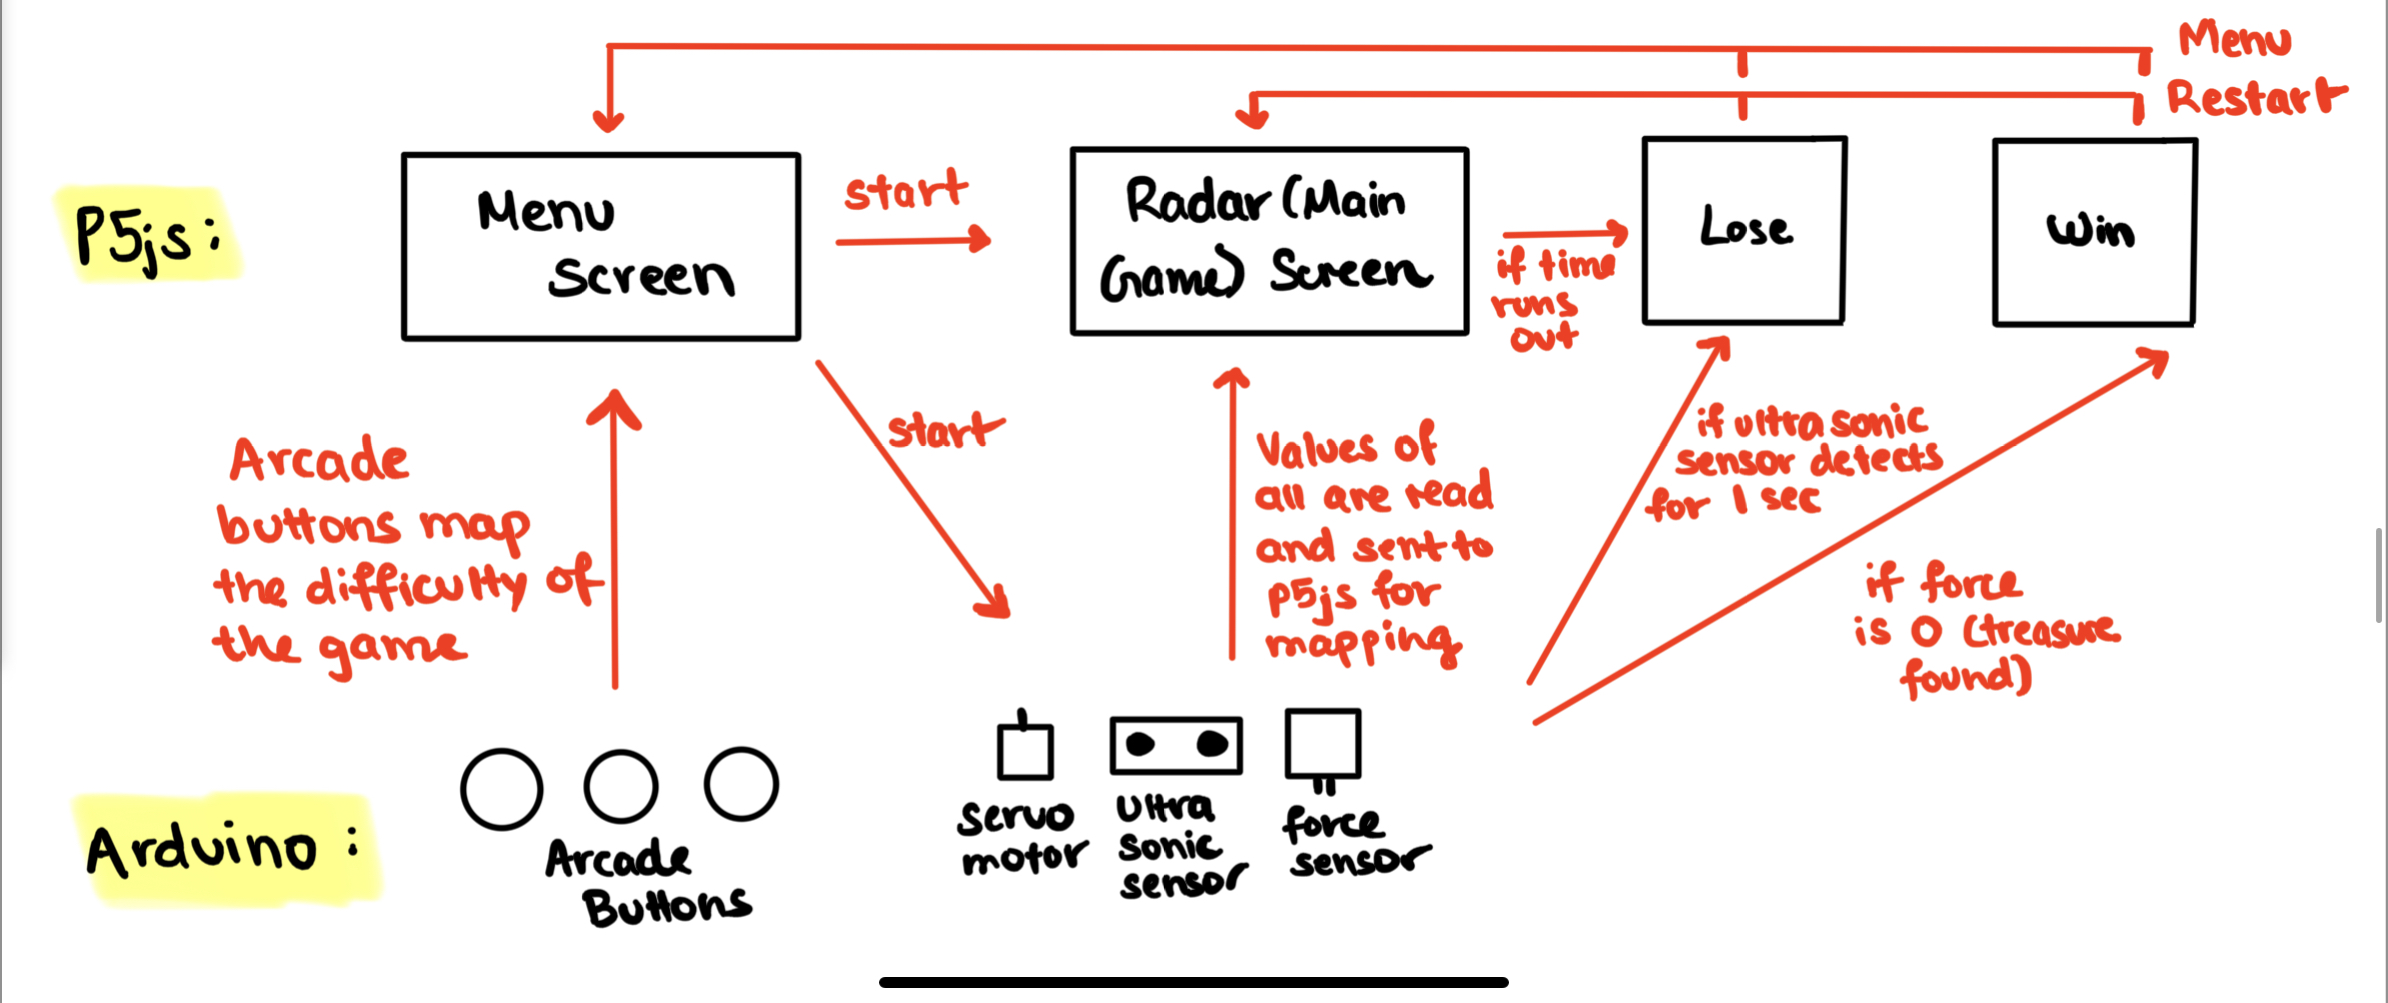
The main aspect of p5js was the map out a visual aid for the radar sensor and to also map out the different stages of the game to Arduino, whether than being the main menu, losing screen, winning screen or the main game screen.

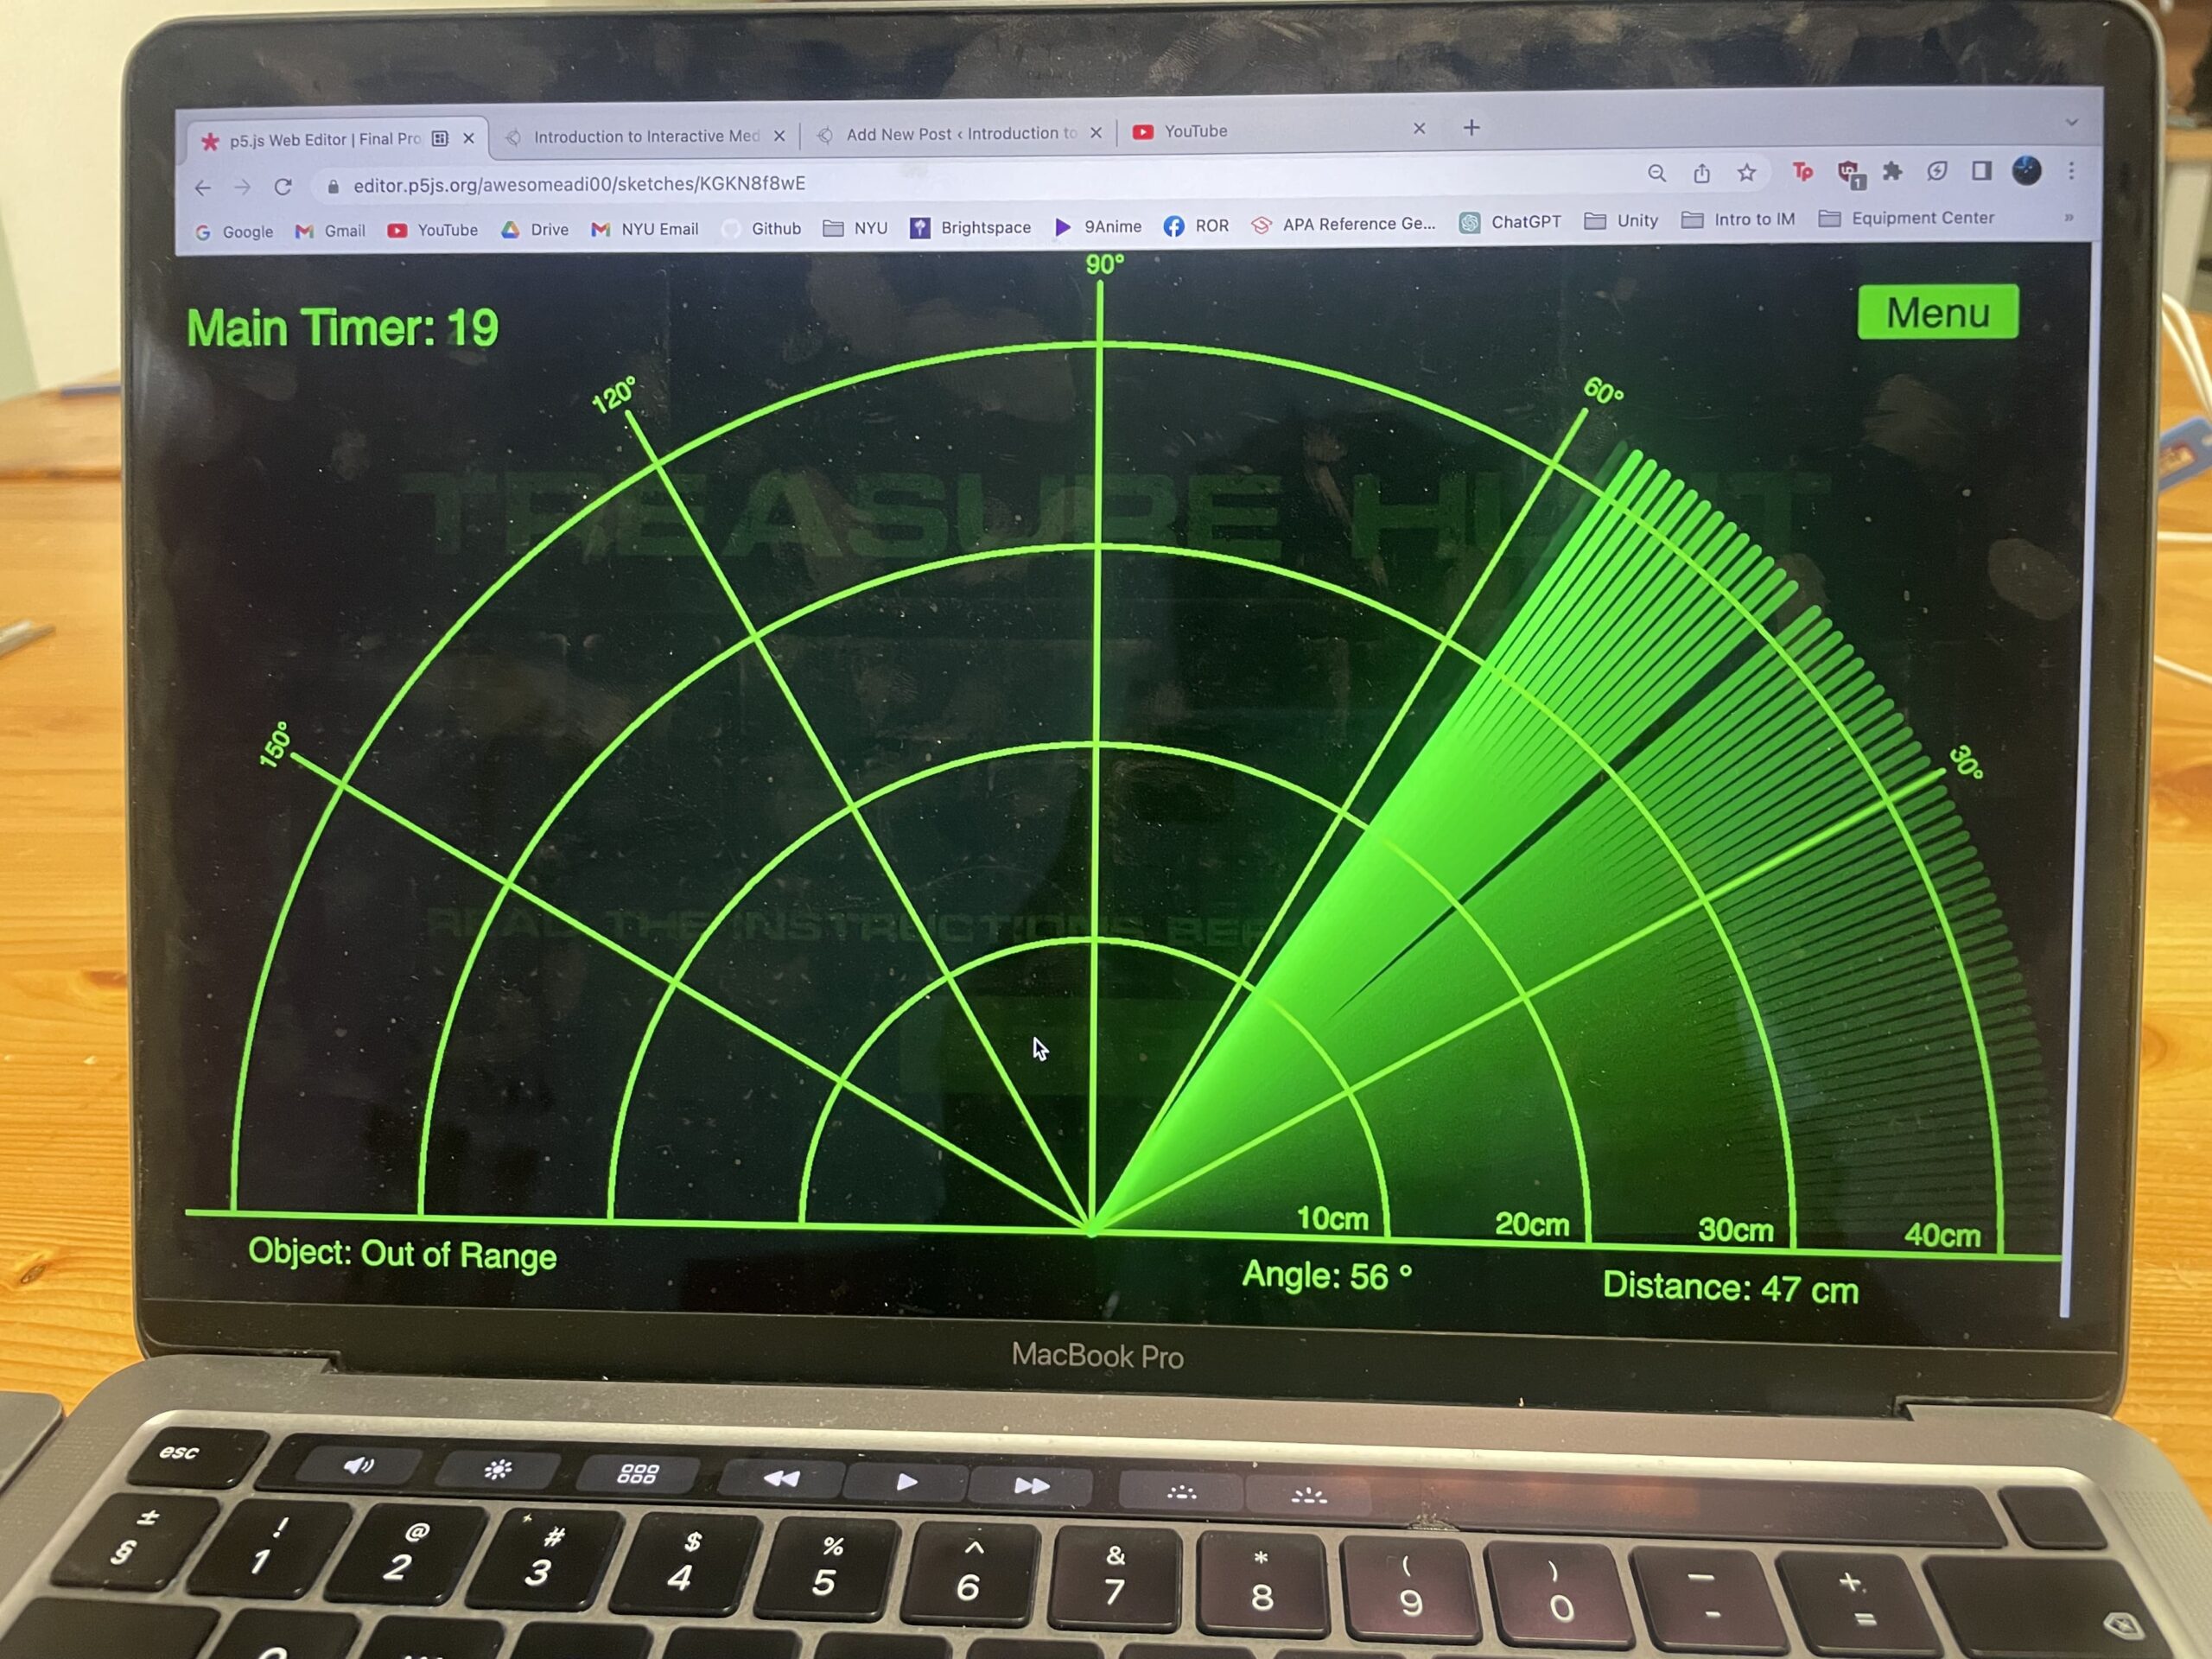
For the main radar screen, it would have the entire mapping of the radar sensor moving back and forth. It also contains details such as whether the object is in range or out of range, the degree of rotation, the distance from the sensor so the user can see how the radar maps them out.

It spins and maps out a green line attempting to detect the user, if the user is detected, it would map out a red line to indicate this and if they are detected for 1 second, then they lose. Else if there were to pick up the treasure then they win!

They can also go back to the menu from this screen to change their difficulty if they wish

Arduino and p5js Interactivity:

I made a little map of how Arduino and p5js map together:

Aspects I’m Proud of:

I would say i’m very proud of how the mapping between the radar sensor through the Arduino and p5js turned out. Visually on the p5js it looks very cool, especially with a really cool blur effect I added on p5js. That way it makes it seem like an actual radar sensor. The mapping between all the different phases of the game are really well done especially through all the values from the Arduino to p5js.

I would say I’m also very proud of how the actual radar sensor box looks like, it looks very cool and the design is very awesome in my opinion. I would also say that the arcade buttons are a very nice touch to display the difficulty of the game. This is because when pressed it lights up indicating which difficulty it is, making it easy for the user to understand what difficulty they have.

Aspects I would Improve:

As per the improvement aspect of the entire project, there are several:

  • I would have loved to implement a physical computing aspect for the win/lose stage of the project. My initial ideas were that if you won, then it would activate a servo motor waving a white flag to signify that the radar sensor admits defeat. Also if they lost, then another servo motor would be activated which would unwind a scroll with a picture saying you lost or something. These ideas would’ve been really cool however, because of the time, I was not able to implement these ideas and was forced to simply put a “you lose” or “you win” screen through p5js. However, next time if possible, will definitely implement.
  • I would have loved to also improve the quality of the box, perhaps use wood or acrylic or something or stronger material so that the entire product looks much nicer to look at rather than cardboard.
  • There is this bug where suppose you lost or won a game, then you would have to wait for the Servo motor to map back to the beginning before you can do anything again. I couldn’t find a solution for this and I think this could also be improved.

Video – Testing on my Own:

Video – User Testing Video:

Video – User Testing #2:

Link to p5js Code:

https://editor.p5js.org/awesomeadi00/sketches/KGKN8f8wE

Arduino Code:

#include <Servo.h>. 

//PINS: 
const int Radar_ServoPin = 10;   

const int echoPin = 9;    
const int trigPin = 8;

const int w_switch = A3;
const int g_switch = A2;
const int y_switch = A1;

const int w_led = 4;
const int g_led = 5;
const int y_led = 6;    

const int pressurePin = A0;
const int pressureLED = 2;

//Global Variables: 
int w_switchVal;
int g_switchVal;
int y_switchVal;
int pressureVal;
unsigned long duration;
int distance;
int difficulty = 1;
int loseBool = 0;

//All game states below are exactly as shown in p5js
int gameState;
int menuState = 0;
int radarState = 1;
int winState = 2;
int loseState = 3;

//Servo object for controlling the servo motor
Servo RadarServo; 

//====================================================================================================================================
void setup() {
  //Begin the serial monitor to p5js at 9600 baud
  Serial.begin(9600);

  //Setting the pinmodes for the ultrasonic sensor
  pinMode(trigPin, OUTPUT);  
  pinMode(echoPin, INPUT);   
  
  //Seting the pinmodes for the arcade switch pins
  pinMode(w_switch, INPUT);
  pinMode(g_switch, INPUT);
  pinMode(y_switch, INPUT);
  
  //Setting the pinmodes for the LEDs in the arcade buttons
  pinMode(w_led, OUTPUT);
  pinMode(g_led, OUTPUT);
  pinMode(y_led, OUTPUT);

  //Output mode for the pressureLED, this will check whether the pressure sensor is active or not.
  pinMode(pressureLED, OUTPUT);

  //Attaching the servos to arduino 
  RadarServo.attach(Radar_ServoPin);  
  RadarServo.write(0);

  //Setup for the game, sets the easy difficulty on by default (difficulty = 1) and sets up the menu screen.
  digitalWrite(w_led, HIGH);
  gameState = 1;

  // Blinks the pressureLED in case the Serial Connection between p5js and Arduino has not been made (debugging)
  while (Serial.available() <= 0) {
    digitalWrite(pressureLED, HIGH);
    Serial.println("0,0"); 
    delay(300);     
    digitalWrite(pressureLED, LOW);
    delay(50);
  }
}

//====================================================================================================================================
void loop() {
  // This checks while the serial connection is available from p5js, then it will parse the gamestate from p5js to arduino. 
  while(Serial.available()) {
    int p5js_gameState = Serial.parseInt();
    if(Serial.read() == '\n') {
      gameState = p5js_gameState;
    }
  }

  //Based on the gamestate from p5js, it will map out exactly what to do on Arduino.
  if(gameState == menuState) {setDifficulty();}
  else if(gameState == radarState) {radarActivate();}
  Serial.println();
}

//====================================================================================================================================
//This functions is only called during the Main Menu. It checks which buttons are pressed to map the speed of the radar, hence setting the difficulty.
void setDifficulty() {
  //If the pressure is greater than 50, then it will switch on the pressureLED to indicate that the user still needs to find it. Else it will switch off indicating they won.
  pressureVal = analogRead(pressurePin);
  if(pressureVal > 200) {digitalWrite(pressureLED, HIGH); }
  else {digitalWrite(pressureLED, LOW); }

  //Reads all the values for all three buttons
  int y_sstate = digitalRead(y_switch);
  int g_sstate = digitalRead(g_switch);
  int w_sstate = digitalRead(w_switch);

  //If the yellow button is pressed, it will switch that on and set hard difficulty to 3
  if(y_sstate == HIGH) {
    digitalWrite(y_led, HIGH);
    digitalWrite(g_led, LOW);
    digitalWrite(w_led, LOW);
    difficulty = 3;
  }

  //If the green button is pressed, it will switch that on and set medium difficulty to 2
  else if(g_sstate == HIGH) {
    digitalWrite(y_led, LOW);
    digitalWrite(g_led, HIGH);
    digitalWrite(w_led, LOW);
    difficulty = 2;           
  }

  //If the white button is pressed, it will switch that on and set easy difficulty to 1
  else if(w_sstate == HIGH) {
    digitalWrite(y_led, LOW);
    digitalWrite(g_led, LOW);
    digitalWrite(w_led, HIGH);
    difficulty = 1;
  }
  Serial.println(difficulty);
}

//====================================================================================================================================
//This function will only be called if the game has started and thus the radar will become active. 
void radarActivate() {
  //Rotates the servo motor from 0 to 180 degrees
  for(int i = 0; i <= 180; i+=difficulty){ 
    pressureVal = analogRead(pressurePin);    //Reads the pressure value to determine if the user has won or not.
    if(pressureVal > 200) {digitalWrite(pressureLED, HIGH); }
    else {digitalWrite(pressureLED, LOW); }
    
    if(gameState == winState || gameState == loseState) {
      RadarServo.write(0); 
      break; 
    }

    RadarServo.write(i);                      
    delay(30);
    distance = calculateDistance();           //Calculates the distance measured by the ultrasonic sensor for each degree. 

    //Sending p5js the degree of rotation of the servo, the distance and the pressure value from the Arduino.
    Serial.print(i+difficulty);              //Sends the current degree to p5js
    Serial.print(",");                  //Sends comma character for indexing in p5js
    Serial.print(distance);             //Sends the distance value to p5js
    Serial.print(",");                  //Sends comma character for indexing in p5js
    Serial.println(pressureVal);          //Sends the pressure value to p5js
  }

  // Repeats the previous lines from 180 to 0 degrees (moving it backwards)
  for(int i = 180; i > 0; i-=difficulty){ 
    pressureVal = analogRead(pressurePin); 
    if(pressureVal > 200) {digitalWrite(pressureLED, HIGH); }
    else {digitalWrite(pressureLED, LOW); }

    if(gameState == winState || gameState == loseState) {
      RadarServo.write(0); 
      break; 
    }

    RadarServo.write(i);
    delay(30);
    distance = calculateDistance();

    Serial.print(i-difficulty);
    Serial.print(",");
    Serial.print(distance);
    Serial.print(",");
    Serial.println(pressureVal);
  }
  Serial.println();
}

//====================================================================================================================================
//Function for calculating the distance measured by the Ultrasonic sensor
//Issue with the sensor is that for objects extremely far away, it takes virtually 69ms to come back and translate to distance
//This is way too long hence, for each increment on the Radar Servo, it would take 69ms.
//Perhaps wrap some board 90cm away from the sensor around in 180˚ so it maps that out and nothing else that's far.
int calculateDistance(){ 
  //Sets the trigPin on LOW for 2 microseceonds.
  digitalWrite(trigPin, LOW); 
  delayMicroseconds(2);
  //Sends a signal from the triggering transducer for 10 microsends.
  digitalWrite(trigPin, HIGH); 
  delayMicroseconds(10);
  digitalWrite(trigPin, LOW);
  
  //Reads the echoPin and returns the sound wave travel time in microseconds. 
  duration = pulseIn(echoPin, HIGH); 

  //The distance will be calculated in cm, hence cm = (microseconds/2)/29
  distance = (duration/2)/29;
  return distance;
}


Final Project: Report #2 – Finalized Concept

Finalized Concept:

My finalized concept is to construct an Arduino Radar Sensor and make a game out of it! Essentially, I would have a bunch of random items all over the desk and it’s the user’s job to find the treasure in this pile of mess within a certain amount of time.

The only threat is, there is a radar constantly moving back and forth around a servo motor trying to detect the user. If the radar detects the user, and they are within firing range they would lose! However, if the user manages to find the correct piece of treasure before being noticed and within the time limit then they win! They would compete with each other to try and get the treasure at the fastest time possible!

Arduino:

For the Arduino, I was going to implement a Servo motor. I would make this motor move back and forth at a fixed speed and the angle at which the Servo motor rotates would be sent to p5js which would route to the visual representation of the radar.

Then I would mount the ultrasonic sensor onto the Servo motor. The distance that the user is from the sensor would be sent to p5js and translated in the range of the map and be drawn onto the radar. If the user is detected within some range then it would trigger the losing mechanism.

For the losing mechanism, I though I could incorporate a solenoid and it would essentially knock some mini model of a human, indicating they got shot and basically lost.

Additionally, I would add a pressure sensor on the table for the treasure. As the treasure rests on the table, it will apply pressure on the sensor, so when it’s picked up, the sensor has less weight so it implies the user picked it up and won! This would signal p5js to stop the radar and stop the timer and indicate that the user has won.

I was also thinking of adding a potentiometer to the circuit to try and challenge the user. This potentiometer would change the speed of the servo motor. So that way it maps the area even faster making it more challenging not to be noticed.

P5js:

For p5js, I wanted to simply create a visual for the radar, sort of like the image I posted last time:

So, as the Servo motor rotates, the line rotates around the circle as well. The ultrasonic sensor would produce some point on this radar to detect a person is there. If they are outside the range then it will not map.

Additionally, I wanted to also draw a timer somewhere so that the user can detect how much time they have left.

I also plan to add some music and some cool radar sound effects through p5js to keep the experience a little more fun and realistic.

Afterthoughts:

I may utilize the createCapture() function on p5js (camera) as that may be useful as a backup or to even double down on the scanning. Perhaps, I could use this to detect the user and use the ultra sonic sensor to detect how far they are. Maybe I could use the camera to communicate with Arduino to move the laser pointing or the nerf gun or whatever to point exactly at their body or something so it doesn’t get in their eye.


Final Project: Report #1 – Proposal

Arduino Radar:

My idea for my final project I thought of creating some sort of Arduino Radar, something like shown below:

So essentially, I plan to have maybe the ultrasonic-distance sensor maybe on a servo motor which keeps track of how far people are and based on that, it would map out onto a sensor which would look something like shown above.

I was thinking of several applications of using this for my project. For example: Perhaps, there could be treasure somewhere, and the user had to get that treasure without alerting this radar. If the radar detects the user, it would activate a solenoid to open a door and shoot the user with maybe a nerf bullet or something.

A really AWESOME idea could be if I could hide the treasure maybe somewhere around the IM showcase, and the user must use my radar device to track this treasure before some time limit. Hence, they would have to go around the showcase and find this treasure.

If they don’t find it by the given time, then the solenoids can be activated and they get shot. It could also be some sort of game where people can try and compete to find the treasure for the fastest time or something.

Arduino and p5js division:

  • The hardware as in the sensor, the shooting mechanism can all be through Arduino
  • The radar visualization can be drawn onto p5js. Maybe even the treasure icon or something can be mapped out onto p5js as well.

Initial Challenges: 

I’m thinking that this project is doable but if I were to maybe do the finding treasure around the showcase idea, I’m not entirely sure how I would track the treasure’s location at all times. I’m not even sure how the sensor would be able to track it. Maybe through OSC so the computer (p5js) knows where the ball is at all times (like its coordinates) and that way it can map out on the radar and as you walk around, the sensor can start to pick it up and when it does, it can map out on the radar or something.

I’m not sure but i’ll have to do a little more thinking and investigating.

Assignment 8: Serial Communication – In Class Exercises

Exercise 1: Control p5js through Arduino

In this exercise, we had to have an analog sensor on our Arduino and let those values control something in p5js. Hence, I used a photo resistor and the values from that would make an ellipse in p5js move along its horizontal axis.

Schematic:

p5js Code:
//Class Exercise 1: Controlling P5JS objects from Arduino
let xValue = 0;  

function setup() {
  createCanvas(700, 700);
}

function draw() {
  background(220);
  
  if (!serialActive) {
    text("Press Space Bar to select Serial Port", 20, 30);
  } 
  
  else {
    text("Connected", 20, 30);
    ellipse(xValue, height/2, 150, 150);
  }
}

//Sets up the serial connection
function keyPressed() {
  if (key == " ") {
    setUpSerial();
  }
}

//Function to read in serial data from the Serial Port. 
function readSerial(data) {
  if (data != null) {
    //Mapping the sensor values from 'data' - 0 to 500 - 0
    xValue = map(data, 0, 1023, 0, width);
  }
}

Arduino Code:
const int lightSensor = A0;

void setup() {
  Serial.begin(9600);
  pinMode(lightSensor, INPUT);
}

void loop() {
  //Reads value from the sensor and prints it to the Serial Port (p5js)
  int lightValue = analogRead(lightSensor);
  Serial.println(lightValue);
}
Video:

Exercise 2: Control Arduino LEDs through p5js

In this exercise, we had to simply control LEDs on our Arduino board via p5js code. Hence, I decided to do something where depending on where the user’s mouse is on the canvas on p5js, it will light up a specific LED. So, for instance, if it’s on the far left side, it will switch on the left most LED, and if it’s on the right side, it will switch on the right most LED and so on.

Schematic:

p5js Code:
let circle_size = 50;

//These are variables to determine whether the any of the coloured lights are ON or OFF
let g_ON = 0;
let b_ON = 0;
let r_ON = 0;
let y_ON = 0;

function setup() {
  createCanvas(700, 700);
}

function draw() {
  background(0);
  fill(255);
  textAlign(CENTER);
  textSize(20);
  text("Move the cursor around to switch the LED's ON!", width/2, 40);
  
  if (!serialActive) {text("Press Space Bar to select Serial Port", width/2, 75); } 
  else {text("Connected", width/2, 75); }
  
  //Depending on which side of the canvas the mouse is on, that specific LED will switch on and the circle icon will also be switched to that color as well
  if(mouseX < width/4) {
    fill("red");
    r_ON = 1;
    y_ON = 0;
    b_ON = 0;
    g_ON = 0;
  }
  
  else if(mouseX >= width/4 && mouseX < width/2) {
    fill("yellow");
    r_ON = 0;
    y_ON = 1;
    b_ON = 0;
    g_ON = 0;
  }
  
  else if(mouseX >= width/2 && mouseX < 3*width/4) {
    fill("blue");
    r_ON = 0;
    y_ON = 0;
    b_ON = 1;
    g_ON = 0;
  }
  
  else {
    fill("green");
    r_ON = 0;
    y_ON = 0;
    b_ON = 0;
    g_ON = 1;
  }
  
  circle(mouseX, mouseY, circle_size);
}

function keyPressed() {
  if(key == " ") {
    setUpSerial();
  }
}

function readSerial(data) {
  if(data != null) {
    //Sends the light ON/OFF messages for all the lights to the arduino
    let sendToArduino = r_ON + "," + y_ON + "," + b_ON + "," + g_ON + "\n";
    writeSerial(sendToArduino);
  }
}
Arduino:
const int red_pin = 13;
const int yellow_pin = 11;
const int blue_pin = 4;
const int green_pin = 2;

void setup() {
  Serial.begin(9600);
  pinMode(red_pin, OUTPUT);
  pinMode(yellow_pin, OUTPUT);
  pinMode(blue_pin, OUTPUT);
  pinMode(green_pin, OUTPUT);

  // Blink them so we can check the wiring
  digitalWrite(red_pin, HIGH);
  digitalWrite(yellow_pin, HIGH);
  digitalWrite(blue_pin, HIGH);
  digitalWrite(green_pin, HIGH);
  delay(200);
  digitalWrite(red_pin, LOW);
  digitalWrite(yellow_pin, LOW);
  digitalWrite(blue_pin, LOW);
  digitalWrite(green_pin, LOW);

  //Checks while the Serial Port is available then we send '0'
  while(Serial.available() <= 0) {
    Serial.println("0");
    delay(300);
  }
}

void loop() {
  while(Serial.available()) {
    //We parse the integer values (ON/OFF) to the respective leds
    int red = Serial.parseInt();
    int yellow = Serial.parseInt();
    int blue = Serial.parseInt();
    int green = Serial.parseInt();

    //Once it's read the \n character, then we switch the according LEDs on
    if (Serial.read() == '\n') {
      digitalWrite(red_pin, red);
      digitalWrite(yellow_pin, yellow);
      digitalWrite(blue_pin, blue);
      digitalWrite(green_pin, green);
    }
    Serial.println(); //Needs two way handshake commuincation between ports. 
  }
}
Video:

Exercise 3: Two-way communication between p5js and Arduino

In this exercise, we were given a p5js code which drew a bouncing ball and it could change directions depending on some ‘wind’ variable. We were supposed to relay the information of when the ball bounced (hit the floor), then the LED would switch on, otherwise it’s off. Similarly, we would also be able to control the wind value through an analog sensor, hence I chose the photo resistor.

Schematic:

p5js Code:
let velocity;
let gravity;
let position;
let acceleration;
let wind;
let drag = 0.99;
let mass = 50;

//These are the variables which would be read and written from/to the Arduino
let sensor_wind = 0;
let led_ON = 0;

function setup() {
  createCanvas(640, 640);
  position = createVector(width/2, 0);
  velocity = createVector(0,0);
  acceleration = createVector(0,0);
  gravity = createVector(0, 0.5*mass);
  wind = createVector(0,0);
}

function draw() {
  background(255);
  
  if (!serialActive) {text("Press Space Bar to select Serial Port", 20, 30); } 
  else {text("Connected!", 20, 30); }
  
  fill(0);
  applyForce(wind);
  applyForce(gravity);
  velocity.add(acceleration);
  velocity.mult(drag);
  position.add(velocity);
  acceleration.mult(0);
  ellipse(position.x,position.y,mass,mass);
  
  if (position.y > height-mass/2) {
      velocity.y *= -0.9;  // A little dampening when hitting the bottom
      position.y = height-mass/2;
      led_ON = 1;  //If the ball makes contact with the ground, the LED will be ON
  }
  else {led_ON = 0;}   //Else the LED will be OFF
  
  //If the sensor_wind value from the Arduino that was mapped is greater than 0, then it will move the ball to the right
  if(sensor_wind > 0) {
    wind.x = 1;
  }
  
  //Else if the sensor_wind value from the Arduino is less than 0, it will move the ball to the left
  else if(sensor_wind < 0) {
    wind.x = -1;
  }
  
  //If it's 0, aka no wind, then it will just keep the ball where it is, no wind. 
  else {
    wind.x = 0;
  }
}

function applyForce(force){
  // Newton's 2nd law: F = M * A
  // or A = F / M
  let f = p5.Vector.div(force, mass);
  acceleration.add(f);
}

function keyPressed(){
  if (key == "m"){
    mass=random(15,80);
    position.y=-mass;
    velocity.mult(0);
  }
  
  if(key == " ") {
    setUpSerial();
  }
}

function readSerial(data) {
  if(data != null) {
    //Sends the LED ON/OFF information to the Arduino
    let sendToArduino = led_ON + "\n";
    writeSerial(sendToArduino);
    //Reads the sensor_wind values from the Arduino and maps its value to either -1 or 1 to correspond to wind direction. 
    sensor_wind = map(data, 0, 1023, -1 , 1);
  }
}
Arduino Code:
const int led_pin = 13;
const int lightSensor = A0;

void setup() {
  Serial.begin(9600);
  pinMode(led_pin, OUTPUT);
  pinMode(lightSensor, INPUT);

  //Check wiring: 
  digitalWrite(led_pin, HIGH);
  delay(200);
  digitalWrite(led_pin, LOW);

  while(Serial.available() <= 0) {
    Serial.println("0");
  }

}

void loop() {
  while(Serial.available()) {
    //Gets the led ON/OFF information from p5js and switches the led on/off accordingly
    int led_ON = Serial.parseInt();
    digitalWrite(led_pin, led_ON);

    //Gets the light value from the sensor and sends it to p5js
    int lightValue = analogRead(lightSensor);
    Serial.println(lightValue);
  }
}
Video:

Assignment 7: Musical Instrument (DJ)

Idea:

For my musical instrument, I thought it would be cool to create a DJ because I wanted to try and incorporate pretty much all the components we learned up until now.

This was my idea for the components:

  • The Servo Motor could act as the DJ and this can be controlled via the light sensor. So you could move your hand up and down and it would map out the Servo rotation. Additionally, I thought it would be cool to add some cool lights to kinda give that disco vibe so as you change your hand position over the light sensor, the lights would change too.
  • I added a button and a potentiometer and this would essentially play the songs that a regular DJ would play. So essentially, I have a library of songs on the Arduino code, and depending on which position the potentiometer is on, when pressed the button, it would play that appropriate song.

For now, I only added 4 songs. How this worked is, I borrowed the “pitch.h” header file that we used in class to map out the note pitches and frequencies. From that, I constructed several arrays which would be the different songs. Then that would be played out loud through the buzzer.

Schematic:

Arduino Code:

#include <Servo.h>
#include "pitches.h"

const int LightSensorPin = A0;
const int PotPin = A1;
const int Button = A2;

const int ServoPin = 9;
const int BuzzerPin = 8;
const int YPin1 = 13;
const int YPin2 = 12;
const int YPin3 = 7;
const int YPin4 = 4;

const int Melody1_Size = 13;
const int Melody2_Size = 11;
const int Melody3_Size = 30;
const int Melody4_Size = 29;

Servo DJ;

//Melodies:  
int melody1[] = {NOTE_E4, NOTE_D4, NOTE_FS3, NOTE_GS3, NOTE_CS4, NOTE_B3, NOTE_D3, NOTE_E3, NOTE_B3, NOTE_A3, NOTE_CS3, NOTE_E3, NOTE_A3};
int melody2[] = {NOTE_C4, NOTE_DS4, NOTE_F4, NOTE_FS4, NOTE_F4, NOTE_DS4, NOTE_C4, 0, NOTE_AS3, NOTE_D4, NOTE_C4};
int melody3[] = {NOTE_A3, NOTE_B3, NOTE_D4, NOTE_B3, NOTE_FS4, NOTE_FS4, NOTE_E4, 0, NOTE_A3, NOTE_B3, NOTE_D4, NOTE_B3, NOTE_E4, NOTE_E4, NOTE_D4, NOTE_CS4, NOTE_B3, 0, NOTE_A3, NOTE_B3, NOTE_D4, NOTE_B3, NOTE_D4, NOTE_E4, NOTE_CS4, NOTE_B3, NOTE_A3, NOTE_A3, NOTE_E4, NOTE_D4};
int melody4[] = {NOTE_E4, NOTE_D4, NOTE_C4, NOTE_D4, NOTE_E4, NOTE_E4, NOTE_E4, 0, NOTE_D4, NOTE_D4, NOTE_D4, 0, NOTE_E4, NOTE_G4, NOTE_G4, 0, NOTE_E4, NOTE_D4, NOTE_C4, NOTE_D4, NOTE_E4, NOTE_E4, NOTE_E4, NOTE_E4, NOTE_D4, NOTE_D4, NOTE_E4, NOTE_D4, NOTE_C4};

//Melody Durations
int m1_durations[] = {8, 8, 4, 4, 8, 8, 4, 4, 8, 8, 4, 4, 2};
int m2_durations[] = {4, 4, 4, 4, 4, 4, 4, 2, 8, 8, 2};
int m3_durations[] = {8, 8, 8, 8, 3, 3, 4, 3, 8, 8, 8, 8, 3, 3, 2, 8, 8, 4, 8, 8, 8, 8, 3, 3, 2, 8, 4, 4, 2, 4};
int m4_durations[] = {4, 4, 4, 4, 4, 4, 4, 4, 4, 4, 4, 4, 4, 4, 4, 4, 4, 4, 4, 4, 4, 4, 4, 4, 4, 4, 4, 4, 4};


void setup() {
  Serial.begin(9600);
  DJ.attach(ServoPin);                 //Pin for the Servo Motor 
  
  //Analog Inputs
  pinMode(LightSensorPin, INPUT);     //Pin for the Light Sensor
  pinMode(PotPin, INPUT);             //Pin for the Potentiometer
  pinMode(Button, INPUT);             //Pin for the Button

  //LED Pins
  pinMode(YPin1, OUTPUT);    
  pinMode(YPin2, OUTPUT);    
  pinMode(YPin3, OUTPUT);     
  pinMode(YPin4, OUTPUT);  
}

void loop() {
  //Reads all the necessary values from the analog input pins
  int LightValue = analogRead(LightSensorPin);
  int PotValue = analogRead(PotPin);
  int ButtonValue = analogRead(Button);
  int discoLight = LightValue;    //Variable for changing the lights

  //Writing the Light Sensor data onto the Servo:
  LightValue = map(LightValue, 0, 1023, 0, 180);

  //Converting the potentiometer values to the according melody
  int Melody = map(PotValue, 0, 1023, 0, 4);
  DJ.write(LightValue);

  //Writing the data for the disco lights: 
    if(discoLight < 550 && discoLight >= 450) {
    digitalWrite(YPin1, HIGH);
    digitalWrite(YPin2, LOW);
    digitalWrite(YPin3, LOW);
    digitalWrite(YPin4, LOW);
  }

  else if (discoLight < 450 && discoLight >= 350){
    digitalWrite(YPin1, LOW);
    digitalWrite(YPin2, HIGH);
    digitalWrite(YPin3, LOW);
    digitalWrite(YPin4, LOW);
  }

  else if(discoLight < 350 && discoLight >= 250) {
    digitalWrite(YPin1, LOW);
    digitalWrite(YPin2, LOW);
    digitalWrite(YPin3, HIGH);
    digitalWrite(YPin4, LOW);
  }

  else if(discoLight < 250) {
    digitalWrite(YPin1, LOW);
    digitalWrite(YPin2, LOW);
    digitalWrite(YPin3, LOW);
    digitalWrite(YPin4, HIGH);
  }

  //Offsets the PotValue to 3 in case it reaches 4, for stabilization
  if(PotValue == 4) {
    PotValue = 3;
  }
  Serial.println(Melody);

  //If the button is pressed, depending on the potentiometer value, it will play the according melodies. 
  if(ButtonValue > 1000) {
    if(Melody == 0) {
      MelodyPlayer(melody1, m1_durations, Melody1_Size, LightValue);
    }

    else if(Melody == 1) {
      MelodyPlayer(melody2, m2_durations, Melody2_Size, LightValue);
    }

    else if(Melody == 2) {
      MelodyPlayer(melody3, m3_durations, Melody3_Size, LightValue);
    }

    else {
      MelodyPlayer(melody4, m4_durations, Melody4_Size, LightValue);
    }

  }
  delay(50);
}

//This function plays the melody that it was assigned to it. It also registers the LightValue so that way the DJ can play while the song is also playing. 
void MelodyPlayer(int melodyNum[], int melodyDur[], int melodySize, int LightValue) {
    for (int thisNote = 0; thisNote < melodySize; thisNote++) {
      LightValue = analogRead(LightSensorPin);
      LightValue = map(LightValue, 0, 1023, 0, 180);
      DJ.write(LightValue);

      //To calculate the note duration, take one second divided by the note type.
      //Ex: quarter note = 1000 / 4, eighth note = 1000/8, etc.
      int noteDuration = 1000 / melodyDur[thisNote];

      tone(8, melodyNum[thisNote], noteDuration);
      //To distinguish the notes, set a minimum time between them.
      int pauseBetweenNotes = noteDuration * 1.30;
      delay(pauseBetweenNotes);
      
      //Stop the tone playing:
      noTone(8);
    }
}

Video:

Improvements:

I feel that when the song is playing, because it enters the for loop, the sensors stop reading in data, meaning the servo motors and the LED lights stop reading in data so it won’t move while the song is playing. My solution was to pass the LightValue so that the motor would at least move while the song is playing on beat. But if the motor and lights could move while the song is playing freely like it does with no song playing, that would be an amazing improvement.


Assignment 6: Arduino Input/Output (Police Siren)

Idea:

For my assignment, we were told to deal with one a digital and an analog sensor, hence for my digital sensors, I used two switches and for my analog sensors I went with the light sensor. My idea for this assignment was to mimic police siren lights because I thought it might be creative and cool.

How it would work is you have two red led lights which both have their respective switches. Hence, if you press one switch, one of the red led lights would switch on. Same case if you were to press the other switch. However, if you were to press both switches at the same time, they would blink alternatively like police siren lights.

For the light sensor, I would make it such that if the light sensor reads above some specific threshold of voltage, then it would trigger another yellow led to indicate that the light sensor has switched and this would in turn also active both the red led lights to once again alternate while blinking, mimicking that police siren light effect.

Schematic:

Arduino Code:

const int ANALOG_THRESHOLD = 500;   //Constant Threshold of light used for the Light Sensor. 


void setup() {
  pinMode(13, OUTPUT);  //Top RED LED
  pinMode(8, OUTPUT);   //Bottom RED LED
  pinMode(4, OUTPUT);   //YELLOW LED
  pinMode(A2, INPUT);   //Switch 1 (Bottom Switch)
  pinMode(A3, INPUT);   //Switch 2 (Top Switch)
  pinMode(A0, INPUT);   //Analog Reader for Light Sensor
}

void loop() {
  int analogValue = analogRead(A0);
  int switch1 = digitalRead(A2);
  int switch2 = digitalRead(A3);

  //If the bottom switch is on, then the bottom light will be on (LED connected to pin-8). 
  //Otherwise, it will remain off. 
  if(switch1 == HIGH) {
    digitalWrite(8, HIGH);
  } else {
    digitalWrite(8, LOW);
  }

  //If the top switch is on, then the top light will be on (LED connected to pin-13). 
  //Otherwise, it will remain off. 
  if(switch2 == HIGH) {
    digitalWrite(13, HIGH);
  } else {
    digitalWrite(13, LOW);
  }

  //If both switches are pressed together, then it will call the police_siren() function:
  if(switch1 == HIGH && switch2 == HIGH) {
    police_siren();
  }

  //Above all else, the switches will remain off if neither of the switches are pressed
  else {
    digitalWrite(13, LOW);
    digitalWrite(8, LOW);
  }


  //This is for the light sensor, if the analogValue read from A0 is greater than the threshold value of light.
  //Then it would let the yellow LED turn on and signal to call the police_siren() function. 
  if(analogValue > ANALOG_THRESHOLD) {
    digitalWrite(4, HIGH);
    police_siren();
  }

  //If the analogValue read is below the threshold of light, then it will remain off. 
  else {
    digitalWrite(4, LOW);
  }
}

//This is the police_siren function which simply takes the two RED LEDS and blinks them alternatively.
//Essentially mimicking a police siren lighting on top of a police car. 
void police_siren() {
    digitalWrite(13, LOW);
    digitalWrite(8, HIGH);
    delay(300);
    digitalWrite(13, HIGH);
    digitalWrite(8, LOW);
    delay(300);
}

Video:

Assignment 5: Unusual Switch

Idea:

For my unusual switch, I decided to link something I love doing into my assignment which is skateboarding. There’s this skating move called “manual” where you balance the board on your back wheels and continue riding, kinda like this picture shown below:

If the board touches the ground, it’s not a manual, however if you manage to keep the board up and balanced, you’re doing a manual. So for my unusual switch, essentially, you would do a manual, and if the back end of the board would touch the ground, then it would connect the circuit, hence acting like a switch.

So I taped some aluminum foil to my board and some to the ground. If I manage to do a manual (aka the board not touching the ground), the LED light will be off because the circuit isn’t connected. Else, if the board does touch the ground, the two foils will touch and thus connecting the circuit and the LED light would switch on.

Here is a simple circuit diagram I have constructed to show my assignment:


Video:

Midterm Final Project:

Final Project:

Idea Refinement:

Since my Midterm Progress report, these were the things I mentioned I still had to do

  • Create the food items and their specific data
  • I have to animate Luffy’s movements
  • I have to work on collision detection with Luffy and the Food objects and the Platform objects.
  • Add a time countdown
  • Create an ending screen (depending on whether the user wins/loses)
  • Allow the user to restart or go back to the Main Menu.

Initially, my game idea was to have a 1 min timer and you had to feed Luffy by keeping his hunger bar above 0. If you fail to do so within that 1 min, you lose, if you can, then you win. However, I did not like this idea so much because it felt like you could easily defeat every difficulty of the game easily and then that’s it, you’re officially done with the game. No need to play anymore.

Hence, I decided to change the structure of my game from this idea to a High-score type game. So essentially in my new idea, there is no more time countdown. There’s still a depleting hunger bar and the goal is to keep feeding luffy by jumping around and eating different kinds of food. Depending on the food item, the more points you get and you gotta try and get the highest possible score you can. The same difficulty settings apply, the greater the difficulty, the faster the hunger bar depletes.

I thought this new idea for the game was so much better because then it brings that addictive nature of “I want to beat my high-score” and allows the user to actually feel rewarded after getting a better score, rather than simply feeding Luffy for 1 min.

Project Structure:

For my code, I decided to implement a screen state system. So, I would have variables for different screen states whether it was for the Main Menu, Instruction Screen, Difficulty Screen, Game Screen or End Screen. Depending on what the user clicks on, it will direct them to that particular screen. This way, my draw function is very simple to understand as it just calls one function depending on the screen state.

For my project structure, I organized all of my coding files in a very specific way. For instance, I have a .js file for:

  • The main skecth.js = contains the setup() and draw() functions
  • A screens.js = contains the functions to display all the types of screens depending on the screen state.
  • A game.js = contains all the necessary functions related to the actual game (game settings)
  • A classes.js = contains all the classes that are used in my code. This includes the Luffy class, Food class, Platform class.

Sections i’m proud of:

I would say i’m particularly very proud of Luffy’s animations because that was the part I worked the hardest on and looks the cleanest in my opinion.

So for Luffy’s movements, I had to get a sprite sheet from the internet, and I found one that I really liked:

However the challenge with this sprite sheet was that it wasn’t evenly divided, so I had to manually divide the sheet myself into four and load those into the code as 4 seperate sprite sheets. Then since they have different widths, I had to divide them equally depending on their width to which some of them weren’t, hence I had to resplit the frames and resize the sprites several times which was quite annoying but at the end I got it to work.

Eventually, I managed to create a test code which works based on the arrow keys. So if you were to press RIGHT_ARROW, then the Running Right sprites would start cycling and so on depending on the directions. Additionally, if no keys were pressed, I would cycle through Luffy’s standing movements which make it seem more realistic.

I also had to animate the jump feature which was quite tricky to think of. After watching certain videos, I realized I would have to incorporate a sort of “gravity”, hence:

jump_settings() {
    this.velocity += this.gravity;
    this.y += this.velocity;
    
    //This ensures that Luffy is always above this.platform (including the ground which is what it is initialized to). Depending on what he's standing on, this.platform will change. 
    if(this.y > this.level) {
      this.velocity = 0;
      this.y = this.level;

      if(keyIsDown(LEFT_ARROW) && keyIsDown(UP_ARROW)) {
        this.velocity += this.boost;
        Jump_Sound.play();
      }

      else if(keyIsDown(UP_ARROW) && keyIsDown(RIGHT_ARROW)) {
        this.velocity += this.boost;
        Jump_Sound.play();
      }

      else if(keyIsDown(UP_ARROW)) {
        this.velocity += this.boost;
        Jump_Sound.play();
      }
    }
  }

This is specifically a function taken from Luffy’s jump class which monitors his jump settings. To essentially I have gravity set to some value (0.3). This will keep adding onto Luffy’s y coordinate to keep him grounded. If he goes beyond a certain y level (aka the ground), that will push him up.

Essentially, if any of the up arrow combinations are pressed, it would give Luffy a jump boost which is some value (10) and this is like how high luffy jumps. We add that to Luffy’s velocity which is essentially like the speed at which he is jumping and then at a certain peak point, since gravity is constantly pulling Luffy down, it will overcome the velocity value and drag him back down.

So overall, in my test code I was able to create this (controllable with the arrow keys):

Overall, i’m very happy with how Luffy’s animations turned out. It honestly feels like a real game which is so cool.

Other additions (Interactivity):

For the food class, I essentially added different 5 different foods, each of which having different “hunger points”:

  • Bone Meat = 200hp (Luffy’s Favourite)
  • Fried Rice = 150hp
  • Cake = 100hp
  • Vegetables = 50hp
  • Devil Fruit = -50hp.

I thought it would be cool to add a food item that would deplete his hunger even further to make it more challenging. Plus it adds to the theme of the show because Devil Fruits make you weaker in the water.

So the food items would spawn only on platforms so I had to make sure that they interact with the Platform class by retrieving its coordinates and spawning them on it. I would spawn them at different rates depending on the difficulty, so if it’s harder, more food should spawn quickly to keep up with the depleting hunger bar.

For the platform class, this was the most challenging because I had to make sure the collision detection for all platforms worked for Luffy and honestly this was the most challenging part.

Challenging Bits and Improvements:

So for the Platform class, I added several platforms onto the screen and I also decided to add a moving platform to make it more interesting. Some of the problems I ran into were with regards to Luffy landing on the platform or his head hiting the platform. It was tricky because as Luffy moved, his coordinates did not exactly match with the coordinates of the platform. Since the platform coordinates are in integers and Luffy’s are in floating points, it never equaled each other.

This was quite challenging, so to fix this, I added a range. So, if Luffy’s coordinates were somewhere in the very small range of the platforms coordinates, then he should be able to stand on it.

It was also difficult to know which platform Luffy was standing on because although Luffy would be in the specific range of being above a platform, it’s difficult to know which platform exactly because the for loop is cycling through all platforms. Hence, to fix this, I saved the x coordinate of the platform Luffy is currently standing on and kept checking, if he left that platform, then make gravity act on him to the Ground.

The moving platform was the most annoying to deal with because its x coordinates constantly moved, so I had to create another if statement for that independently to check if Luffy was on it or not.

Here’s the collision function for that:

//This function checks the collision of Luffy with all of the platforms. It checks if his head hits the platforms that he stays under it. If his feet touch the platform, he will stay on it.
platform_collide(platform, moving_p) {    
  //Checks if Luffy's head hits a platform.
  if(this.y-this.height/2 >= platform.y && this.y-this.height/2 <= platform.y+platform.h && this.x >= platform.x && this.x <= platform.x+platform.w) {
    this.y = (platform.y+platform.h) + this.height/2;
  }
  
  //Checks if Luffy's feet are on the platform.
  if(this.x >= platform.x && this.x <= platform.x+platform.w && this.y+this.height/2 >= platform.y && this.y+this.height/2 <= platform.y+platform.h) {
    this.level = platform.y - this.height/2; //this makes platform y coordinate the new ground
    this.platform_x = platform.x;
    this.platform_w = platform.w;
  }
  
  //This gets the saved platform that Luffy is currently on's x coordinate and width and checks if he is outside the range of the width of the platform. If so, then he will fall to the ground.
  else if(this.x <= this.platform_x || this.x >= this.platform_x+this.platform_w) {
    this.level = Ground;
  }
  
  //This is specifically for the moving platform, since it has constantly changing x coordinates, it has a seperate if statement check. If Luffy is outside the range of its level, he will fall.    
  if((this.x <= moving_p.x || this.x >= moving_p.x+moving_p.w) && this.y+this.height/2 == moving_p.y){
    this.level = Ground;
  }
}

I honestly think there is much room for improvement in this function. Because although it works, it doesn’t seem very elegant to me. Additionally, I haven’t included any collision in terms of Luffy’s sides with any of the platforms, only his head and feet because they were the main ones. Hence, this can definitely be an improvement.

Overall Thoughts:

This was a very long blog post but honestly it’s because I had so much to say. To be honest I don’t even feel like i’ve said everything because there are so many fine details with every single function and class in this game. I felt like I was proud of so many aspects of my code but I only put a few because this would be extremely long then XD.

I think that’s enough to say that I genuinely enjoyed making this code. Gaming has always been a passion of mine and game development is a field i’d love to get in so this entire project was amazing. It’s also why I put so much effort into every little tiny component.

I think the execution of everything is really well organized and the game is very fun and addictive (trust me i’ve played it several times) so I would say that i’m very happy with my midterm project.

Midterm Project #1: Progress Report

Concept:

For my midterm project, I was inspired by some of the mini-games in Five Nights at Freddys: https://www.youtube.com/watch?v=HB8iVkfWlBU.

Especially the balloon-boy mini-game or Chica mini-game where essentially as the main character, you’re in a platform style game and you’re supposed to go around collecting balloons to give to the children throughout the game. I found it a pretty simple concept but very fun to play around with:

I obviously wanted my own design of the game but I had trouble thinking of what to do. But, I was watching one of my favourite animes One Piece and I thought why not just make a game about that! It’s a pretty cool idea and it’s pretty motivational for me so I went along with it!

My Game Idea:

The game idea is pretty cool. Essentially the main character of the series is a guy called Luffy, and he is known for always being hungry and eating everything he can possibly find. So, I decided to make a similar platform style game where Luffy would jump around eating as much food as possible.

To make it into a game, I thought of implementing a depleting hunger bar, and the goal is to keep feeding Luffy by jumping around and eating food before that hunger bar runs out and the only way to refill that hunger bar is to eat food. If you manage to satisfy Luffy’s hunger bar before time runs out, you win! Else you lose!

Progress:

With regards to my process, i’ve so far, made the main menu screen. This main menu screen has some music playing in the background, I added a slider so the user can control the volume. I added an instructions tab so the user knows how to play. I also added a difficulty system, where the user can select between Easy, Medium and Hard mode. The idea is, the greater the difficulty, the faster Luffy’s Hunger bar depletes, hence the more challenging it gets to satisfy Luffy’s hunger.

I’ve also set the stage for the platforms of the game and i’ve added an animation for the hunger bar depletion when the game starts. If the hunger bar reaches 0, for now it just says “Game Over”:

Game:

Things still left to do:

  • I have to create the food items and their specific data (this includes their spawn point, spawn rate and food value)
  • I have to animate Luffy’s movements (using a sprite sheet i’ve found on the internet)
  • I have to work on collision detection with Luffy and the Food objects and the Platform objects.
  • I have to ensure that when a collision is detected between Luffy and Food, it should refill the Hunger Bar
  • Add a time countdown
  • Create an ending screen (depending on whether the user wins/loses)
  • Allow the user to restart or go back to the Main Menu.

Terrifying parts of the code:

In my opinion, I think the most terrifying bit is going to be two things, animating Luffy’s movements, being both left and right and especially the jumping animation. The issue with this is, if you press both the LEFT and UP arrow keys together, they don’t move the object diagonally because it registers as one key pressed at a time, so to handle smooth movement is going to be tricky. I’m thinking to avoid this I might have to ensure the platforms are close enough for the user to maneuver across the game.

Also animating Luffy’s jump is going to be extremely tricky. For this, I am thinking of creating a sort of gravity variable, which will allow Luffy to move up a maximum distance when pressed the UP Arrow key and then after that, he would move down in the opposite direction. Still need to do some thinking for that.

Finally, another tricky thing would be collision detection. I’m wondering how to ensure that Luffy can stand on the platforms. For now, i’ve set up a class for Platforms and a class for Luffy and if their x and y coordinates are the same, then Luffy can stand on the platforms. Still need to do some more thinking of that.

Overall:

Overall, I feel like this can be a really cool game. The easy bit is kinda done but the challenging bits are here and I’ll work hard to ensure the game is great!

Assignment 4: Data Visualization

Concept:

Upon looking at a bunch of open source data sets, I found a data set for Exoplanets that have been documented outside our solar system by NASA: https://www.kaggle.com/datasets/adityamishraml/nasaexoplanets

I thought this would be pretty cool to implement as a form of data visualization as I don’t think I’ve seen any examples of data visualization for astronomy or space hence, I decided to implement this into my assignment.

Process and Planning:

For visualizing the exoplanets, I didn’t want to simply draw an ellipse as I thought it wouldn’t look that great and it would be too simple. Hence, I found some nice planet art online and used some of them to visualize some of the exoplanets:

I used a few of these planets and put them into some img variables and then put them all into an array of planet designs so that I could access any design I wanted from this array anytime I wanted. I also loaded the entire exoplanets.csv dataset into an array called exoplanet_data which I would plan to use later in my code.

function preload() {
  exoplanet_data = loadStrings("exoplanets.csv");

  planet1_img = loadImage("Planet1.png");
  append(planet_designs, planet1_img);
  
  planet2_img = loadImage("Planet2.png");
  append(planet_designs, planet2_img);
  
  planet3_img = loadImage("Planet3.png");
  append(planet_designs, planet3_img);
  
  planet4_img = loadImage("Planet4.png");   
  append(planet_designs, planet4_img);
  
  planet5_img = loadImage("Planet5.png");
  append(planet_designs, planet5_img);
}

I knew that I would have to create a class in which each exoplanet would be its own object, hence I made one here:

class ExoPlanet {
  constructor() {
    this.x;                  //X coordinate for the planet                    
    this.y;                  //Y coordinate for the planet 
    this.planet_radius;      //Radius of the planet image
    this.design_num;         //Type of planet design from planet_designs
    this.data;               //String data of the planet
    this.data_split;         //Splits the data into an array of its data
    
    this.init();
    this.printData();
  }
  
  //This function initializes all the variables for each exoplanet.
  init() {
    this.design_num = int(random(5));
    this.planet_radius = planet_designs[this.design_num].width/10;
    
    this.x = mouseX;
    this.y = mouseY;
    
    this.data = exoplanet_data[data_count];
    this.data_split = split(this.data, ',');
    if(data_count != exoplanet_data.length) {
      data_count++;
    }
    else {
      print("All planets printed!");
    }
  }
  
  //This function takes a random planet image and draws it at a random (x,y) coordinate on the canvas
  draw() {
    image(planet_designs[this.design_num], this.x, this.y, planet_designs[this.design_num].width/5, planet_designs[this.design_num].height/5);   
  }
  
  displayData() {
    fill(255, 255, 180);
    rect(mouseX, mouseY, 500, 120);
    
    textAlign(LEFT);
    fill("black");
    
    text("Planet Name:", mouseX+10, mouseY+30);
    text("Distance from Earth (ly):", mouseX+10, mouseY+55);
    text("Stellar Magnitude (brightness):", mouseX+10, mouseY+80);
    text("Planet Type:", mouseX+10, mouseY+105);
    
    fill("red");
    text(this.data_split[0], mouseX+140, mouseY+30);
    text(this.data_split[1], mouseX+235, mouseY+55);
    text(this.data_split[2], mouseX+290, mouseY+80);
    text(this.data_split[3], mouseX+125, mouseY+105);
  }
  
  //This function is for debugging and code checking to ensure everything runs smoothly.
  printData() {    
    print("Planet Image:",this.design_num);
    print("Planet Radius:",this.planet_radius);
    print("Planet Data:",this.data);
    
    print("Planet Name:",this.data_split[0]);
    print("Distance (from Earth):",this.data_split[1]);
    print("Stellar Magnitude:",this.data_split[2]);
    print("Planet Type:",this.data_split[4]);
  }
}

In this class, each planet has:

  • An (X, Y) coordinate of the planet on the canvas (this would be where the user’s mouse is when they click)
  • The radius of the planet (so when the user moves close to the planet, its data pops up)
  • Design number: This indicates any one of the planet images shown perviously.
  • Data: This entails the particular planet data from the csv file for that planet.
  • Data_Split: This variable would be an array of each component of the data of the planet, hence, it would be easier to print out its data.

I had an initialize function, init(), to initialize it with some variables. I had another function which would draw the planet onto the canvas using the image(). Finally, I had a displayData() function which would print out a rectangle containing some of the vital information of the exoplanet’s data.

How does the data pop up?

//Here we continuously draw the planets on the canvas
for(let j=0; j<exoplanets.length; j++) {
  exoplanets[j].draw();
  planet_dist = dist(exoplanets[j].x, exoplanets[j].y, mouseX, mouseY);
  
  //If the mouse coordinates hit's the planet, it will print the data of that planet.
  if(planet_dist < exoplanets[j].planet_radius) {
    exoplanets[j].displayData();
  }
}

Essentially, in the draw() function, it will continuously print the exoplanet using the draw function from the class. It calculates the planet_dist between the planets coordinates and the user’s mouse. If the user’s mouse touches the planet, then it will call the displayData() function.

I added it such that the user can add a planet onto the canvas by simply clicking their mouse as well.

Final Piece:

Overall Thoughts:

Overall, I’m pretty happy with the interactivity and design with my assignment. Perhaps, for improvements I could have included more planet shapes, and maybe even added some cool sound effects to enhance the experience a little more. More improvements, I could have also made sure that if the planet size was bigger, the planet drawn could also be bigger and vice versa. This way the data visualization is even stronger.

Midterm Project Ideas:

For my midterm, I wanted to develop a game since I really love games and would love to get into game development. Some of the ideas that initially sparked in my head was perhaps something like “Battleship” or maybe something like a parody of “Subway Surfers” where the user can continuously run and get the highest score or something like that. For now these are the ideas I thought of initially but I’d love to come up with a cool unique game of my own.