
Concept:
My concept for the final presentation is the Interactive Glove: a completely different way of interacting with the computer. The idea behind this project comes from “A Brief Rant on the Future of Interaction Design”, where interaction with digital media is discussed and criticized. After thinking about it thoroughly, I imagined that the best way to innovate in the interaction field would be to use a medium that we commonly use, our hands, but in a way that will utilize the limbs differently.
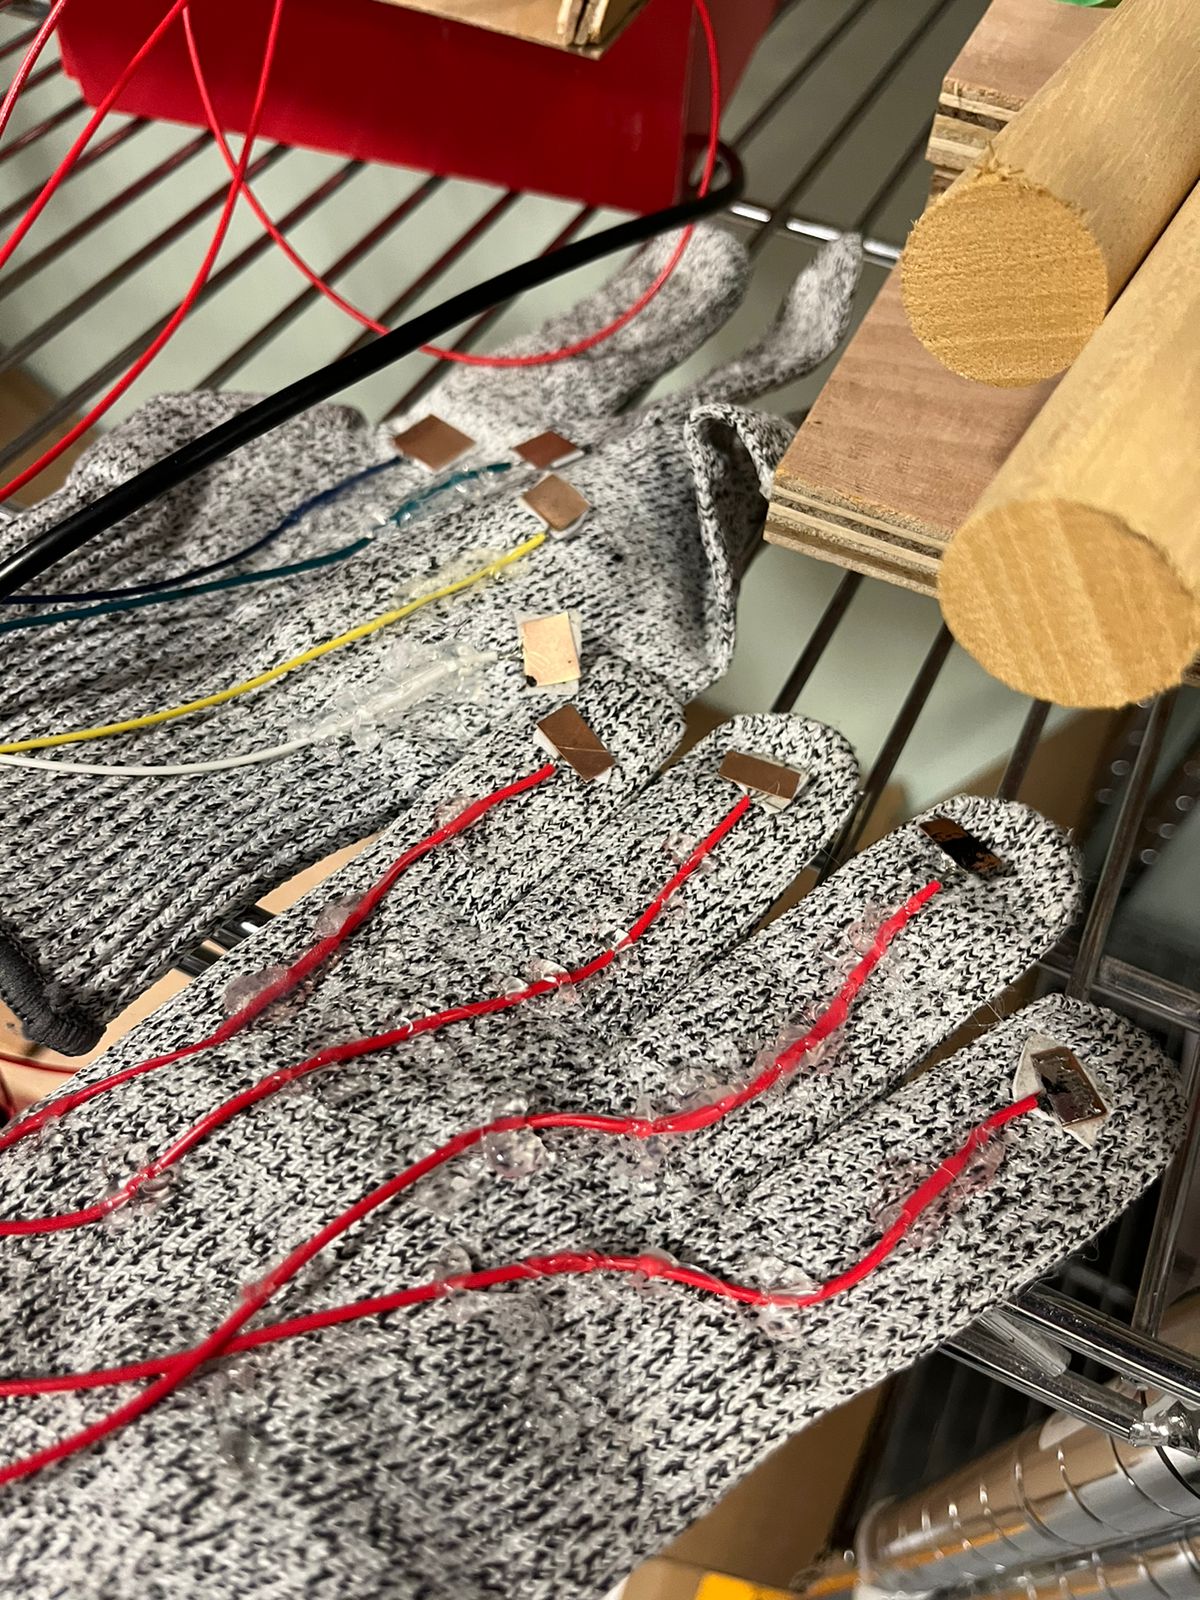
In this case, we can imagine the interactive glove as a binary system: we have 4 sensors in the left hand and 4 pins on the right hand that will turn on a sensor on contact. This allows for the user to have versatility in terms of how they want to use the glove. Some users will prefer to use one finger for all 4 sensors, while others might require 4 fingers for 4 sensors. Because it is a binary system, the glove can do anything: It can become a mouse, a keyboard, a switch, a controller, etc…
To show the versatility of this input method, we will use p5.js alongside some small games and experiences in order to show how the glove inputs values.
Implementation:
P5.js Sketch: https://editor.p5js.org/ff2185/sketches/A4mnwlg4h
Arduino code:
/*
  DigitalReadSerial

  Reads a digital input on pin 2, prints the result to the Serial Monitor

  This example code is in the public domain.

  https://www.arduino.cc/en/Tutorial/BuiltInExamples/DigitalReadSerial
*/

// digital pin 2 has a pushbutton attached to it. Give it a name:
int inputA = 2;
int inputB = 3;
int inputC = 4;
int inputD = 5;

// the setup routine runs once when you press reset:
void setup() {
  // initialize serial communication at 9600 bits per second:
  Serial.begin(9600);
  pinMode(LED_BUILTIN, OUTPUT);
  pinMode(inputA, INPUT);
  pinMode(inputB, INPUT);
  pinMode(inputC, INPUT);
  pinMode(inputD, INPUT);
  while (Serial.available() <= 0) {
    digitalWrite(LED_BUILTIN, HIGH);  // on/blink while waiting for serial data
    Serial.println("0,0");            // send a starting message
    delay(300);                       // wait 1/3 second
    digitalWrite(LED_BUILTIN, LOW);
    delay(50);
  }
}

// the loop routine runs over and over again forever:
void loop() {
  // print out the state of the button:// wait for data from p5 before doing something
  while (Serial.available()) {
    digitalWrite(LED_BUILTIN, HIGH);  // led on while receiving data
    if (Serial.read() == '\n') {
      // read the input pin:
      int stateA = digitalRead(inputA);
      int stateB = digitalRead(inputB);
      int stateC = digitalRead(inputC);
      int stateD = digitalRead(inputD);
      delay(5);
      int sensor2 = analogRead(A1);
      delay(5);
      Serial.print(stateA);
      Serial.print(',');
      Serial.print(stateB);
      Serial.print(',');
      Serial.print(stateC);
      Serial.print(',');
      Serial.println(stateD);
    }
  }
  digitalWrite(LED_BUILTIN, LOW);
  delay(1);  // delay in between reads for stability
}
Arduino:
The Arduino Design is a simple switch system with 4 resistors connected to the ground, each connected to its proper pin and a cable which will be the connection to the 5v source. On the other side, we connected 4 cables to the 5v strip. This allows us to create a circuit in which any time 5v touches a cable that is on the other side, it will set the digitalInput of the pin to 1.
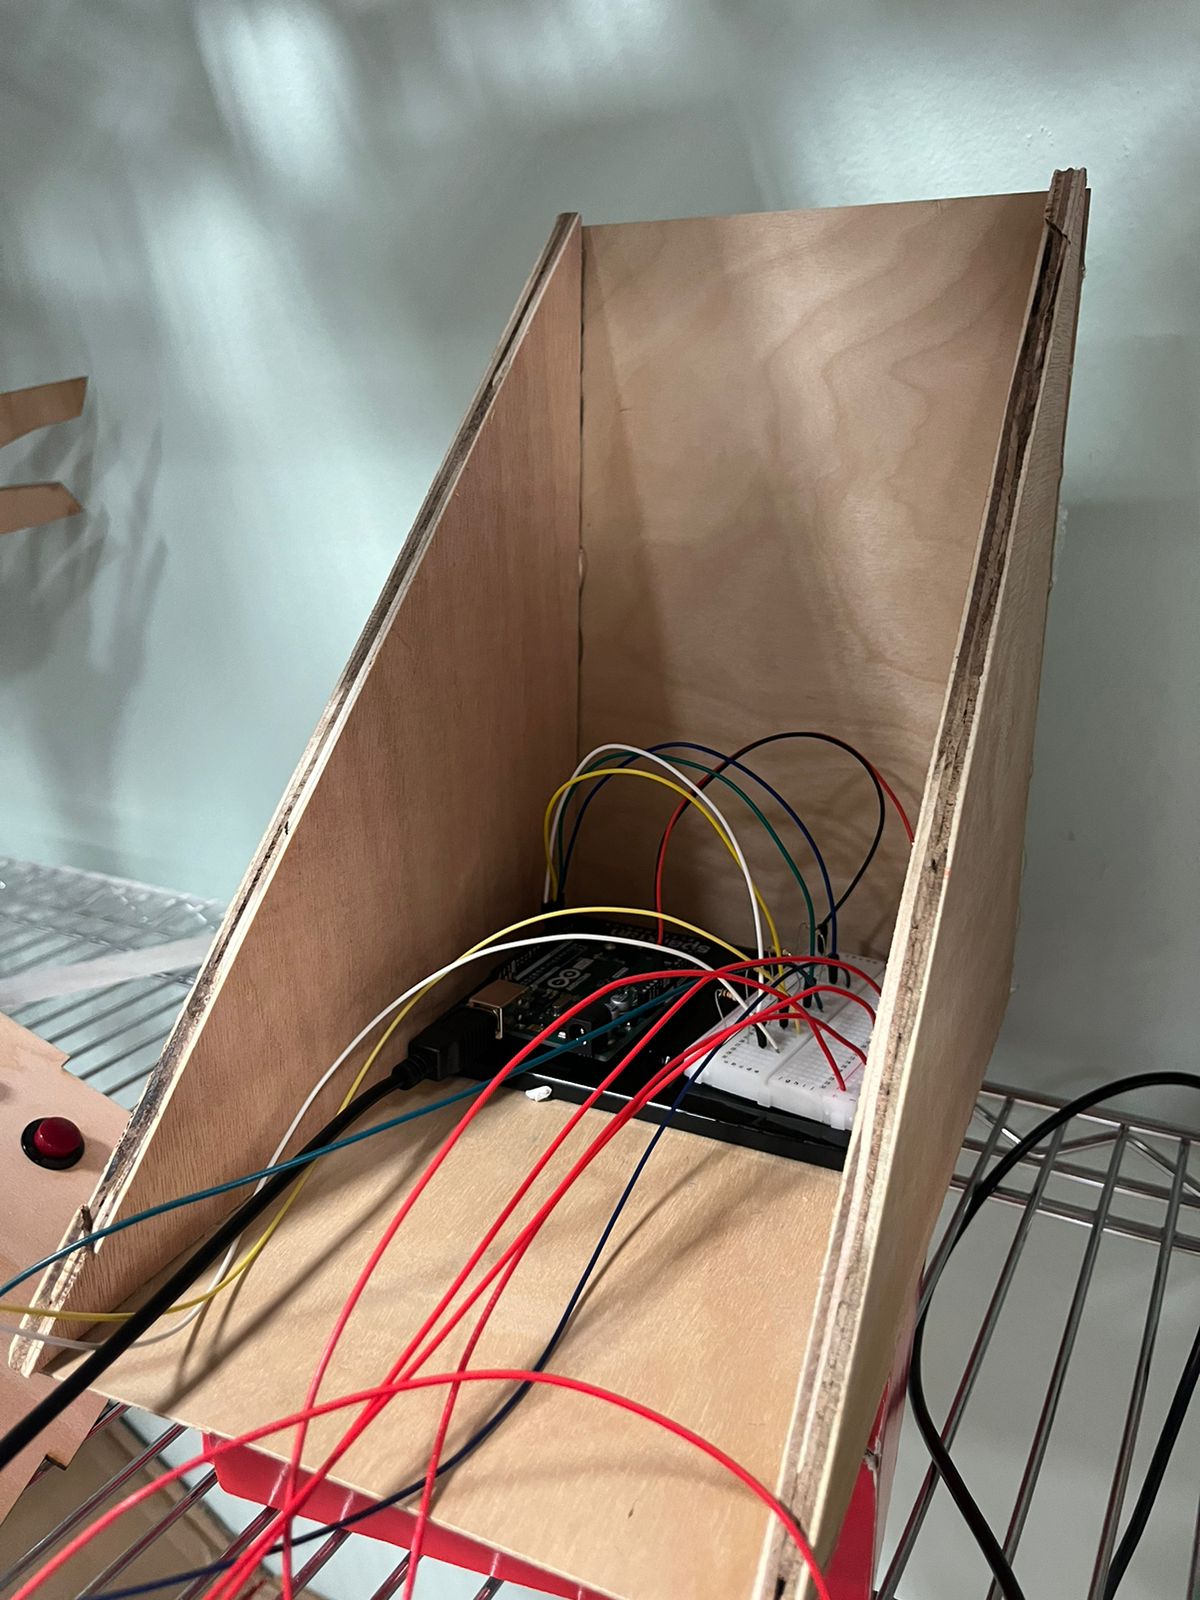
To cover the circuit, I handcrafted a “sandwich” shaped box that will allow the cables to move freely in the vertical axis. The biggest problem was to create an enclosure that would not disturb the cable movement. My idea, to not utilize the classic open top box, was to do this tringular enclosure that allows cables to move up and down freely. Due to the pure nature of the circuit itself, horizontal movement has to be limited in order to not disturb the functioning, so that is why movement is only constrained in the vertical axis
P5.js:
The P5.js sketch is a combination of past projects, examples provided by p5.js and other sketches I have gathered during my research. Each one of the experiences/games is a representation of different inputs styles: For example, the piano will behave differently based on the combination of fingers we press, while the rocket moves from left to right with the index and ring finger.
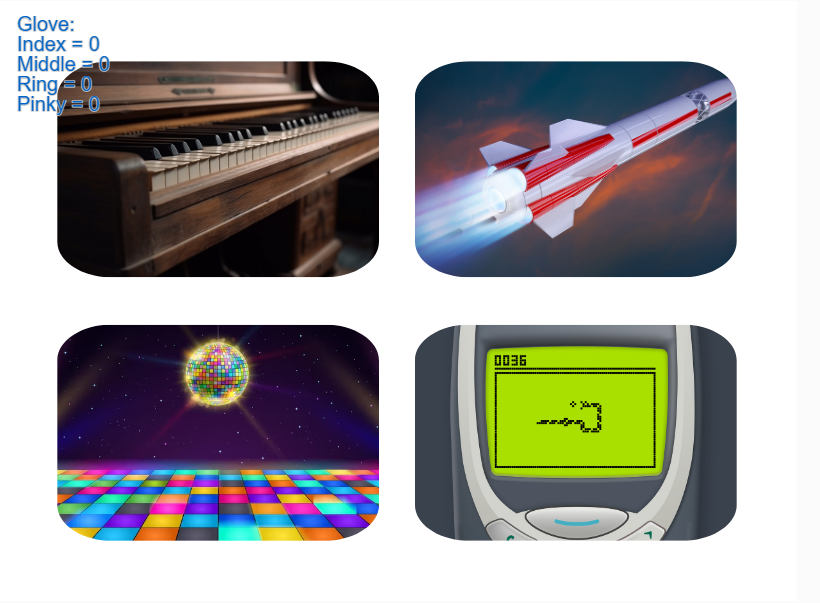
The available experiences are the following:
- Piano: The piano experience is a recreation of a previous project. Back then, I utilized the keyboard in order to press the piano keys and generate the sound. This time, the gloves will do that function. Every key is mapped to a certain combination. For example. the “DO” note corresponds to touching just the index finger sensor. The following one is mapped to the middle finger, and so on until you will need to use two fingers. The input method shown here is converting the glove into a set of 2^4 inputs. In other words, a binary input.
- Rocket: The Rocket Game involves long pressing a single sensor in order to fly the rocket up, go to the left or go to the right. There is no score, no timer, just you and a single fuel bar. Careful, if you go too low you will crash. Try your best to stay on air!
This game simulates what it would be to use it as a mouse (the mouse clicks) to control the rocket. - Disco: The Disco experience is simple. Out of the 4 buttons you press, each of them will show a different ever-changing background. Try all of them and focus on the colors!
This shows the glove working as 4 different buttons independent of each other. - Snake: The Snake Game is all about trying to eat the fruits that will randomly spawn in the map. The 4 sensors in the glove represent the 4 directions that the snake can go to: left, right, top, down. This makes the glove resemble the keyboard arrows system.
Code:
One piece of code I am proud of is the state management. A seemingly trivial problem becomes a major challenge when you realize every single experience needs to have a different setup. More over, the different frame rate, strokes, fill, background and other setting that vary in each screen make it especially specific to manage.
if (state == "intro") {
      scoreElem.html("");
      drawIntro();
    } else if (state == "piano") {
      scoreElem.html("");
      drawPiano();
      if (frameCount % 60 == 0) {
        for (var i = 0; i < 10; i++) {
          rSide[i].white();
          black[i].white();
          mid[i].white();
          lSide[i].white();
        }
      }
    } else if (state == "rocket") {
      rectMode(CENTER);
      scoreElem.html("");
      drawRocket();
    } else if (state == "disco") {
      scoreElem.html("");
      drawDisco();
    } else if (state == "snake") {
      scoreElem.html("Score = 0");
      frameRate(15);
      stroke(255);
      strokeWeight(10);
      drawSnake();
    }else if(state == "tutorial"){
      stroke(255);
      scoreElem.html("");
      drawTutorial();
    }
Another code I especially like is the code that allows the snake to move:
function updateSnakeCoordinates() {
  for (let i = 0; i < numSegments - 1; i++) {
    xCor[i] = xCor[i + 1];
    yCor[i] = yCor[i + 1];
  }
  switch (direction) {
    case "right":
      xCor[numSegments - 1] = xCor[numSegments - 2] + diff;
      yCor[numSegments - 1] = yCor[numSegments - 2];
      break;
    case "up":
      xCor[numSegments - 1] = xCor[numSegments - 2];
      yCor[numSegments - 1] = yCor[numSegments - 2] - diff;
      break;
    case "left":
      xCor[numSegments - 1] = xCor[numSegments - 2] - diff;
      yCor[numSegments - 1] = yCor[numSegments - 2];
      break;
    case "down":
      xCor[numSegments - 1] = xCor[numSegments - 2];
      yCor[numSegments - 1] = yCor[numSegments - 2] + diff;
      break;
  }
}
Learnings and Improvements
For this final project, I feel that I have learned a lot from the Arduino development field. Small things that we usually omit during the process of creating these types of projects become bigger problems when it comes to user usability and versatility. For example, the contacts for the glove are really hard to match due to the lesser amount of copper I had available. Moreover, the cables were extremely hard to position properly in order to fix them but also allow movement of the whole arm.
In general, the construction process for the cables and circuit was the hardest part of this project. I would like, in future iterations to improve the cable management and the outside box, maybe ideate some other way to construct a box that will allow the movement of the glove but also easy access if needed (open box).
To conclude, I have really enjoyed every step I took in this class. I have learned ways of expressing my ideas and thoughts in manners I would have never imagined. I have grown to love the idea of exploring new horizons and implementing new designs, approaches, methods for my projects.
Thank you and see you soon.