
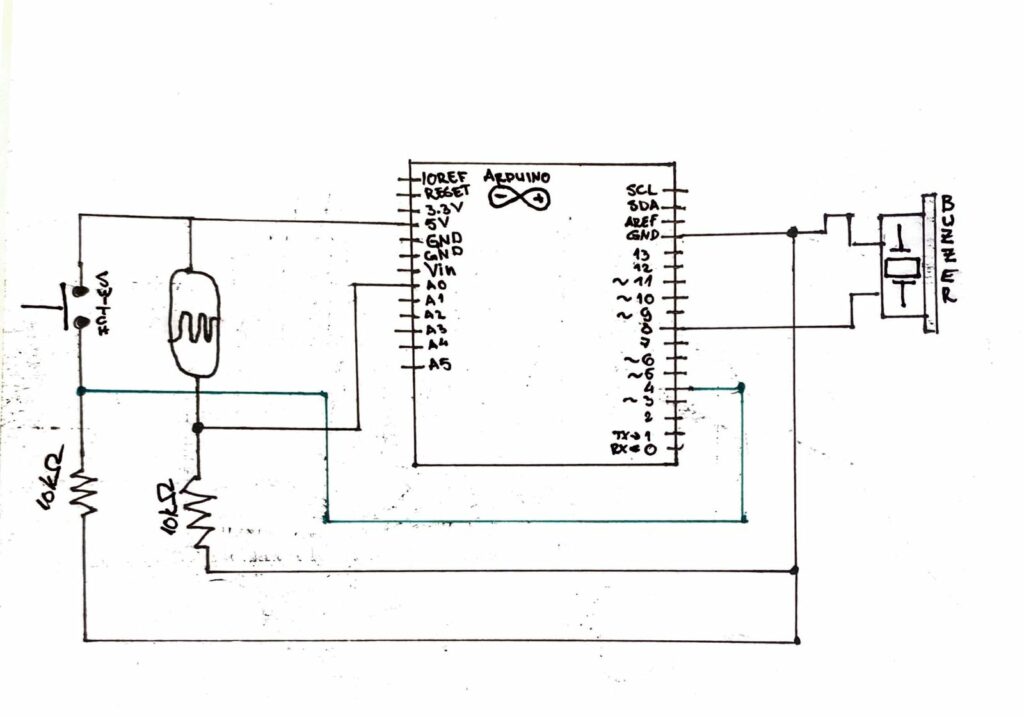
Concept:
For this assignment, we wanted to create a version “Theremin” that will be linked with the light sensor and will produce sound based on the light intensity received by the sensor on Arduino board. Additionally, we’ll add the switch to this Light Theremin to change the frequency of the sound and to play different sounds using the light sensor. The frequency only changes while the button is pressed, we did this to change tune while playing the theremin which makes it easier for the user to play different tone from both frequencies. In short, the analog in takes values from the light sensor and these values are converted within a certain limit to be played through the buzzer. When the button is pressed, the limit of these values changes and thus giving us the tone of higher frequency.
SCHEMATIC:
 Video:
Code:
// create variable to hold sensor value
int sensorValue;
// UNO's analog read sensors use "analog to digital converter" (ADC),
// which means it divides the reading coming from the sensor (0 to 5 volts) into 1024 equal steps.
// Thus, the reading from our photoresistor could range from 0 to 1023,
// however it is unlikely to use the full range so we will calibrate it.
// For now, create variables to hold the high and low value for our photoresistor range,
// make them the opposite of the max/min values and we will calibrate them down.
int sensorLow = 1023;
int sensorHigh = 0;
// set the LED pin, 13 is the built in LED
const int ledPin = 13;
int switchFreq = 4;
int switchVal;


void setup() {


  pinMode(ledPin, OUTPUT);
  pinMode(switchFreq, INPUT);

  digitalWrite(ledPin, HIGH);

  delay(500);

  digitalWrite(ledPin, LOW);
  delay(500);
  digitalWrite(ledPin, HIGH);
  delay(500);
  digitalWrite(ledPin, LOW);
  delay(500);
  digitalWrite(ledPin, HIGH);

  // after it blinks for 2 seconds, its time to calibrate the photoresistor readings
  // create a loop with while() that lasts for 5000 ms to calibrate the light sensor according the setting,
  while (millis() < 5000) {
    // use analogRead() to get a reading from the photoresistor,
    sensorValue = analogRead(A0);
    // create two conditions using if() to calibrate the max and min sensor values,
    // raise the sensorHigh if the current reading is higher:
    if (sensorValue > sensorHigh) {
      sensorHigh = sensorValue;
    }
    // lower the sensorLow if the current reading is lower:
    if (sensorValue < sensorLow) {
      sensorLow = sensorValue;
    }
  }

  // turn the LED off, calibration is done!
  digitalWrite(ledPin, LOW);
}


void loop() {
  //read the input from A0 and store it in a variable
  sensorValue = analogRead(A0);
  switchVal = digitalRead(switchFreq);

  // map(currentValue, oldRange1, oldRange2, newRange1, newRange2)
  // I reverse their order (high, low) so that shading the photoresister will cause a higher tone.
  // the new range is the range of Hz to use to produce sound, which for UNO can be from 31 to 65535 Hz.
  // I set it from 0 to 300, which is a more normal sound range and if a button is pressed I change the values between 500 to 1000
  // since we start at 0, full light will make no tone, full shade will make the highest tone.
  if (switchVal == HIGH){
  int pitch = map(sensorValue, sensorHigh, sensorLow, 500, 1000);
  tone(8, pitch, 10);
  }
  else{
    int pitch = map(sensorValue, sensorHigh, sensorLow, 0, 300);
    tone(8, pitch, 10);
  }
  // use the tone function to create sound in the piezo,
  // tone(pin#, value, milliseconds)


  // add a delay to make the current tone sustained for a few ms to adjust the quality of the tone
  delay(15);
}
Future improvements:
For future, we want to use more than 2 limits of frequencies and we want to add instruments that could be switched using the button. After completing this project, we realised that playing sound using the light sensor is easier than any other sensor since it only requires basic movements of hands to block the light or allow the light to the sensor. Thus, in future, we’d like to add more instruments like electric guitar frequencies and allow users to switch between these instruments using the switch buttons.