Assignment 1- Self Portrait


IDEA AND PROCESS

In this Assignment we were to use p5Js to create a portrait of ourselves. I used basic shapes ( ellipses, rectangles, lines and arcs ) in creating my figure. I used hex color codes in generating the colors in my portrait. The diagram below shows the rough work and though process that went into producing my portrait( though it doe not look exactly like me ).

REFLECTION AND FUTURE IMPROVEMENTS

For the code, i used basic coding technique and involved no functions  on my own. In future, I intend to explore ways to make the portrait more interactive and dynamic. I intend make the eyes move relative to the position of the mouse, and also incorporate some objects into the background.

Let’s Party

Overall Experience
Even though I am a CS major, I started my coding journey only after coming to NYUAD. But all the CS courses I have taken so far don’t involve a creative expression of thoughts and imagination, but this course started off itself with an interesting assignment – to code a self-portrait. I wanted my self-portrait to reflect my vibes, so I wanted the theme to be related to a party.

Process and Progress
Initially, I just explored different functions and methods that I could use to make my theme alive. So, I added a colorful dance floor, for which I used 2d arrays to arrange the rectangles and then used drawingContext.shadowBlur to give a realistic shadow effect, which turned out good. Then I wanted the background to shine, like with lights, so I added little white ellipses in the background.

function disco(Y) {
  for (let x = 0; x <= 600; x += 30) {
    for (let y = Y; y <= 400; y += 30) {
      drawingContext.shadowBlur = 20;
      drawingContext.shadowColor = color(random(255));
      fill(random(255), random(255), y);
      rect(x, y, 30, 30);
    }
  }
}

function sparkle() {
  fill(255);
  noStroke();
  for (let i = 0; i < 100; i++) {
    ellipse(random(width), random(height), random(1, 6));
  }
}

As for drawing myself, in the beginning, the task was to identify which shapes would be the best to use and understand how to use them – rectangles, circles, triangles, ellipses, Bezier curves, Bezier vertices, curves, and arcs. Using Bezier curves and vertices was my favorite. The most difficult part for me was the arms to have two parts of the arm properly rotate. I explored the constrain function and used it to constrain the arms to a region. At first, I found it hard to get the logic on how I could use this function to constrain the parts of the arm and rotate them properly. But I am happy I could figure that out in the end.

function moveHands() {
  strokeWeight(20);
  stroke(25);

  //left arm
  line(245, 180, constrain(mouseX - 70, 175, 325), constrain(mouseY, 150, 250));
  line(
    constrain(mouseX - 70, 175, 325),
    constrain(mouseY, 150, 250),
    constrain(mouseX, 150, 350),
    constrain(mouseY + 10, 50, 300)
  );

  //right arm
  line(
    width - 250,
    180,
    constrain(mouseX + 70, 325, 425),
    constrain(mouseY, 150, 250)
  );
  line(
    constrain(mouseX + 70, 325, 425),
    constrain(mouseY, 150, 250),
    constrain(mouseX, 250, 450),
    constrain(mouseY + 10, 50, 300)
  );

  strokeWeight(1);
  noStroke();
}

Reflection
There is so much more to learn and explore that I can never say my project is fully perfect. Each time I found something or tried something, I kept feeling that I should expand my project more and more. I looked forward to exploring much more in this class and letting my creative side explore.

Assignment 1: Self-Portrait in P5.js!


Concept

As part of the first assignment, I have produced an animated face, alongside a Captain America Shield, and a Flash Logo on a Canvas.

Flash has been a superhero that I have watched my entire childhood, and Captain America eventually became my favorite as I grew older and started watching Marvel Movies – I draw inspiration from the Captain!

Since my drawing skills are not that amazing, I wanted to sketch something that looked simple and clean. Hence, I went forward with representing things that I thought represent myself. Though I like simplistic things, I try to work towards perfection, and so I could not help but learn to add some interactivity on my Canvas that would draw the user’s attention and add complexity in the skills that would be needed to produce such a sketch.

Embedded Canvas

The final production for my assignment is as follows:

Code

For me, personally, a clean and understandable code is always admirable. Therefore, I am proud of the entirety of the well structured and commented code. However, there are certain sections that I would choose to highlight here.

The first segment of my code that could stand out was the usage of different functions to draw the different objects. This allowed me to structure my code, but also allow dynamic positioning of the objects on the canvas, instead of fixed positions. For this purpose, I had to have relative measurements within each function from a specific starting point. Therefore, in this manner, I have adapted my objects to be usable in place of even pngs or other graphics:

// Call to the function that draws the Iron Man Mask
face(ispx, ispy);

// Call to the function that draws the Captain America shield
captainAmerica(cspx, cspy);

// Call to the function that draws the Flash Logo
flash(fspx, fspy);

The way I positioned every element with a reference point is as follows:

// Function to Draw the Captain America Shield
function captainAmerica(cspx, cspy) {
  // To leave no strokes, and for smooth edges of the shield
  noStroke();

  // Drawing the border layer with 'Grey' for the entire sheild
  fill(192);
  circle(cspx, cspy, 385);

  // Drawing the red outermost circle
  fill(170, 20, 40);
  circle(cspx, cspy, 380);

  // Drawing the grey 'in-between' circle
  fill(192);
  circle(cspx, cspy, 325);

  // Drawing the innermost red circle
  fill(170, 20, 40);
  circle(cspx, cspy, 265);

  // Drawing the 'grey border' for the 'Blue' circle
  fill(192);
  circle(cspx, cspy, 205);

  // Drawing the inner 'Blue' circle
  fill(0, 0, 66);
  circle(cspx, cspy, 200);

  // Setting the grey color for filling the star
  fill(180);

  // Drawing the shape of the star with the following vertices
  beginShape();
  vertex(cspx, cspy - 100);
  vertex(cspx - 60, cspy + 80);
  vertex(cspx + 92, cspy - 40);
  vertex(cspx - 92, cspy - 40);
  vertex(cspx + 60, cspy + 80);
  vertex(cspx, cspy - 100);
  endShape(CLOSE);
}

Moreover, the computational logic for allowing the drag and drop of an object was something that also took some creative logical thinking. I researched and utilized the ‘mousePressed() and the mouseReleased() functions, coupled with the usage of an IF Statement.

function mousePressed() {
  // Checks if the mouse is pressed in the periphery of the Face,
  if (
    mouseX > ispx - 80 &&
    mouseX < ispx + 80 &&
    mouseY < ispy + 100 &&
    mouseY > ispy - 110
  ) {
    onface = true;
  }
function mouseReleased(event) {
  // If the face was being held, releases it on the mouse released position on the canvas
  if (onface == true) {
    onface = false;
  }

The following segment of the code is within the ‘draw’ function:

// Checks if the mouse is being held on the face,if so, it drags it along!
if (onface == true) {
  ispx = mouseX;
  ispy = mouseY;
}

Improvements

I certainly believe that my on-paper creativity, keeping the coding aspect aside, could be improved. The lack of an artsy touch in this canvas is evident, and that is something I could spend more time on!

The full canvas is linked here.

Week 1 – Self Portrait

Self-Portrait
For the first assignment, we were asked to make a self-portrait using p5js. For this, I wanted to create a drawing that reflects my personality. I am usually bright and cheerful and tend to get excited about little things – so I wanted to represent this in my self-portrait. With this assignment, I also aimed to familiarize myself with as many p5js features and tools as possible.


Process
For this, I first went through the p5js reference to learn about the colors and different shape tools (ellipse, triangle, quad, bezier, curves, etc.) and practiced them to get a grip on how to draw lines and shapes. Then, I used a bottom-up approach by starting with the most minor facial features and building them up to the whole face, hair, and then the background and interactivity. I used ellipse to draw the eyes, quad for the nose and neck, and then arcs for the lips. Then I used bezier and quad for the hair and so on. With the face, I felt like I could not get as intricate because it would have required a lot more lines/shadows, etc and I found the process tiring. However, the next part was my favorite – it was the background, borders, and interactivity. For this, I got to use for-loops and experiment with different backgrounds and color schemes before I landed on one that I liked best. I initially tried multi-colored quads in the background, then a check background made with a for loop, and finally the pastel-colored stripes.

Interactivity
Something I really wanted to add was an element of randomness in my design – hence the moving circles in the background that randomly change positions when the mouse is pressed. Moreover, their concentration varies relative to the position of the mouse. As you slide the mouse toward the top-right corner, the circles become more saturated and as you move further along the x and y axis, they grow further apart.

I also added other interactions when the mouse is pressed and moved. One is the moving circles. On top of that, the face also smiles bigger, the eyebrows rise, the pupils dilate, and the cheeks become pinker when the mouse is pressed displaying the excitement the avatar feels when seeing the moving circles. Also, some strokes appear as well.

Code

function setup() {
  createCanvas(500, 500);
}

function draw() {
  
  
  let faceX = 250, faceY=210, faceWidth = 180, faceHeight=220;
  background('#C8C7D7');
  
  //background stripes
  noStroke();
  let b = true;
  for(let i=0; i<500; i+=10){
    for (let y=0; y<500; y+=10){
      if(b==true)
      {fill('#EDECF2')
      b=false;}
    else{
      b=true; 
      fill('#C8C7D7');}
    rect(i,y,10,10)
    }
  }
  let c=true;
  for(let i=0; i<500; i+=20){
    for (let y=0; y<500; y+=20){
      if(c==true)
      {fill('#C8C7D7')
      c=false;}
    else{
      b=true; 
      fill('#EDECF2');}
    rect(i,y,10,10)
    }
  }
 
  //background circles when mouse is pressed
  if(mouseIsPressed){
    stroke(205)
  for(let i = 0; i<100; i++)
   {
     fill('#A89DBD')
     num1= random(5);
     num2 = random(5);
     ellipse(mouseX*num1,mouseY*num2, 15, 15);
   }
}
  
  //hair 
  fill("#4d2511");
  quad(150, 150, 350, 150, 400, 400, 100, 400);
  fill(255, 213, 173);
  quad(200, 230, 300, 230, 320, 280, 180, 280);
  
  //face
  noFill()
  noStroke()
  arc(250, 350, 100, 80, 0, PI);
  stroke(0)
  fill(252, 210, 155);
  ellipse(faceX,faceY,faceWidth,faceHeight); 
  fill(252, 210, 155);
  
  //neck
  noStroke()
  quad(220, 280, 280, 280, 300, 360, 200, 360);
  
  //eyes
  fill(255)
  ellipse(215,190, 35,30 )
  ellipse(285,190, 35,30)
  fill(0);
  ellipse(215,190, 20,25);
  ellipse(285,190, 20,25);
  fill(255);
  
  //eye balls
  ellipse(219,193, 8,8);
  ellipse(289,193, 8,8);
  
  //eye balls dilate when mouse is pressed
  if(mouseIsPressed)
    {
    ellipse(219,193, 10,10);
    ellipse(289,193, 10,10);
    }

  //nose
  fill(250, 188, 130);
  quad(260,250, 240,250, 250,210, 260,250);
  line(260,250, 250, 210);
  line(240,250, 250, 210);
  line(240,250, 260,250);
  
   
  //eyebrows
  //eyebrows raised if mouse is pressed
  if (mouseIsPressed){
    fill('rgb(146,63,8)')
    rect(200,150, 30,8)
  rect(270,150, 30,8)
  }
  else{
  fill('#4A2500')
  rect(200,160, 30,8)
  rect(270,160, 30,8)}
  
  //hair
  noStroke()
  fill("#4A2500");
  bezier(250,100, 50, 100, 180, 250, 100,400);
  bezier(250,100, 450, 100, 320, 250, 400,400);
  
  //lips
  fill('darkred')
  noFill();

  //lips get bigger/smile when mouse is pressed
  if (mouseIsPressed){
    fill(180, 13, 61);
    arc(250, 265, 50, 50, 0, PI);
  }
  else{
  fill(180, 13, 61);
  arc(250, 270, 50, 30, 0, PI);
  }
 
  
  //blush when mouse is pressed
  if (mouseIsPressed){
    fill('rgb(250,187,129)');
  ellipse(200,250,25,15);
  ellipse(300,250,25,15);
  }
  noStroke(); 
  
  if(mouseIsPressed)
    { stroke(240); }
  
  x=10
  for(let i =0;i<20;i++){
  fill('#D8E2EB')
  ellipse(x,20,40,60);
  ellipse(x,480,40,60);
  ellipse(0,x,60,40);
  ellipse(500,x,60,40);
  x=x+30;
  }
  //bow on head
  fill('#A89DBD')
  quad(140,130, 190,170, 190,130, 140,170)
  
  fill(120);
  text('Press and move the cursor...', 10, 485);
}


Reflection
Overall, the process was very insightful and allowed me to practice a range of p5js features. When I started out, I felt the process is boring but as I delved more into the programming concepts such as using for loops or random, and when I played around with the features, especially to create interactivity, it actually became very interesting and fun!

In the future, I want to improve further by using other features. For example, I came across Blendmode which I found very interesting but I could not learn much about it in the scope of this project. Thus, I want to learn about it and its other features later.

Week 1: Self-Portrait

Overview:

For this assignment, I tried to utilize basic programming principles and primitive shapes to create a portrait of myself using p5.js.  I started my work with a preliminary sketch to figure out which shapes best represent different aspects of my facial features. When drawing it on the p5.js,  I relied mainly on the shapes such as circles, triangles, rectangles, arcs, and ellipses. Additionally, even though we weren’t asked to implement animation or any kind of interactivity, I decided to add some minor touches and make my avatar a bit interactive. Overall, this assignment helped me get familiar with the p5.js platform and understand how to translate complex designs and features into simple, primitive shapes.


Concept:

My concept for this assignment was creating a cartoon-style version of myself. It may not be 100% realistic, but I tried to convey my main facial features such as oval-roundish head, brown hair and eyes, round eyes, long neck, and etc. I also wanted to keep it realistic and minimalistic, therefore I didn’t add any special effects or accessories (except for a necklace).

Preliminary sketch:

Code:

The highlights of my code would be pupils that follow the direction of the mouse and a mouth that imitates talking when the mouse is clicked. I was inspired by a “Koala portrait” provided as a sample example in the homework description, so I decided to apply a similar concept to my work as well. The main idea behind moving pupils is that the location of the circles that are forming my pupils are dependent on the X and Y coordinate of the mouse. Those X and Y locations are multiplied by a small scalar number (in my case, it’s 0.02) and are added to the center of the circles.

With regards to the talking mouth animation, the shape of the mouth depends on whether the mouse is clicked or not. When it is clicked, the arc that is forming the mouth is drawn a bit thinner, but when it is not, the arc has a larger width.

I’m also proud of how proportions of different facial features turned out to be. All of these proportions were calculated with regards to the center of the ellipse that is forming my head.


Future Improvements:

One of the ideas for future improvements would be adding more details to my face such as eyelashes, make-up,  a detailed outline of the lips, etc. I would also work on my bangs as they didn’t turn out as much realistic as I wanted them to be. In terms of interactivity,  I think that making the eyelids close occasionally when talking (i.e. once in 7 mouse clicks) would make the talking animation more realistic.


Week 1 – Self-Portrait

After a couple hours of hard work and experimenting with shapes and guessing coordinates, I was finally able to create my very own self-portrait!


You can find the code for this sketch below:

function setup() {
rectMode(CENTER)
createCanvas(600, 600);
}

function draw() {
background(1, 22, 80);
fill(0,127,15)
rect(300,470,600,300)

//Neck
fill(232, 190, 172)
rect(300,420,100,60)

//Face
fill(232, 190, 172)
ellipse(300,250,300,320)


//Eyes
fill(255)
ellipse(240,220,60,40)
ellipse(360,220,60,40)
fill(0)
ellipse(240,220,20,20)
ellipse(360,220,20,20)
fill(255)
ellipse(245,220,7,7)
ellipse(365,220,7,7)

//Nose
triangle(300, 260, 300, 280, 300, 240)

//Mouth
fill(200,0,0)
arc(300,320,100,100,0,HALF_PI*2,CHORD)

//Eyebrows
strokeWeight(3);
line(215,190,260,190)
line(335,190,380,190)

//Hair
fill(0)
arc(300,165,250,170,PI,TWO_PI)
fill(0)
triangle(330,165,350,120,350,186)
triangle(350,165,370,120,370,186)
triangle(370,165,390,120,390,186)

//Body
rect(298,597,400,300)
fill(232, 190, 172)
triangle(250,447,350,447,300,520)

}

The face and eyes were relatively simple to code in, I just needed to utilize ellipses with varying stretches to create the shape of the face and eyes. So are the nose and eyebrows as they are just a simple line. For the hair and mouth, I utilized the arc method and put in arguments to turn them into semi-circles creating the mouth and hair. I also added some triangles in the hair to add some personality to the hair. I also used a triangle to create the effect of a V-neck shirt for the torso. My fashion is basically just black clothes, so I fittingly gave myself a black shirt. I then created a midnight night sky as the background just to round out the whole sketch!

I am just proud of myself that I managed to calculate the correct coordinates of where to put each shape relatively quickly. It was definitely one of the bigger challenges I imagined but ended up not posing much of an issue. For the future, I definitely do think i can improve the facial shape and add more interactive features to give this self-portrait more of a personality.


Homework-1 Self-portrait


In this assignment we had to create our self portrait using functionalities of p5.js that we learned during the class. The task was enjoyable as it involved manipulating various shapes to create a visually appealing and coherent composition.

I started by creating a rough sketch, focusing on my face as the starting point. Drawing the face, eyes, and nose was not difficult as they could be easily represented with an ellipse and triangle. I had some issues adjusting the parameters of the arc to create a smiling face. I figured out manipulation of Pi to get perfect arc for my mouth using below code:

arc(200,230, 50, 30, TWO_PI + QUARTER_PI, PI - QUARTER_PI); //smiling mouth


For the background I chose sunny Abu Dhabi weather and created a sun using ellipse and blue sky using background color. For me the challenging part of this assignment was creating the body and hair of the self portrait. I used rectMode(CENTER); to center the rectangles and created the neck before the face so that it won’t be overlapping the face.


rectMode(CENTER); //centering the rectangles
fill('#F5BE86')
rect(200,280, 35, 40) //creating neck before face

fill('#8B67CE')
rect(200,345, 120, 95) //creating the main body


For the hair I used arc function and new parameter OPEN to get the best result. It took a lot of time to figure out the PI angles and adjusting it to fit the face. The below code draws the hair:

arc(width/2, height/2, 120, 150, PI+.4, -.4, OPEN); //drawing the hair


At the end as a final touch of authenticity I recreated one of my hoodies with NYUAD sign and Class of 2025 text. Overall, it was an amazing experience!


Self-Portrait

As someone who has only ever coded in CS assignments involving complex and detailed task requirements, this particular assignment gave me freedom to explore all kinds of possibilities when it came to creating a self-portrait using shapes and lines through code. I was initially confused on how to add details using only shapes but as I experimented with different sketches, it started to make more sense.

Process

I had drawn a line art sketch to get an idea of the different shapes I will have to use and drew them on a grid so that it’s easier for me to translate that into code. 


I used a circle and bezier curve to create the face shape and the use of control points for the curve proved to be the biggest learning point for me in this assignment. I used the bezier curve in almost every element, from face shape to eyebrows and shadows, and it was interesting when tweaking the control points along the x or y axis would create the effect I wanted. 

I also learnt how to use the translate() and rotate() functions, which were initially tricky to understand. I used them to locate the blush ellipses because I wanted them at an angle. It took me some time to realize that using these two functions causes all the elements after them to be relocated and so I tried to use them at the very end of the code. 

As for the background, I wanted some sort of movement in the portrait so I created clouds and incremented(or decreased for the second one) their x coordinates to depict movement from one end to another.

Reflection

I really enjoyed working on this assignment and I think I was able to grasp the basics of p5.js . However, I do believe there is a lot left to experiment with and I would like to do so in the upcoming assignments. I think I could have done better in this assignment by adding more interactivity through either clicking on the canvas or with the cursor hovering on it. I would love to try similar things and introduce more interactivity in my next assignments.

Sponge Bob Portrait

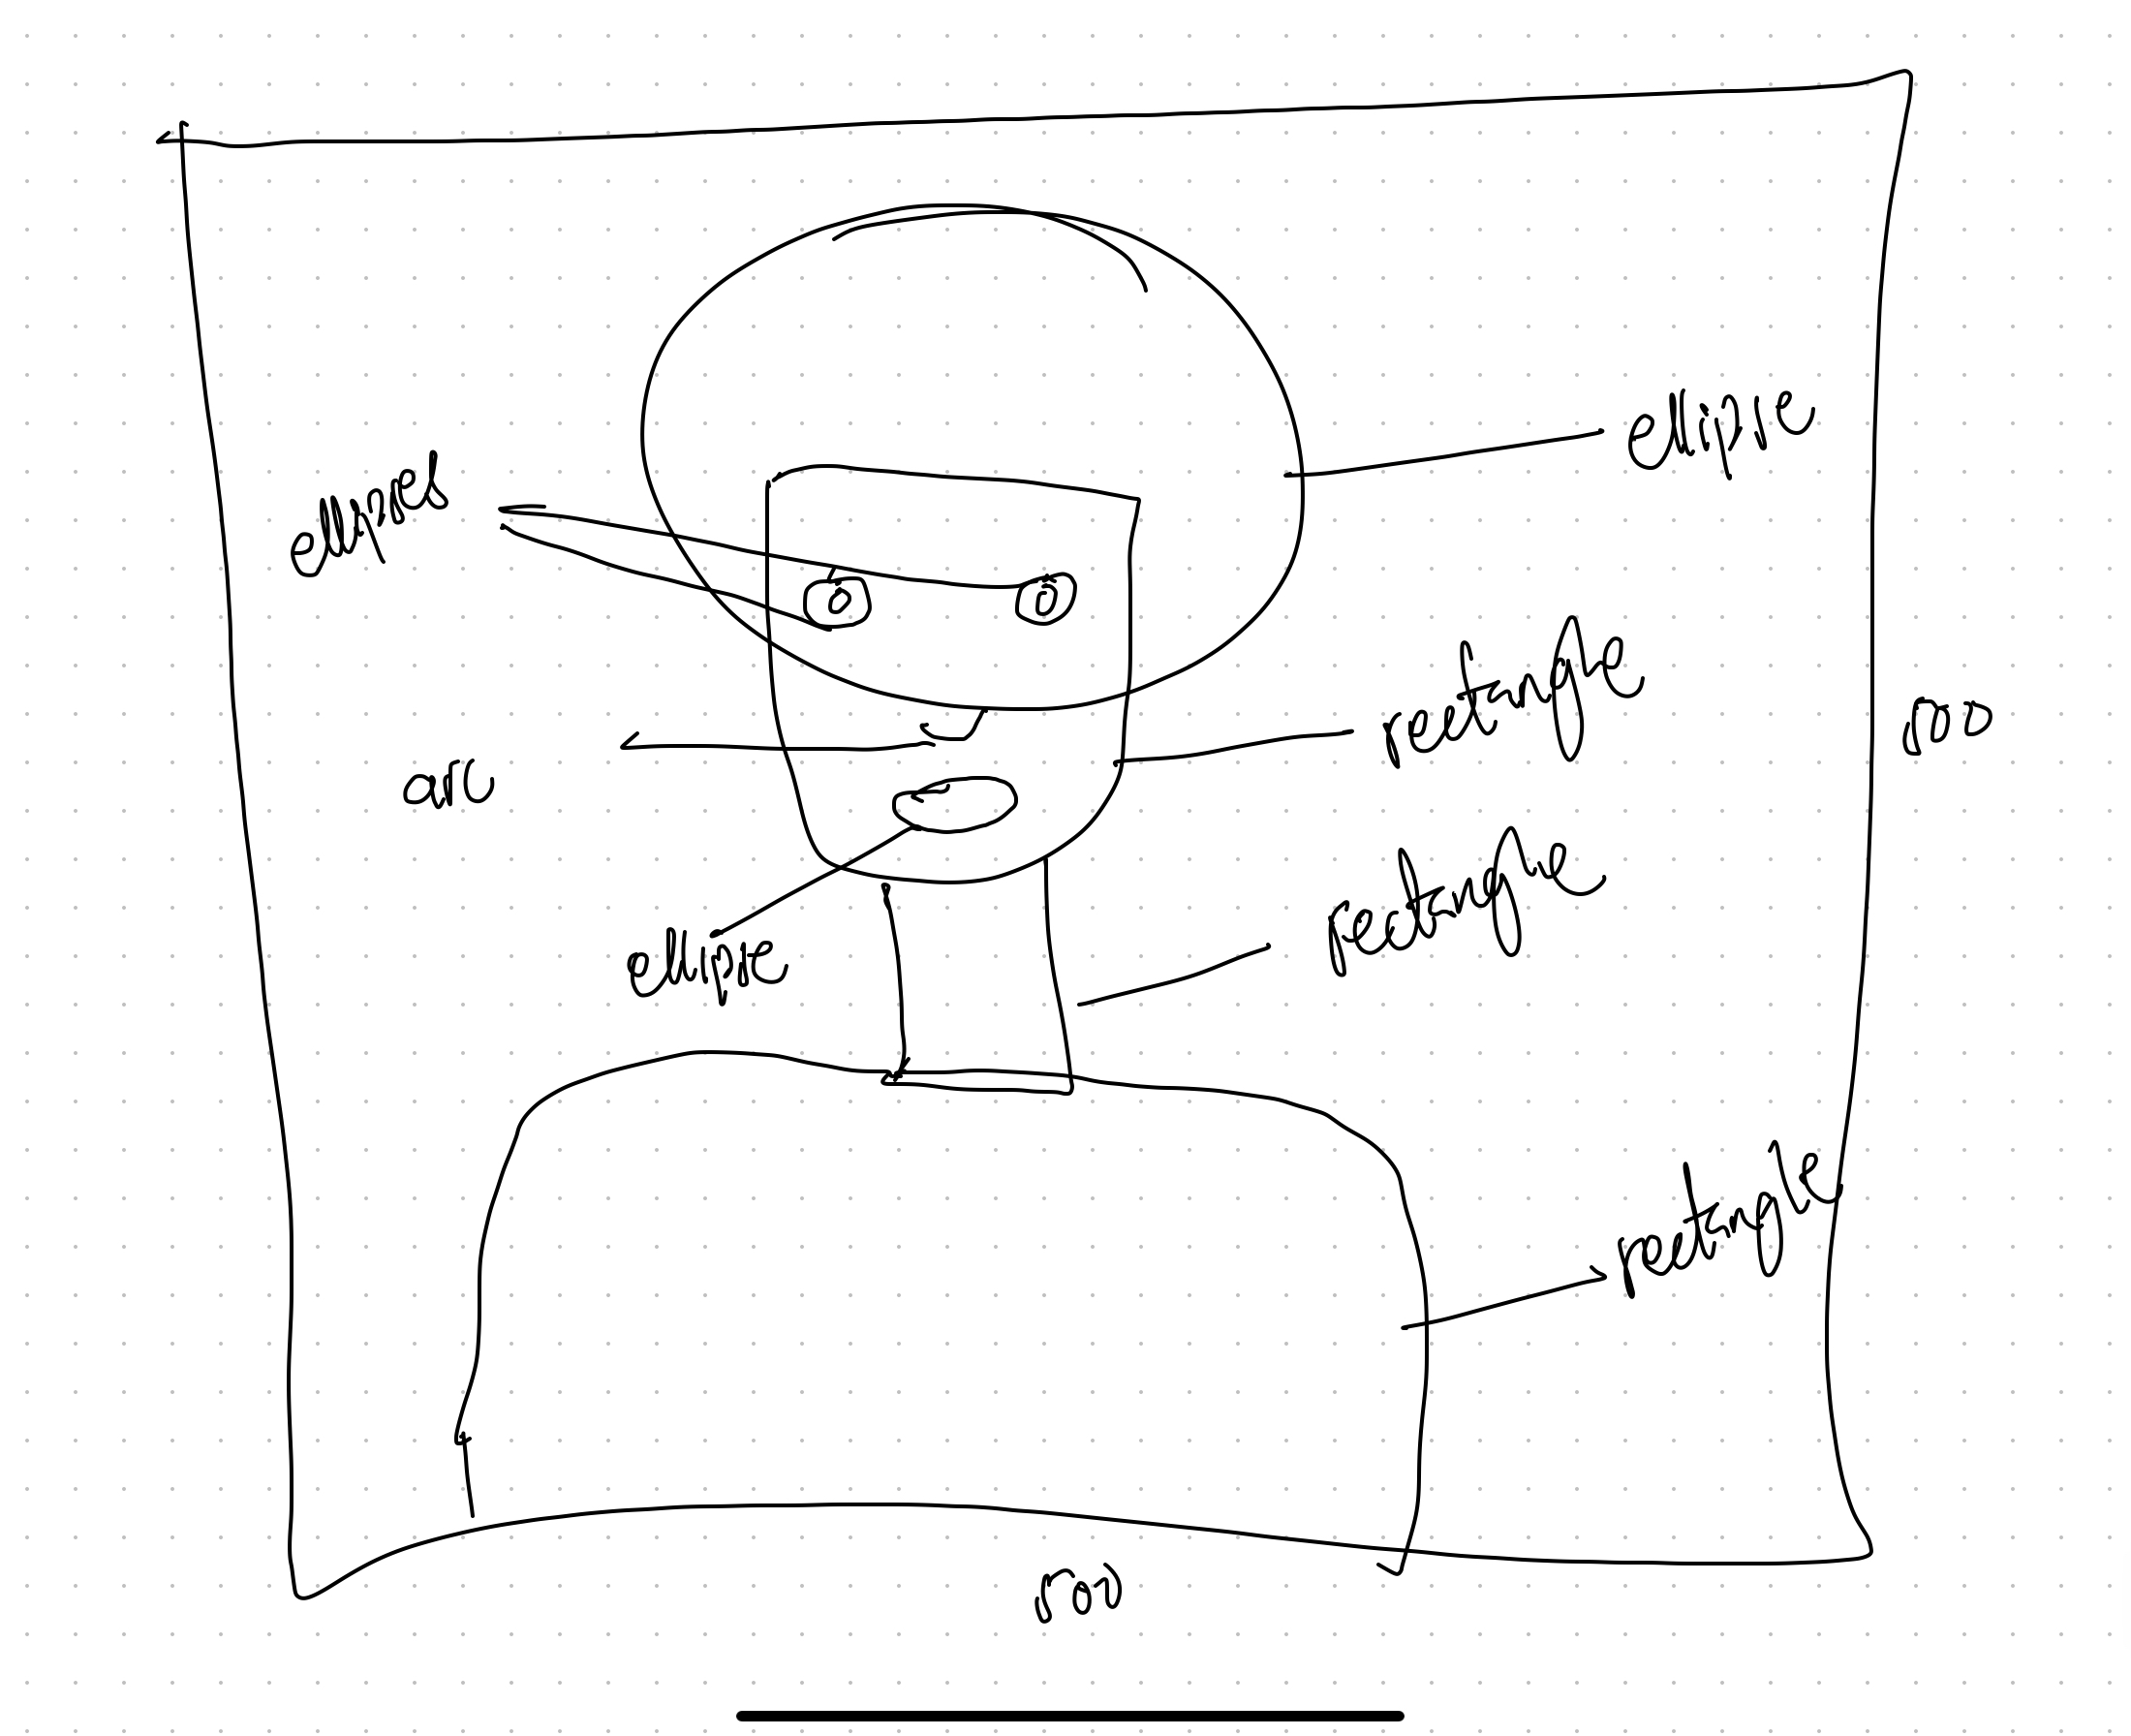
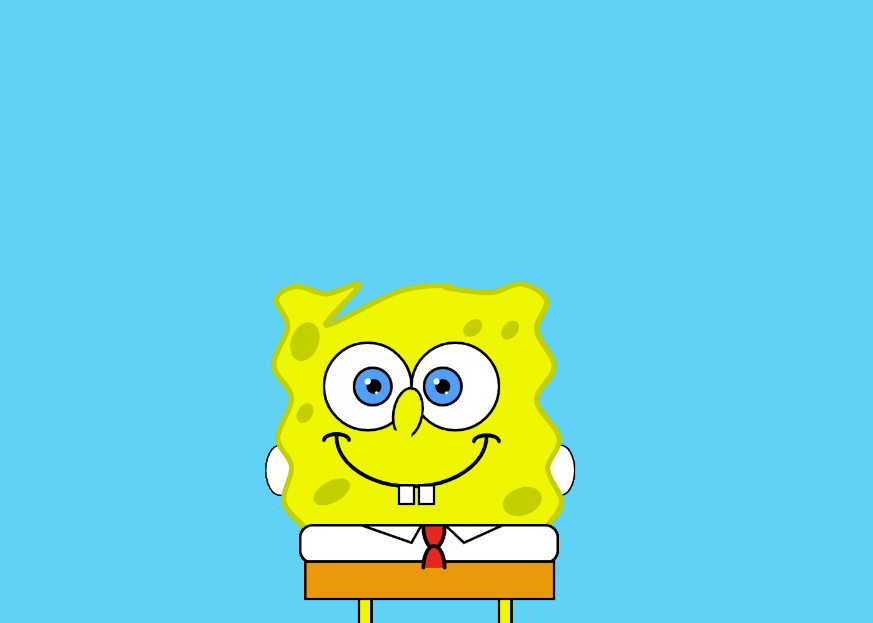
Portrait of SpongeBob SquarePants

function setup() {
  createCanvas(700, 500);
  background(32, 210, 245);
  angleMode(DEGREES);
}

function draw() {
  strokeWeight(1);

  //drawing points to get curve shape
  point(244, 422);
  point(228, 402);
  point(234, 374);
  point(223, 351);
  point(234, 320);
  point(220, 293);
  point(231, 262);
  point(222, 240);
  point(238, 230);
  point(262, 236);
  point(288, 229);
  point(320, 234);
  point(358, 231);

  //rightside curve
  point(450, 402);
  point(439, 376);
  point(448, 351);
  point(430, 321);
  point(444, 294);
  point(430, 265);
  point(438, 241);
  point(418, 228);
  point(393, 235);
  point(439, 421);

  //creating hands
  stroke(0);
  fill(255, 255, 255);
  ellipse(225, 377, 23, 40);

  stroke(0);
  fill(255, 255, 255);
  ellipse(449, 377, 23, 40);

  //creating curve from points

  stroke(197, 207, 19);
  strokeWeight(4);
  fill(241, 245, 32);
  beginShape();
  curveVertex(244, 422);
  curveVertex(244, 422);
  curveVertex(228, 402);
  curveVertex(234, 374);
  curveVertex(223, 351);
  curveVertex(234, 319);
  curveVertex(220, 293);
  curveVertex(231, 262);
  curveVertex(222, 240);
  curveVertex(238, 230);
  curveVertex(262, 236);
  curveVertex(288, 229);
  curveVertex(262, 261);
  curveVertex(320, 234);
  curveVertex(358, 229);
  curveVertex(358, 231);
  curveVertex(393, 235);
  curveVertex(418, 228);
  curveVertex(438, 241);
  curveVertex(430, 265);
  curveVertex(444, 294);
  curveVertex(430, 321);
  curveVertex(448, 351);
  curveVertex(439, 376);
  curveVertex(450, 402);
  curveVertex(439, 421);
  curveVertex(439, 421);
  endShape();

  //drawing for eyes
  stroke(0);
  strokeWeight(2);
  fill(255, 255, 255);
  circle(365, 310, 70);

  //2nd eyes
  stroke(0);
  strokeWeight(2);
  fill(255, 255, 255);
  circle(295, 310, 70);

  //inner circless for eyes
  stroke(0);
  strokeWeight(2);
  fill(32, 160, 245);
  circle(299, 310, 30);

  stroke(0);
  strokeWeight(2);
  fill(32, 160, 245);
  circle(355, 310, 30);

  //inner inner eyes

  stroke(0);
  strokeWeight(2);
  fill(0);
  circle(300, 310, 10);

  stroke(0);
  strokeWeight(2);
  fill(0);
  circle(355, 310, 10);

  //white patches of cirlcles to make eyes realistic
  //left eye
  noStroke(0);
  fill(255, 255, 255);
  circle(295, 306, 5);

  //lower circle
  noStroke(0);
  fill(255, 255, 255);
  circle(302, 315, 2.5);

  //for right eye
  noStroke(0);
  fill(255, 255, 255);
  circle(350, 306, 5);

  //lower circle
  noStroke(0);
  fill(255, 255, 255);
  circle(358, 315, 2.5);

  //lower rectangles
  stroke(0);
  fill(255, 255, 255);
  rect(241, 421, 206, 30, 10);
  fill(245, 153, 32);
  rect(245, 450, 199, 30);

  //smile on Bob's face
  stroke(0);
  strokeWeight(3);
  fill(241, 245, 32);
  arc(330, 350, 120, 80, 0, 180);

  stroke(0);
  strokeWeight(3);
  noFill();
  arc(270, 353, 20, 10, -180, 0);
  arc(390, 354, 20, 10, -180, 0);

  //red blushing of Bob
  // stroke(245, 99, 32);
  // strokeWeight(3);
  // noFill(197, 207, 19);
  // arc(270,345,50,35,-190,20)
  // arc(390,345,50,35,-190,20)

  //Bob's tie
  stroke(0);
  strokeWeight(2);
  triangle(290, 421, 330, 435, 338, 421);
  triangle(357, 421, 372, 435, 403, 421);

  stroke(0);
  strokeWeight(3);
  fill(245, 39, 32);
  arc(348, 422, 17, 35, 0, 180);
  arc(348, 455, 17, 35, 180, 0);

  // stroke(0);
  // strokeWeight(1);
  // strokeJoin(ROUND);
  // triangle(338,421,349,443,357,421)
  
  stroke(0);
  strokeWeight(2);
  fill(245, 245, 32);
  rect(288,480,10,25);
  rect(400,480,10,25)

  stroke(0);
  strokeWeight(2);
  fill(255, 255, 255);
  rect(320, 389, 12, 15);

  rect(336, 389, 12, 15);


  //ellipse for nose
  translate(61, -60);
  rotate(10);
  stroke(0);
  fill(241, 245, 32);
  ellipse(330, 339, 23, 40);

  translate(12, 1);
  rotate(1);
  noStroke();
  fill(241, 245, 32);
  rect(310, 348, 20, 20);

  //other spots on body
  translate(20, -60);
  rotate(10);
  stroke(197, 207, 19);
  fill(197, 207, 19);
  ellipse(270, 310, 20, 30);

  translate(20, -60);
  rotate(10);
  stroke(197, 207, 19);
  fill(197, 207, 19);
  ellipse(340, 370, 10, 15);

  translate(20, -60);
  rotate(10);
  stroke(197, 207, 19);
  fill(197, 207, 19);
  ellipse(470, 210, 10, 15);

  translate(20, -60);
  rotate(10);
  stroke(197, 207, 19);
  fill(197, 207, 19);
  ellipse(470, 210, 10, 15);

  translate(20, -60);
  rotate(10);
  stroke(197, 207, 19);
  fill(197, 207, 19);
  ellipse(550, 350, 15, 30);

  translate(20, -60);
  rotate(10);
  stroke(197, 207, 19);
  fill(197, 207, 19);
  ellipse(650, 170, 20, 30);
  
  // translate(20, -60);
  // rotate(-60);
  // stroke(0);
  // strokeWeight(1)
  // fill(245, 245, 32);
  // rect(-82, 692, 9, 80);


  print(mouseX + "," + mouseY);
}

Result:

Here


Assignment 1 – Self-Portrait

Concept

We had to create a self-portrait, so I tried to make an animated version of myself which turned out to be a very fun process. The code sets up the canvas using createCanvas(400, 400) and uses the draw() function to render the face. The face, eyebrows, eyes, nose, hair, ears, beard, lips, shirt, and neck are created using various shapes such as ellipses, triangles, arcs, rectangles, and lines. The fill color and stroke color of each shape is set using the fill() and stroke() functions. The background() function sets the background color to a light gray color. The color of the shirt changes from black to different shades of white and black as the fill() is set to random(255) when the mouse is clicked on the canvas. Also, the eyes blink once every second as the frameCount()% 60 will be true once every second. The code also contains commented out lines that would create a grid for reference, but this is not displayed in the final output. This helped in the positioning of the facial features.

Code

let blink = false;
let color1 = 0;
let color2 = 0;
let color3 = 0;
function setup() {
  createCanvas(400, 400);
}

function draw() {
  
//background
background(51, 102, 153);
  noStroke();
  for (let i = 0; i < 400; i += 20) {
    fill(102, 153, 204);
    ellipse(200, 200, 400 - i, 400 - i);
  }

fill(194, 150, 130);
  noStroke();
  let face = ellipse(200,160,180,200);
  fill('white');
  let eyel = ellipse(165,140,35,15);
  let eyer = ellipse(240,140,35,15);

 fill(50, 60, 60);

//   eyebrows
  stroke(21, 19, 19);
  strokeWeight(3.5);
  noFill();
  arc(165, 130, 45, 5, PI, TWO_PI, OPEN);
  arc(240, 130, 45, 5, PI, TWO_PI, OPEN);
  
  //eyeball
  noStroke();
//   fill(0);
//   ellipse(165, 140, 15, 15);
//   ellipse(240, 140, 15, 15);
//   fill(255);
//   ellipse(164, 136, 5, 5);
//   ellipse(239, 136, 5, 5);

  
 if (frameCount % 60 == 0) {
    blink = !blink;
  }

  if (!blink) {
    fill(0);
    ellipse(165, 140, 15, 15);
    ellipse(240, 140, 15, 15);
    fill(255);
    ellipse(164, 136, 5, 5); // left eye ball
    ellipse(239, 136, 5, 5); // right eye ball
  } else {
    fill(194, 150, 130);
    ellipse(165, 140, 35, 15);
    ellipse(240, 140, 35, 15);
  }
  
  
  //nose
  fill(194, 150, 130);
  stroke(21, 19, 19);
  strokeWeight(1.5);
  triangle(200, 155, 193, 190, 207, 190); // nose tip

  //Hair
  fill('black');

  arc(200, 110, 160, 120, PI, 0);

  triangle(230,67,210,67,250,120);
  triangle(240,67,220,67,260,120);
  triangle(250,67,230,67,270,120);
  triangle(260,71,240,60,280,120);
  
  
  //Ears
  fill(194, 150, 130); // set fill color to match the face
  noStroke();
ellipse(100, 160, 20, 40); //left ear
ellipse(300, 160, 20, 40); //right ear
  
  // Beard
stroke(0); // set stroke color to black
strokeWeight(2.5);
for (let i = 115; i < 175; i += 3) {
    line(i, 180, i + 8, 115 + (i*0.88));
}

for (let i = 115; i < 175; i += 3) {
    line(400 - i, 180, 400 - (i + 8), 115 + (i*0.88));
}
for (let i = 180; i < 220; i += 3) {
    line(i, 200, i, 210);
}
for (let i = 180; i < 224; i += 3) {
    line(i, 220, i, 260);
}

  
//Lips
fill(184,63,63); // set fill color to red
noStroke();
arc(200, 210, 40, 30, 0, PI, CHORD);
  
  
  //shirt
   // fill("#151E3D"); // dark blue


  fill(color1,color2,color3);
  rect(125, 260, 150, 140);
  rect(95, 260, 30, 100); // left sleeve
  rect(275, 260, 30, 100); // right sleeve


  //neck 
  fill(194, 150, 130);
  rect(181, 260, 40, 30, 5);
  

//grid for refernce
//     stroke(0); // set stroke color to black
//   strokeWeight(1); // set stroke weight to 1 pixel
  
//   // draw horizontal grid lines
//   for (let i = 0; i <= 400; i += 20) {
//     line(0, i, 400, i);
//   }
  
//   // draw vertical grid lines
//   for (let i = 0; i <= 400; i += 20) {
//     line(i, 0, i, 400);
//   }
  
}
function mouseClicked() {
  if (color1 === 0) {
    color1 = random(255);
  } else {
    color1 = 0;
  }
  if (color2 === 0) {
    color2 = random(255);
  } else {
    color2 = 0;
  }
  if (color3 === 0) {
    color3 = random(255);
  } else {
    color3 = 0;
  }
}


Reflection/Future Improvements

This code provides a basic outline for an animated face and could be used as a starting point for further development. Some potential improvements for the code include adding more details to the face, such as the eyes’ pupils and reflections, more defined eyebrows, and additional shading to add depth. Adding more hair styles, clothing, or accessories to personalize the character. Incorporating user input to allow for customization of features, such as hair style, eye color, or clothing. Improving the overall structure and organization of the code, such as using functions to keep the code more modular and easier to maintain. Overall, there is room for further development and improvement in this code. I learned the usage of basic shapes, functions and some forms of interactivity which I implemented. The assignment was so open-ended that I just wanted to add more and more stuff.