Assignment 3 – Object-Oriented Programming

Initially I hard time coming up with ideas of what I wanted to do for this project. Sitting in my friend’s room, who is obsessed with space, I got inspired to make something space related. In addition, I wanted to experiment with inserting images into p5.js (using the ‘preload’ function)- this was definitely the most time consuming and trickiest part. I ended up realizing that the images I selected from google should actually have a transparent background, many of them seem like they do but it’s actually just a white and grey grid. So initially this is how the inserts would look like –

Once I tackled this issue, by downloading the images directly from websites, I inserted more images such as the rocket (that I wanted to launch). I figured out how to make more than one cloud appear (and control the size, position and lastly the movement of each one). I was then able to control the speed at which the clouds and rocket move – using ‘posXorY +=’ a value. I also played around with shapes (ellipses) but ended up not using them.

I then added the background of the sky as well as the little astronaut which is controlled by the curser (by inserting ‘mouseX, mouseY; into the line of code) which is there just for fun.

Another issue I ran into was with making the clouds reappear onto the screen in a loop form. This took me the longest to figure out.

I made a class which included a constructor which had the different features of my clouds such as the x and y positions, the speed at which they are moving and their width and heights. Then I was able to run this and move the clouds the way I wanted.

In the future, I’d like to make a game out of this concept. Also, I’d like to use arrays in my code – maybe for the clouds. Next time I would make this outer space so I could include shooting stars and different planets floating around.

This is the final outcome.

Yunho Lee Assignment 3 – OOP Raindrops.ver2 / FPS shooting

Since I have already created artwork in OOP for the last assignment, I decided to modify my artwork so that it is more user-interactive. I modified the random spawn of the splashes into click-to-splash. This gives a visual feedback to users clicking the screen.

This is implemented by using the mousePressed() function. This function adds an extra object to my object array whenever the mouse is pressed.

Click the screen below

After checking that the OOP implementation is working properly, I decided to apply the same method to a very game-like work. In this work, made in a first-person shooter game theme, the bullets are implemented in object-oriented programming using an array.

Click to shoot, move your mouse to change the direction

Week 3: generative art with OOP

I honestly could not generate artwork from scratch. Thus, I got inspired after watching Daniel Shiffman’s coding challenge of creating a starfield. He used OOP in the example, so I decided to use his sketch. I watched the video till the end, while also enhancing my understanding of implementing OOP. (source: https://www.youtube.com/watch?v=17WoOqgXsRM&t=581s)

The interesting fact is that I have a fear of being stung by bees. Perhaps, this is the reason why I got inspired to create them. My parents would have always told me that I need to freeze at the sight of flying bees, otherwise they might get angry. I interpreted this idea into the code: when you move the mouse, more crazy bees are generated.

Throughout the process, I also learned how to embed an image into the code, which I needed to create bees.

All in all, I wish I could reach that level of creating beautiful abstract and complicated artworks.

Assignment 3 – OOP Generative Art

Foundation

I set out to make an interactive design  based on  music bars, like those shown in the image below. OOP was a huge help, as this was the first assignment design I am satisfied with having created. I envisioned 2 sets of music bars sideways (from the right and left) widening and shortening depending on the position of the mouse. While at first I set out for a blocky design, my final product ended up being more smooth and wave-like.

sound bars animation Stock Footage Video (100% Royalty-free) 4096171 | Shutterstock

Implementation

After familiarising myself with the OOP syntax, I worked on a class to make a rectangle whose width increases when the mouse moves closer to it. The first problem I faced was trying to connect the mouse movement to the bar width. I overcame the obstacle by first calculating the distance between the base of the bar and mouse position by using the dist() function. I then used this to map the fluctuating value onto the bar width. This can be seen in the updateBar() function in the LeftBar class and RightBar class.

I spent the bulk of my time perfecting this so that when I do produce many bars using a ‘for’ loop, the bars widths would gradually increase and decrease in relation to mouse and eachother. The closer the mouse is to the base of a bar, the longer its width is.

I made the bar height a global variable on line 2 so that it is easy to adjust the smoothness of the curve. I chose to keep it small (1 pixel), so that the movements appear smooth and satisfying. This smoothness reminded me of lava lamps, so I went ahead and coded fluctuating colors that change based the same class variable, “distance”, that I used in the maping function.

So far all my code is object oriented. I didn’t want to leave the  middle of my design empy so I added some spinning squares that I feel gives the piece its hypnotic nature. I found it quicker and easier to just copy and paste the code I wrote for one square over and over with small adjustments rather than object orienting this simple part, so that’s what I did. This may be why my code is longer than it needs to be. I gave the larger squares a lower saturation and brighness value to give the piece some depth.

Conclusion

OOP made my code so much more readible and organised. Furthermore, I gained more control over my art piece and am more confident to code my vision onto the digital canvas.

Assignment 2 – OOP

Inspiration/Idea

I realized that the most challenging aspect of this assignment is not coding, but coming up with an idea for the assignment. For this assignment, I was inspired by the following sketch that the Professor made in class:

I intended to make “Replicating Balls”: every time the ball collides with the edge of the canvas, it would spawn a new ball that goes off in a random direction. Additionally, every ball would have an “energy” level, so that it cannot spawn balls infinitely. This energy level would be apparent by the transparency of the ball: the more transparent it is, the less energy it has, and eventually it cannot replicate.

Problems

I could have used this idea to illustrate in the simplest way how biological cells replicate. However, I ran into a problem that would not allow the replicated ball to have the same initial coordinates as the origin ball. This is because if the coordinates of the new ball were on the edge, it would infinitely spawn new balls causing the program to crash. This is why I ended up making the new balls spawn randomly across the canvas.

Implementation

I made a class Circ for every circle. The update() function update the position of every circle each time it is called and the replicate() function checks if the balls are in contact with the edges – a new ball is spawned randomly if there is such contact. Finally, the run() function calls both the update() and replicate() functions in the draw loop. I made an array of circles to contain every instance of the Circ object, and called the run() function for every circle in this array. I also randomly choose the colors for the balls. The background is a black rectangle with a high transparency so that the balls are seen leaving trails. The balls have high transparency to achieve the trail effect.  I increase the transparency of every ball every time it bounces off the edges until at one point, the transparency is so low that it cannot replicate any further (I do this using the if statements in the replicate() function). Here is the sketch and the code:


Mariam’s OOP

I wanted to start with making something simple and making it more complicated gradually as I understood the code. I used the professor’s example in class as kind of a reference point to help me throughout the process. I started with making one cloud and then making it move. I had trouble representing the cloud as an actual cloud and not just an ellipse, my code for the cloud contained 3 ellipses, therefore, it was hard for me to combine them as one.

I fixed the cloud shape by adding and subtracting values from the x and y positions,. I added more clouds. I think, however, it would have been smarter if I used an array instead of creating more clouds.

Bubbles – OOP assignment

Ideation

For this assignment, I wanted to create something that was colorful and dynamic. My immediate thoughts went to something that would grow on the screen and somehow interact with other objects.

First iteration – without OOP

First, I just wanted to draw a circle on the screen at a fixed position and have it grow in size.
Once I finished this, I worked on creating an object for the circles so that I can have multiple of them on the screen using an array.

Second Iteration – OOP

I also wanted to add some randomness to the way the bubbles change, so I used random for creating a different starting position, radius, color, and growth rate. I removed the stroke because it looks neater.

Bubbles pop!

To make the bubbles pop, I did something similar to a coin flip but with tighter constraints so that they pop slower.

Pop them yourself

Click on the bubbles to pop them.

Find the code here and below:

let bubbles = [];

function setup() {
  createCanvas(800, 800);

  for (let i = 0; i < 100; i++) {
    let colorVals = color(
      random(255),
      random(255),
      random(255),
      random(100, 150)
    );
    let growth = random(1.5);
    let diameter = random(5);
    let timer = random(20);
    let x = random(diameter, height - diameter);
    let y = random(diameter, width - diameter);
    bubbles.push(new Bubble(x, y, diameter, timer, growth, colorVals));
  }
}

function draw() {
  background(220);

  for (let i = 0; i < bubbles.length; i++) {
    bubbles[i].run();
  }
}

function mousePressed() {
  for (let i = bubbles.length - 1; i >= 0; i--) {
    let popped = bubbles[i].pop();
    if (popped) {
      bubbles.splice(i, 1);
      break;
    }
  }
}

class Bubble {
  constructor(posX, posY, diameter, timer, growth, colorValues) {
    this.color = color(colorValues);
    this.size = diameter;
    this.timer = timer;
    this.growth = growth;
    this.x = posX;
    this.y = posY;
    this.radius = this.size / 2;
  }

  run() {
    this.draw();
    this.update();
  }

  draw() {
    noStroke();
    fill(this.color);
    circle(this.x, this.y, this.size);
  }

  update() {
    this.size += this.growth;
    this.radius = this.size / 2;
  }

  pop() {
    let d = dist(mouseX, mouseY, this.x, this.y);
    if (d < this.radius) {
      return true;
    }
  }
}


Assignment 3: OOP

Inspiration

For this assignment, I was inspired by the  Tron movies.  While I was too young to watch the originals, I loved how cool the light cycles were and wanted to make a piece of art that was based on collections of lines moving independently.

The idea I had was to have a collection of random lines bounce off of the walls and off of each other. For added effect, I wanted the lines that bounced off of each other to swap colors, and the background of the piece was to be the color of the line with most bounces.

Implementation

I began writing the class for the Lines. Each had to have a stroke weight, initial X&Y position, a current X&Y position, a dy and dx, a current color, and a list of past colors and X&Y positions. Here’s the code for the constructor I used.

class BouncyLine{
  constructor(dx, dy, radius, posX, posY){
    this.color = color(random(255), random(255), random(255));
    this.dx = dx;
    this.dy = dy;
    this.radius = radius;
    this.posX = posX;
    this.posY = posY;
    this.initposX = posX;
    this.initposY = posY;
    this.numcollisions = 0;
    this.pastlist = [];
  }
}

I would have to update the current posX and posY based on dx and dy, and account for collisions along the wall. I would also have to push a previous line with the current initposX and initposY to the array I had, and then update initposX and Y to the current posX and posY.

updateList(){
  this.pastlist.push([this.initposX, this.initposY, this.posX, this.posY, this.color]);
    this.initposX = this.posX;
    this.initposY = this.posY
}
update(){
  this.posX += this.dx;
  this.posY += this.dy;
  if(this.posX > width-this.radius || this.posX<this.radius){
    this.dx*=-1;
    this.updateList();
  }
  if(this.posY > height-this.radius || this.posY<this.radius){
    this.dy*=-1
    this.updateList();
  }
}

Then, to draw the line, I would have to take the strokeWeight of the line, draw each line in the array, then draw the current one.

draw(){
    strokeWeight(this.radius*2);
    for(let i=0; i<this.pastlist.length; i++){
      stroke(this.pastlist[i][4])
      line(this.pastlist[i][0],this.pastlist[i][1],this.pastlist[i][2],this.pastlist[i][3]);
    }
    stroke(this.color);
    line(this.initposX, this.initposY, this.posX, this.posY);
  }

To simplify, I created a run() method that ran both draw() and update():

//method to draw the circle and update its position
run(){
  this.draw();
  this.update();
}

For the setup() function, I had to initialize all of the lines in an array, making sure that none of them started inside of each other.

let randradius;
let linelist = [];
let maxradius;
let xoffset;
let maxdx;
let maxdy;
let bg;

function setup() {
  createCanvas(500, 500);
  bg = color(220,220,220)
  xoffset = 30;
  maxradius = 3;
  maxdx = 3;
  maxdy = 3;
  for(let i=0; i<width/(xoffset+maxradius)-1; i++){
    randradius = random(maxradius);
    linelist.push(new BouncyLine(
      random(maxdx),
      random(maxdy),
      randradius,
      (i+1)*xoffset,
      random(randradius,height-randradius),
    ));
  }
}

I then had to account for collisions, which was done by checking the Euclidean distance between 2 lines. If a collision was detected, I would find the opposite of the dx and dy for both, and swap their colors after updating the lists for both lines. I would also note the number of collisions they have with each other by incrementing numcollisions for both.

checkCollision(otherHead){
    if(sqrt((otherHead.posX-this.posX)**2+(otherHead.posY-this.posY)**2)<(this.radius+otherHead.radius)){
      this.dx*=-1;
      this.dy*=-1;
      this.updateList();
      otherHead.updateList();
      otherHead.dx*=-1;
      otherHead.dy*=-1;
      let otherColor = otherHead.color;
      otherHead.color = this.color;
      this.color = otherColor;
      this.numcollisions +=1;
      otherHead.numcollisions+=1;
    }
  }

To draw them, I ran the run() method for everything in the linelist, and had a nested for loop to check each combination of lines if there was a collision.

function draw(){
  background(bg);
  for(let i=0; i < linelist.length; i++){
    linelist[i].run();
  }
  for(let i=0; i < linelist.length-1; i++){
    for(let j=i+1; j < linelist.length; j++){
      linelist[i].checkCollision(linelist[j])
    }
  }

Finally, I added a global function that compared the number of collisions, and extracted the color of the line with most collisions. I then set this to the bg variable, which updated each time.

function getMostCollisions(linelist){
  let maxcollisions = 0;
  let maxcollisioncolor;
  for(let i=0; i < linelist.length; i++){
    if(linelist[i].numcollisions>maxcollisions){
      maxcollisions = linelist[i].numcollisions;
      maxcollisioncolor = linelist[i].color;
    }
  }
  return maxcollisioncolor||bg;
}

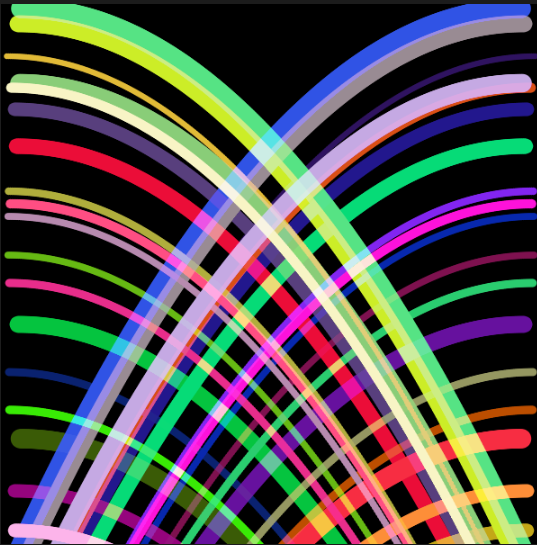
My piece was complete, and looks like this:

Reflection

I really liked how OOP modularized everything and added to reusability. I would like to keep thinking about how I can best format my code for readability, as the page was pretty cluttered by the end. I would also like to think about expanding my class to handle a list of lines, so that the code would be even more organized.

Kashyapa Generative Artwork

I started by looking at images of other generative artwork on Google images but I found nothing really interesting so I brainstormed and played around with different functions and shapes on P5Js until I decided to incorporate a ball with trails to create some form of design.

Of course, I looked at Professor Aaron’s trailing ball example from class to do this by replacing the background with a black rectangle instead. I also used the blend mode LIGHTEST to make the ball trails look better when they are blended together. Also I made an array to hold all the objects to be used and used a for loop in the draw function to continuously draw all the balls.

Then I wanted to incorporate some interactive elements into the art so I used the mouseClicked() function to initialize two objects of the Ball class with random radii on each side of the canvas each time a mouse button is pressed.

The Ball class consisted of a few variables to determine the features of each ball generated, and two functions, one to draw the balls and one to update their location, using the X speed and Y speed variables. I used the millis() function to record the timestamp when each ball was created and find the difference with the current time to cause the balls to accelerate downwards to make it look like they are falling.

In the end, repeatedly clicking at different heights on the canvas creates a pattern on the screen which is somewhat symmetrical.