
3 weeks (and a few changes to our preliminary idea) later, we finally have a working version of our game.
User testing videos, some screen recording demos, and a diagram of the Arduino setup can be found at the end of the post. The code for the project can be found on the github repository. A zipfile containing all the code and files can also be found at the end.
TLDR: the Arduino works better if it’s suspended in the air.
Game Concept:
This game is an NYUAD-themed game (yes we’re mentioning this for the third time over the past 3 weeks). The concept is very simple. The game consists of four levels which correspond to the four academic years of life at NYUAD, and each level consists of customized objects – both good and bad (for instance, you might see study away as an object but this only appears Sophomore year onwards. Similarly, capstone appears Junior year onwards). The player is represented as Faiza the Falcon at the bottom of the screen, and is controlled by moving the Arduino set in the horizontal direction. There are 2 metrics of performance, Academics and Health, both of which are set to 50 initially. Catching the good objects in each category will help improve the player’s performance in each. Similarly, catching the bad objects worsens the player’s performance in that particular category. The player has to take both performances to 100 to proceed to the next level and to eventually graduate!
Arduino-Processing Communication
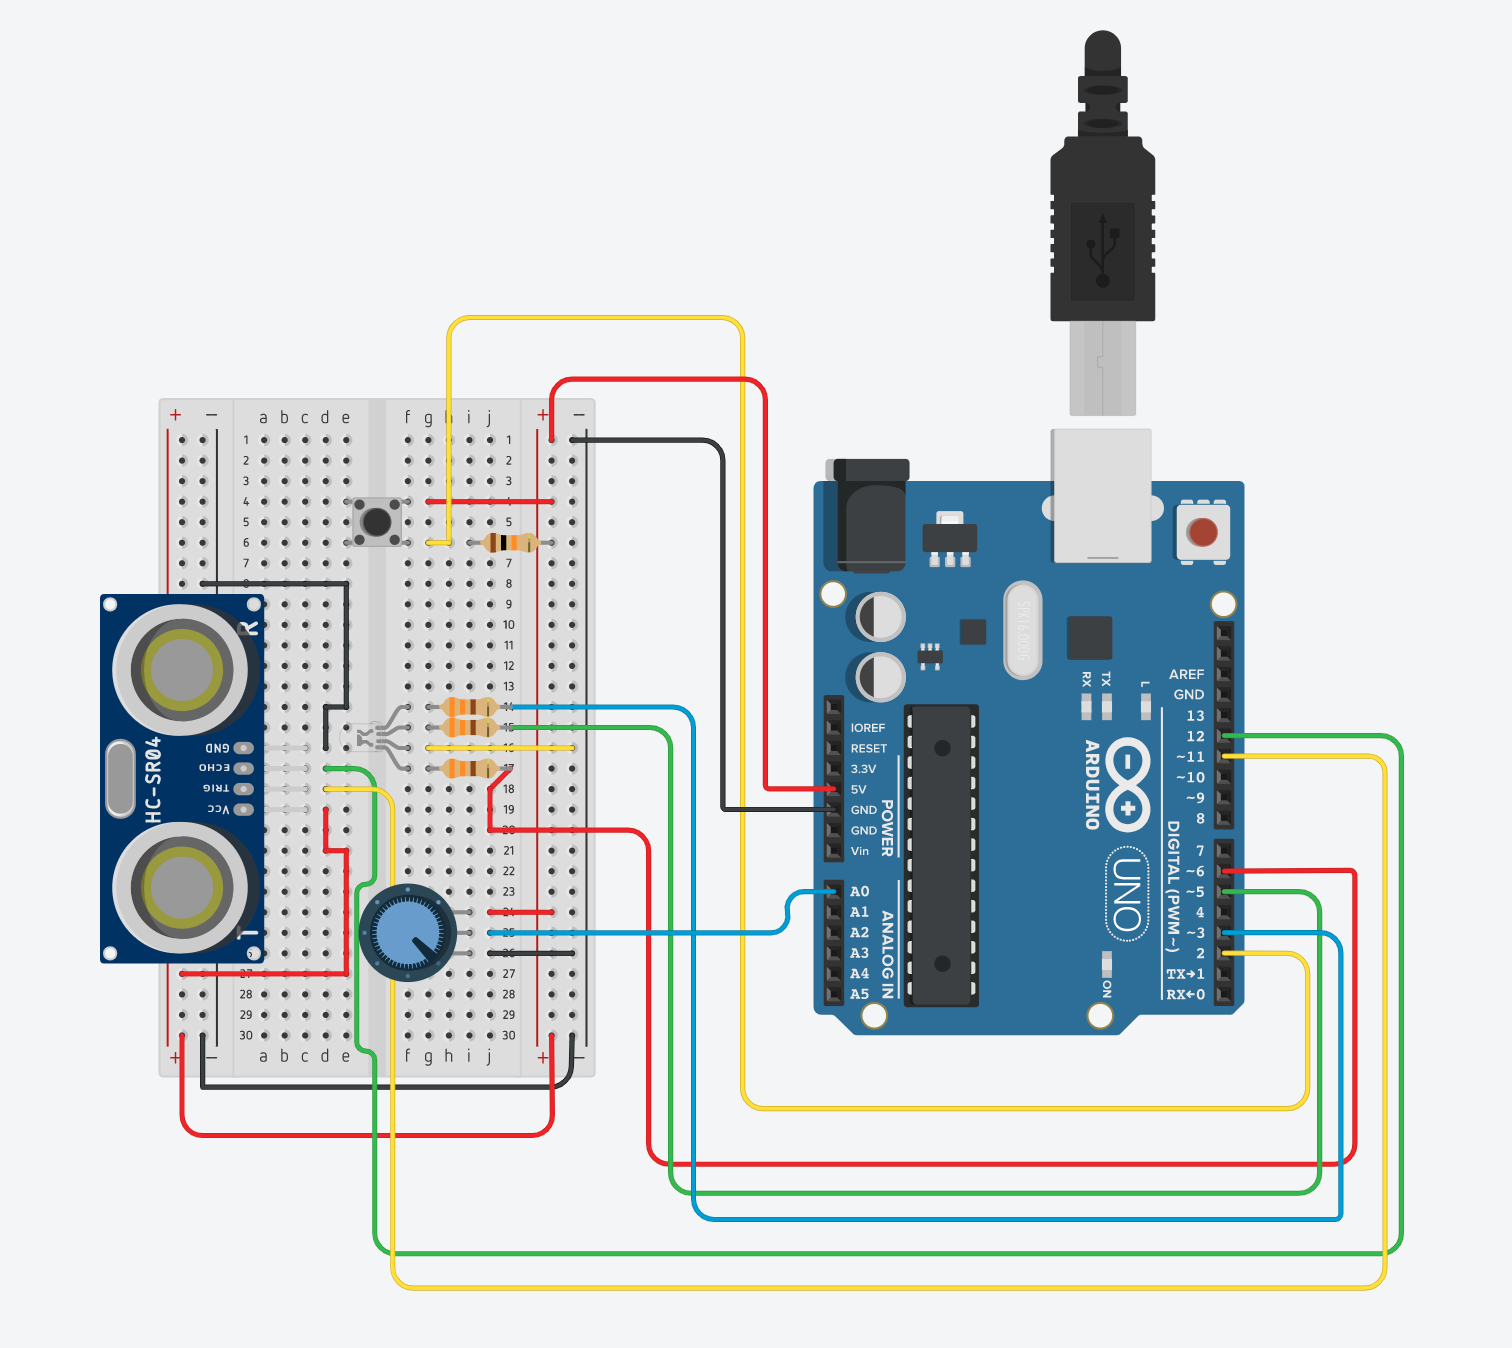
Our Arduino consists of 3 sensors – a potentiometer, a button and an ultrasonic sensor. It also consists of a tricolored LED. The functions of all of these components are described below.
- The ultrasonic sensor measures the distance between the sensor and a frame (a solid vertical surface) and sends relevant information to Processing, which then maps this distance to Faiza’s position on the screen. In this manner, using the Arduino set in the horizontal direction allows us to move Faiza on the screen.
- The potentiometer is used to traverse between different options on the screen (where applicable). The use of the potentiometer can be found on the welcome screen and when the player loses a certain level (fails an academic year).
- The button is used to make selections wherever needed, at different points in the game.
- The tricolored LED shows how well the player is doing overall in the game. Processing uses a combination of both metrics of performance (Academic and Health) and sends a signal to Arduino to set the LED to the relevant color. Red, of course, indicates danger, green indicates that the player is safe and yellow indicates that the player should do better.
Code & Some features
Item
This is the class which describes all the attributes and methods of items which fall down the screen. These attributes include the items’ x-coordinates within a range on the screen (75% of the screen), the y-coordinate, the sprite image, the number of frames which each sprite image consists of, and the value associated with each (good or bad) item. The update() function in the Item class ensures that each item falls down the screen with a random vertical velocity, which again, is within a certain range. It also contains a display() function which determines how each sprite has to be displayed on the screen.
Player
This is the class representing the user and displaying the player’s avatar (Faiza the Falcon) on the screen. The main function of this class is the display() method which serves to display the correct frame of the sprite as well as flip it appropriately to illustrate movements to the right or to the left. This class also takes the mapped value of the distance sensor from the main program as the current position of the player on the screen.
Level
This is the class that coordinates the different game functions and the interactions between Player and Items. Since different levels have different sets of available objects, and said objects are further divided into categories, the Level class has a number of lists using different Java data structures to store necessary.
item_names is an ArrayList containing the names of all the objects available for the current level. We put these names in four .csv files, which are used to populate the item_names list. ArrayList is helpful for this list because it supports functions like contains(), size(), add().
frames and values are two HashMap with String keys and Integer values. Since different items have different numbers of sprite frames and values, these can be read (also from .csv files) and later called upon. We want to index these values using item names, which is why we decide to use HashMaps.
posAcademic, negAcademic, posHealth, and negHealth are four StringList storing the names of items that belong to four categories (as the names suggest, positive and negative for academics and health). The StringList structure is mostly identical to an ArrayList, only that it’s limited to storing String data. We recently discovered this data type and wanted to try it out. StringList supports the function hasValue() that can quickly check if a list contains a certain value, which comes in handy for our program.
We add two more StringLists positives and negatives which store the names of all the positive items and negative items respectively, regardless of which metrics they involve. These lists are mainly used for randomizing new items.
rare_items_count and rare_items_catch are two HashMaps using the names of rare items (described in details below) as keys to store how many times an object has appeared in a level, and how many times it has been caught by the player, respectively. These lists are used to put a limit on the frequencies of rare items appearing in a level.
The last list of this class is items, an ArrayList that stores Item objects. New items are created and added to this list, and later picked out to display on the screen.
Some other attributes of the Level class includes levelNum (0-3 corresponding to four academic years), academic and health to store Academics and Health metrics (default 50 each), a number of background images for different screens, away (boolean value to keep track of whether the player has caught a Study away item), etc.
The Level class also contains a number of methods, as will be explained below.
loadData() is called upon construction of an object. This method reads from the various .csv files we prepared beforehand to populate relevant lists as mentioned above. We first started out filling the lists manually, but then cleaned up the data into .csvs files instead to reduce confusion should we want to add new items, change frames, values, etc.
displayBackground() checks which level is currently played to display the correct background image. It also checks if the player is currently ‘studying away’.
addItems() randomizes new items for the game. We settle with the rate of two new items per second, one positive and one negative (we use positives and negatives lists for this). This method also takes into account rare_items_count and rare_items_catch to limit these items. displayItems() then picks items out of the list and display them.
checkCollision() iterates through the list of items to check whether Faiza the Falcon is colliding with any of them. Upon collision, the method checks the category to which the item belongs to adjust the performance metrics accordingly.
There are also a number of helper methods like colliding() (returning a boolean value of whether the player is ‘catching’ the item), lost() and won(), increase/decrease Health/Academic().
Level_test
This is the main game program that coordinates different levels and different screens, and it also processes data from Arduino program and sends data back.
Most of the screens of the game either has one option (selected through pressing the button) or two options. For those with two options, we use a threshold on the reading of the potentiometer to display which option is being selected (signified with >> <<). Pressing the button will select the highlighted option.
The main program reads from the Arduino programs three sensor values: button state, potentiometer values, and distance sensor value.
As described in the documentation of a previous week, we use a formula from an earlier lecture to add smoothing to the value reading from the distance measuring sensor. In our program, we use a smoothing factor of 0.2, which eases the movement of the player. We also add a threshold in case sudden jumps in distance are detected. The player will only move if the new position mapped from the distance measuring sensor is within 1/3 of screen width from the position of the player recorded in the previous frame.
The main program also inspects the current performance metrics and sends appropriate values to the Arduino program, which will control the color of the LED.
Features
- The game consists of three rare items – Study away, J-term and Capstone. Since these are objects which aren’t as common as others (both in the context of the game and in reality), they function in a slightly different manner. For instance, a person can only get one J-term, one study away and one capstone in an academic year (in reality), hence this is what we implemented in our game too. The player is only presented with a maximum of three of each of these rare items within a certain level (this was implemented using certain boolean values). However, once the player catches one item of each of these types, that particular item won’t reappear in the same academic year in the game. To put this into perspective, if the player catches an item corresponding to a J-term, then a J-term will never appear again in the same academic year (level) and it will only appear a maximum of three times in case the player never manages to catch it.
- In order to make the game a little more interactive and NYUAD-themed, we used several different images of the NYUAD campus as backgrounds for the different levels. However, there’s something even nicer to add to this! If the player catches an item which corresponds to a study away, the background changes to an image of the New York campus (yes this is the only way we can get a semester in New York during Covid times).
- The sprites used to represent each of the items were created using https://www.piskelapp.com/. This was a very time-consuming but interesting process as we had to spend a lot of time paying attention to detail. It was also necessary to make all sprites ourselves because all items are NYUAD-themed and it was impossible to find anything on the internet.
Problems
- We first planned to use the buzzer to play a sound upon collision with an item, but we ran into some problems with it. At one point, we got it to work as we wanted, but we noticed that some items triggered a sound when colliding with the player, while some others didn’t. We didn’t really understand what caused the problem, and the item choices seemed quite arbitrary. When we got back to working on it a few days later, for some reason no sound was playing. We suspected it might had something to do with the value we were sending from Processing to Arduino, but when we tried printing the value out in Processing while sending it to Arduino at the same time, it showed the correct value we wanted. We consulted Professor Aaron and worked on it some more, but we were not able to pinpoint what the problem actually was. Since we already tested the Processing program, and the other value sent from Processing to Arduino (LED value) worked without trouble, it might have been due to the buzzer itself. But since we only have one buzzer between the two of us, we were not able to test this out. In the end, we decided to not use the buzzer and replace it with the sound library of Processing.
- When we first tried controlling the position of Faiza on the screen using the Arduino, we had to smoothen the values which were sent by the distance sensor and that gave us pretty good results. The description of that process can be found in one of our earlier posts, the link to which is attached. https://intro.nyuadim.com/2021/04/19/final-project-progress-ngoc-and-maaz/ For the most part, this allowed us to swiftly control Faiza using the Arduino but on the very last day, it would sometimes give weird results. However, lifting the Arduino set slightly above the solid surface allowed us to have results which were a lot more stable than what we got when we placed it on a table. The solution we found was completely coincidental but it improved the game play more than we expected.
- At times, we faced difficulties trying to figure out how to store all
items which were used in the game, particularly because each level had a separate list of good and bad items and each item had a different number of frames for its sprite, as well as a different value associated to it. With a lot of research and experimentation, we figured out these issues using some data structures which are described in the Code and some features section above.
Reflection
Ngoc: For the second half of the semester and during working on the project, I learned a lot about using the Arduino (which was something I’d been looking forward to since high school, I was not disappointed!). Our project also includes components from earlier lectures, so I think it was a nice wrap-up for what we have learned from the class. Working in a group also made me a lot more responsible, in that I could not afford to wait until the last week to start seriously working. I also came to realize I’m really lacking on the creative side, so working in a group really balanced this out (kudos to Maaz and his collection of sprites).
Maaz: When I started working with the Arduino at the beginning of Spring 2, I wasn’t comfortable with handling the components without supervision, particularly because I have never been a very big fan of working with hardware. Looking at this project and making my friends play the game, I am super proud of what we have created. This process involved a lot of problems, followed by a lot of research and problem-solving. Two days ago, Ngoc and I spent around 20 minutes solving a problem which was caused by using something called shapeMode() instead of rectMode() (sorry Professor, I know you won’t be proud). I have learnt a lot from working with Ngoc; from having a blank face when she first suggested we make a HashMap to making one on my own, this was an extremely nice process of learning and creating something which I am extremely proud of.
Arduino Circuit
User-testing
Demo